


The [Perform task] ![]() case element is used to add an activity as a case stage step.
case element is used to add an activity as a case stage step.
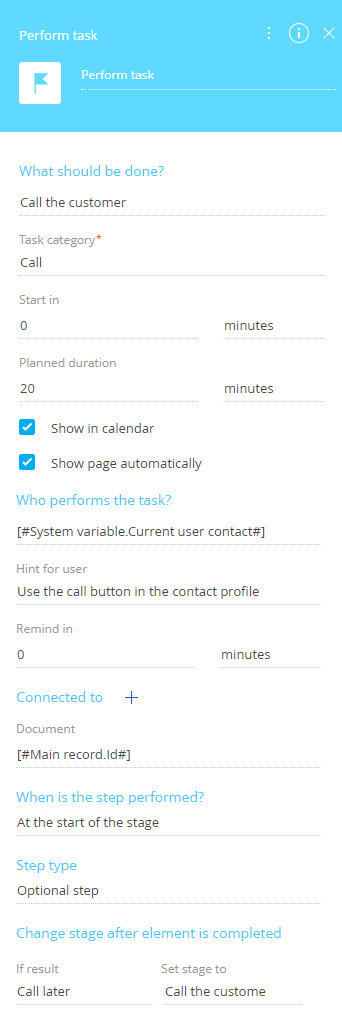
Specify task parameters in the setup area (Fig. 1).
Fig. 1 The [Task] element properties
Most element parameters, like [Subject], [Owner] or [Account], correspond to the fields on the activity page. If any parameter field is populated, then when a case creates a new task, the corresponding field in the task page is automatically populated with the corresponding value. If the parameter is not filled in, then the corresponding field on the activity page will be blank and can be populated manually.
You can populate these fields using the parameter value window.
At the top of the setup area, enter the element title that will be displayed in the Case Designer working area.
[Step type] – specify if the task is required. Select “Optional step” if the user can advance to the next case stage without completing this task.
Note
A user can advance to the final “lost” stage from any stage without completing the required steps.
[What should be done?] – enter the subject of the task. The subject briefly summarizes the task for the user to perform. It is a required field.
[Task category] – select the category of the task, for example, “To do” or “Meeting”. This is a required field.
[When is the step performed?] – indicates whether the element is activated at the start of the stage or upon completion of a specified case step. Select “At the start of the stage” to create activity at the start of the case stage. Select “After the previous step is complete” if the activity must be created after the previous step in the case stage. Specify the step in the [Perform after step] field.
[Start in] – specify the time period after which the activity should start. The time can be specified in minutes, hours, days, weeks and months. This parameter is used to populate the [Start] field of the activity page.
Note
The [Start] field of the activity is filled in with the [Start in] field value plus current user time. For example, if “30 minutes” is specified in the [Start in] field, and the task was created at 12:00, then “12:30” will be specified in the [Start] field of the created task.
[Planned duration] – enter the activity duration in minutes, hours, days, weeks or months. This parameter is used to populate the [Due] field of the activity page.
Note
The [End] field of the activity setup page is filled in with the value from the [Start] field incremented by the value in the [Planned duration] field.
[Show in calendar] – select the checkbox to display the activity in the [Calendar] view.
[Show page automatically] – select the checkbox to automatically open the activity page once the task is created by the case.
[Who performs the task?] — specify the user responsible for performing the task.
[Hint for user] – enter additional information about the task. The user will be able to view the hint by clicking the  button on the activity page.
[Remind in] – indicate the time period for a reminder before the activity starts. When the specified time comes, the system will automatically create a notification for the corresponding employee.
[Connected to] – specify other records that the activity will be connected to. As a result, the task will be added to the [Activities] detail of the corresponding record. By default, the case tasks are connected with the case record. For example, lead case task will be connected to the corresponding lead. You can add fields for connecting the task to other records by clicking the  button.
[Change stage after element is completed] – configure case transition to the next stage depending on an activity result. Click the  button to add fields for configuring conditions of case transition. Select the result of the execution of the [Task] element in the [If result] field (for example, “Completed”) at which the case should be transferred to the next stage. Specify the stage for transition in the [Set stage to] field.
See also