


Use the [Approval] element to:
-
Set up the process of adding a new approval in Creatio and identifying the approver.
-
Enable or disable an option to delegate the approval to another user or group of users.
-
Set up notifications for approval participants about the approval process and its result,
The [Approval] element settings
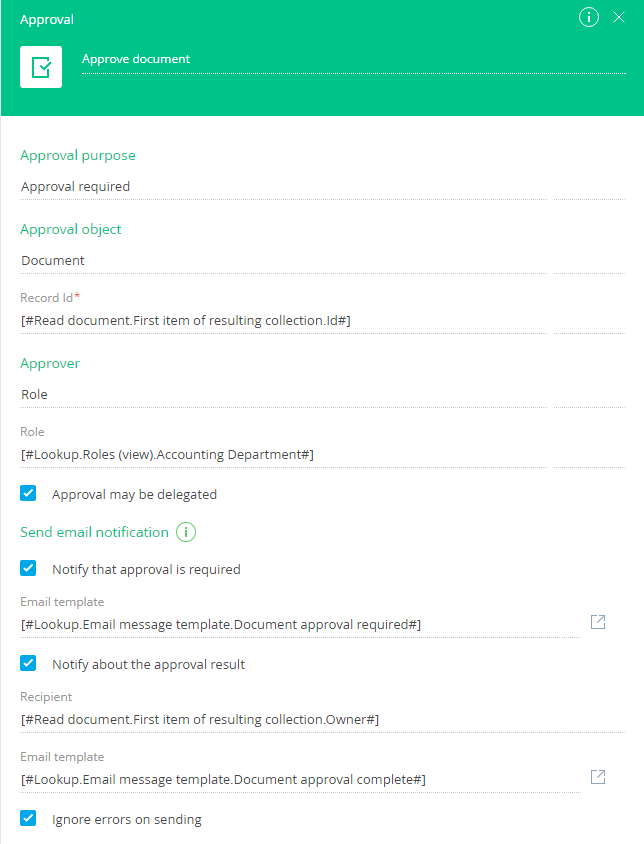
Specify the approval parameters in the element setup area (Fig. 1).
Fig. 1 The [Approval] element properties
Specify the process element purpose by typing in a header at the top right-hand side of the properties are. This will make the element more recognizable on the process diagram.
[Approval purpose] – default purpose is “Approval required”. The approval purpose will be displayed in the [Approval objective] field on the [Approvals] tab. You can edit the value in the [Approval purpose] field directly or map it using the parameter value menu.
[Approval object] – a Creatio object whose record is being approved. This is a required field.
Note
The list contains only objects in which approvals have been enabled. More information about approval setup is available in a separate article.
[Record Id] – the record being approved. You can map this parameter using the parameter value menu. This is a required field.
[Approver] – specify the approver user. Approver can be a specific employee, manager of a specific employee, or any employee who is a member of a Creatio organizational or functional role.
-
If you select “Employee”, specify Creatio user who is the approver in the [Employee] field.
-
If you select “Employee's manager”, specify Creatio user whose direct superior is the approver. Direct superior is specified in the [Manager] profile of the employee's record in the [Employees] section.
Note
If employee’s manager cannot be found, the approval will still be created, but the [Approver] field in it will be empty. In this case, a system administrator user can use the [Change approver] command in the actions menu of the [Approvals] detail to assign an approver.
Note
You can specify employee using the parameter value menu.
-
[Roles] – select an approver’s role. In this case, any employee who belongs to the selected role will be able to set this approval.
[Approval may be delegated] – select the checkbox to allow the approver to forward the approval to another employee.
In the [Send email notification] area, set up sending of email notifications for the employee who created the approval and the approver.
Attention
Set up the mailbox for email notifications in the [Mailbox for sending email with information on approval] system setting. Access the system setting in the Process Designer by clicking the  button in the [Send email notification area].
Note
Create email templates in the content designer, for the corresponding object. For example, to set up a notifications for document approvals, create a template using the [Approvals in section Document] object. The approval objects are created automatically, when you select the [Enable approval in section] checkbox in the section wizard. If the lookup of the [Enable approval in section] does not contain the template you need, click  in the right part of the field to add a new email template. The process of creating an email template is described in a separate article.
-
Select the [Notify that approval is required] checkbox to notify the approver. As a result, the approver user will be notified whenever a record is submitted for approval. If you select “Role” in the [Approver] field, all members of the corresponding role will receive notification.
•[Email template] – select a notification email template from the [Email templates] lookup.
-
Select the [Notify about the approval result] checkbox to notify the employee about the result of the approval.
•[Recipient] – specify who will receive the notification (either an email address, a contact or an account). You can edit the value in the [Recipient] field directly or map it using the parameter value menu. Usually, the recipient in this case is mapped to the [Owner] field of the record submitted for approval.
•[Email template] – select a notification email template from the [Email templates] lookup.
[Ignore errors on sending] – select the checkbox to send email despite email-related errors. If there was an issue with sending an email, the business process will also end with an error.
For outgoing flows:
-
Use conditional flows
 if the process must branch, depending on the approval result.
 -
Use sequence flow
 if the approval result does not affect the process flow.
Click the corresponding flow to select it. Working with flows is covered in a separate article.
What happens when the [Approval] process element is activated
-
A new approval record is created. All approval information, such as the approver, approval result, comments, etc. is displayed on the [Approvals] tab of the record that was submitted for approval. More information about the [Approvals] tab is available in a separate article.
-
The first email notification is sent at the moment the approval record is created.
-
After the approver approves or denies the approval, another email notification is sent to the employee specified in the [Recipient] field under the [Notify about the approval result] checkbox.
Next
See also