[Auto-generated page] process element
The [Auto-generated page] element is used for opening custom pages, generated according to the element parameters by the system.
The auto-generated pages contain buttons, that can be used for process branching, and fields, whose values can be passed to the process or process element parameters.
[Auto-generated page] element settings
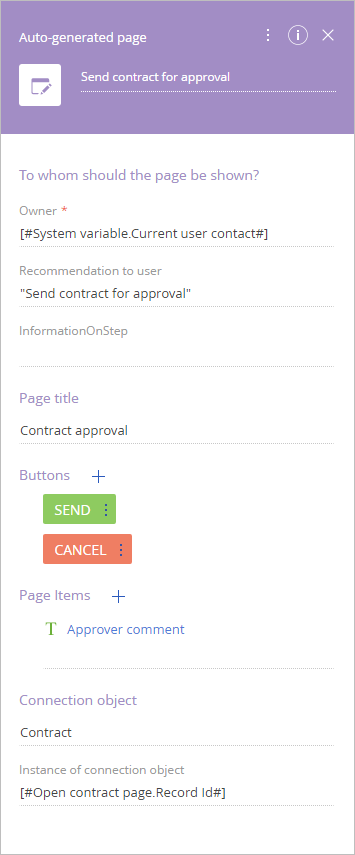
Specify the auto-configured page parameters in the element setup area (Fig. 1).
Fig. 1 [Auto-generated page] element setup area

You can fill in these fields using the parameter value window.
Enter the element caption at the top of the element setup area. The caption is displayed on the process diagram.
[Page title] – Enter the page name.
[To whom should the page be shown?] – Specify the user for whom the page must open. You can fill in this parameter using the parameter value window.
[Recommendation to user] – Enter the text that will be displayed on the page when running the process element. This is a required field.
[User hints] – Enter additional information that will be displayed by clicking the  button. The hint button is displayed on the displayed page.
[Connected object] – If the action execution relates to a particular record in the system object, specify this object.
[Record of connected object] – The record to which the action execution will be connected. If the connected object is specified, the field becomes available and required.
Note
When the action is executed, the record with the specified binding object and the record that relates to the action execution will be added to the [Connected items] block of the [Process log] page. Also, the [Move down the process] menu will become available on the edit page of the connected record.
Buttons
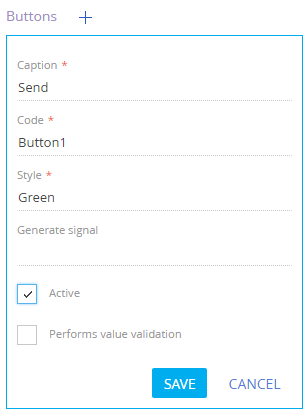
This block contains a list of buttons that can be displayed on an auto-generated page. Click  to add a new button and specify its parameters (Fig. 2).
Fig. 2 Adding a button on the auto-generated page

[Caption] – Enter a button caption. This is a required parameter.
[Code] – Enter the button unique name that can be used when writing the code that will implement the button logic. Required parameter.
[Style] – Select one of the common styles used for the BPMS buttons. Required parameter.
[Generates signal] – Enter the signal to be generated by the process once the button is clicked. Other items that wait for the generation of this signal can be added to the process.
[Active] – Select this checkbox if the button must be active when the page is opened.
[Performs value validation] – Select this checkbox to check if all required fields are populated once the button is clicked.
Click the [Save] button of the parameter value window.
Clicking any button added to the page completes the element and defines its result. If you add outgoing conditional flows to the auto-generated page, the buttons added to the page will be available as completion conditions for these flows.
To manage the button display order and edit the button properties, click the  button.
Page items
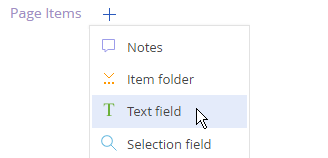
This block contains a list of items that can be displayed on an auto-generated page, such as text comments, fields or groups of fields. Click  to add a new item and specify its parameters (Fig. 3).
Fig. 3 Selecting the type of item to add

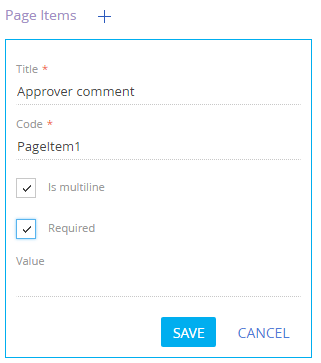
Populate the item parameters. The list of parameters may differ, depending on the page item type (Fig. 4).
Fig. 4 Adding a page item to an auto-generated page

[Title] – Enter a caption for the page item. This is a required parameter.
[Code] – Enter a unique code that contains the page item value.
[Text] – Enter default text for the “Notes” page item.
[Can be minimized] – Select this checkbox to enable the user to minimize an “Item block” page item.
[Minimized] – Select this checkbox to minimize. an “Item block” page item.
[Required] – select the checkbox to make the new field required. This parameter is available for all field-type page items.
[Multiline] – select the checkbox to make a field multiline. Available for the “Text field” type.
[Data source] – Specify the lookup object. This parameter is available for lookup fields.
[View] – Select the means of filling out the field: by using a drop-down list or selecting a lookup value. This parameter is available for lookup fields.
[Date format] – Select the display format for the “Date/Time” field.
To manage the page item display order and edit and delete items, use the menu that appears when you click the  button.
Next
•[Pre-configured page] process element
See also


