Adding a mini-page to a module
Glossary Item Box
General information
When adding object mini-pages to the system you need to connect them to system modules. Arbitrary modules enable you to create links for a certain object. The connection of a mini-page displayed when you hover the cursor over a link enables you to obtain information about the object without going to the section of this object.
In the basic application version an object mini-page is connected to the following modules:
- telephony in the communication panel
- email in the communication panel
- the notification center in the communication panel
- the [Feed] section in the communication panel
- the chart-list in the dashboards section
Case description
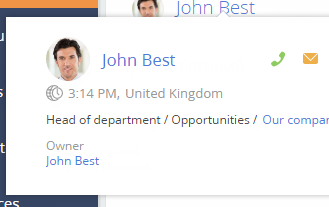
Display the current user in the upper right corner of the application next to the user profile icon. Open the mini-page by hovering the cursor over the current user profile.
Case implementation algorithm
1. Create a module
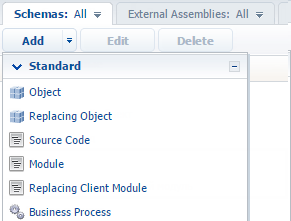
Open the system designer. Go to the [Configuration] section, and on the [Schema] tab, execute the [Add] > [Standard] > [Module] menu command (Fig. 1).
Fig. 1. Adding a module
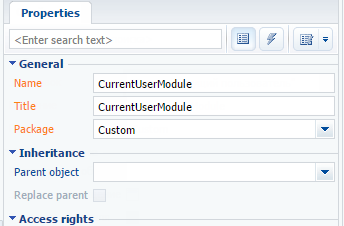
For the generated module, you need to set the "CurrentUserModule" for the [Name] property, and the "Module "Current user" for the [Title] property (Fig. 2).
Fig. 2. Module properties
2. Create a view and module view model
To create a view model in the СurrentUserModule module you must implement a class inherited from Terrasoft.BaseViewModel. You must connect the Terrasoft.MiniPageUtilities utility to the mixins property that will enable you to use the mini-page call methods
// Defining the CurrentUserViewModel class.
Ext.define("Terrasoft.configuration.CurrentUserViewModel", {
    // Parent class name.
    extend: "Terrasoft.BaseViewModel",
    // Short class name.
    alternateClassName: "Terrasoft.CurrentUserViewModel",
    // The mixins used.
    mixins: {
        MiniPageUtilitiesMixin: "Terrasoft.MiniPageUtilities"
    }
});
To create a view, you must implement a class inherited from Terrasoft.BaseModule.
// Defining the CurrentUserModel class.
Ext.define("Terrasoft.configuration.CurrentUserModule", {
    // Short class name.
    alternateClassName: "Terrasoft.CurrentUserModule",
    // Parent class name.
    extend: "Terrasoft.BaseModule",
    // The Ext object.
    Ext: null,
    // The sandbox object.
    sandbox: null,
    // The Terrasoft object.
    Terrasoft: null,
    // View model
    viewModel: null,

    ...
});
In this class you need to extend the init and render methods of the Terrasoft.BaseModule base class. The Init method initializes the view module model, and the render method connects the view model with the view in the container that is passed in the renderTo parameter. To create a view model use the getViewModel method. The link to the created view model is stored in the viewModel property.
// Creates module view model.
getViewModel: function() {
    return Ext.create("Terrasoft.CurrentUserViewModel");
},
// Module initialization.
init: function() {
    this.viewModel = this.getViewModel();
},
// Displays module view.
render: function(renderTo) {
    // Receiving view object.
    var view = this.getView();
    // Connecting a view with a view model.
    view.bind(this.viewModel);
    // Displaying a view in the renderTo element.
    view.render(renderTo);
}
You must then determine the getView method for it to be displayed further. The view must display the full name of the current user with the hyperlink to the contact edit page. When you build a hyperlink, you must define an event handler for the mouse hover.
// Creates module views.
getView: function() {
    // Getting current user contact..
    var currentUser = Terrasoft.SysValue.CURRENT_USER_CONTACT;
    // View — the Terrasoft.Hyperlink class instance.
    return Ext.create("Terrasoft.Hyperlink", {
        // filling in the link caption with a contact name.
        "caption": currentUser.displayValue,
        // Mouse over link event handler.
        "linkMouseOver": {"bindTo": "linkMouseOver"},
        // Property containing additional object parameters.
        "tag": {
            // Current user ID.
            "recordId": currentUser.value,
            // Object schema name.
            "referenceSchemaName": "Contact"
        }
    });
}
The following is the full module source code.
// Module definition.
define("CurrentUserModule", ["MiniPageUtilities"], function() {
    // Defining the CurrentUserViewModel class.
    Ext.define("Terrasoft.configuration.CurrentUserViewModel", {
        // Parent class name.
        extend: "Terrasoft.BaseViewModel",
        // Short class name.
        alternateClassName: "Terrasoft.CurrentUserViewModel",
        // The mixins used.
        mixins: {
            MiniPageUtilitiesMixin: "Terrasoft.MiniPageUtilities"
        }
    });
    // Defining the CurrentUserModel class.
    Ext.define("Terrasoft.configuration.CurrentUserModule", {
        // Short class name.
        alternateClassName: "Terrasoft.CurrentUserModule",
        // Parent class name.
        extend: "Terrasoft.BaseModule",
        // The Ext object.
        Ext: null,
        // The sandbox object.
        sandbox: null,
        // The Terrasoft object.
        Terrasoft: null,
        // View model
        viewModel: null,
        // Creates module views.
        getView: function() {
            // Getting current user contact..
            var currentUser = Terrasoft.SysValue.CURRENT_USER_CONTACT;
            // View — the Terrasoft.Hyperlink class instance.
            return Ext.create("Terrasoft.Hyperlink", {
                // filling in the link caption with a contact name.
                "caption": currentUser.displayValue,
                // Mouse over link event handler.
                "linkMouseOver": {"bindTo": "linkMouseOver"},
                // Property containing additional object parameters.
                "tag": {
                    // Current user ID.
                    "recordId": currentUser.value,
                    // Object schema name.
                    "referenceSchemaName": "Contact"
                }
            });
        },
        // Creates module view model.
        getViewModel: function() {
            return Ext.create("Terrasoft.CurrentUserViewModel");
        },
        // Module initialization.
        init: function() {
            this.viewModel = this.getViewModel();
        },
        // Displays module view.
        render: function(renderTo) {
            // Receiving view object.
            var view = this.getView();
            // Connecting a view with a view model.
            view.bind(this.viewModel);
            // Displaying a view in the renderTo element.
            view.render(renderTo);
        }
    });
    return Terrasoft.CurrentUserModule;
});
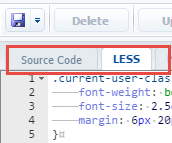
For a more expressive display of hyperlinks, you can add styles to the created module. To do this, go to the LESS tab in the module designer (Fig. 3) and add the following source code.
.current-user-class a {
    font-weight: bold;
    font-size: 2.5em;
    margin: 6px 20px;
}

.current-user-class a:hover {
    text-decoration: none;
}
Fig. 3. The LESS module designer tab
Save the created module.
3. Create a view display container
For links to be displayed in the user profile, you need to place the container in the upper right corner of the application and load the view of the created module. To do this, create a replacing client module that will extend the functionality of the MainHeaderSchema schema implemented in the NUI package. The creation of a replacing client module is described in the "Creating a custom client module schema" article.
To display a view in the source code of the replaced schema, you need to create a container. For this you need to use the diff property. For the container to be displayed in the upper right corner of the page, set the RightHeaderContainer as the parent of the created container. Next, you need to override the onRender method that is invoked after the view, to which you need to load the created module that has been displayed.
The following is the full replaced module source code.
// Module definition.
define("MainHeaderSchema", [], function() {
    return {
        methods: {
            // Executes actions after the view has been dispalyed.
            onRender: function() {
                // Parent method calling
                this.callParent(arguments);
                // Current user module loading.
                this.loadCurrentUserModule();
            },
            // Loads current user module.
            loadCurrentUserModule: function() {
                // Get container to which the module is loaded..
                var currentUserContainer = this.Ext.getCmp("current-user-container");
                // Container existence check.
                if (currentUserContainer && currentUserContainer.rendered) {
                    // Loading module to container.
                    this.sandbox.loadModule("CurrentUserModule", {
                        // Container name.
                        renderTo: "current-user-container"
                    });
                }
            }
        },
        diff: [
            {
                // Element insertion operation.
                "operation": "insert",
                // Element name.
                "name": "CurrentUserContainer",
                // Parent container name.
                "parentName": "RightHeaderContainer",
                // Property name.
                "propertyName": "items",
                // Element value.
                "values": {
                    // Container ID.
                    "id": "current-user-container",
                    // Element type.
                    "itemType": Terrasoft.ViewItemType.CONTAINER,
                    // Container classes.
                    "wrapClass": ["current-user-class"],
                    // Container elements.
                    "items": []
                }
            }
        ]
    };
});
Save the created module.
To apply the changes, you must update the application page and clean the cache. The full name of the current user with the hyperlink to the contact edit page will be displayed in the upper right corner of the application. When you hover the cursor over a hyperlink, the mini-page will appear with data about the current user (Fig. 4).
Fig. 4. Contact mini-page