Manage app elements in the Application Designer
The Application Designer provides a robust set of no-code development tools. Create and modify pages and views, data models, workflows, and integrations in a single no-code workplace. To proceed with the setup of your Freedom UI app click its icon in the Application Hub of your Creatio instance. This opens the Application Designer (Fig. 1).

App profile (1). The profile displays the name, icon and color of the selected app. You can test the app in runtime by clicking Run app. To edit the app properties, click  .
Navigation panel (2). The panel lets you navigate through designer tabs which group different app management options.
Working area (3). Use the working area to manage the properties of pages, sections, app data models etc.
Inherited element toggle (4). Displays elements inherited from a different app or package. Learn more: Set dependencies, Extend elements of other apps.
To avoid errors when saving and transferring changes, make all possible changes in the Application Designer of the app. Keep an eye on packages where your changes are saved. If changes are saved to an unintended package, ensure they are moved to the appropriate package in the Configuration section.
The Application Designer lets you manage the following app elements:
- Pages. Read more >>>
- Sections. Read more >>>
- Objects. Read more >>>
- Business processes. Read more >>>
- Web services. Read more >>>
- AI agents. Read more >>>
- Schemas. Read more >>>
Manage pages
Manage pages using the Pages tab in the Application Designer. If the app contains multiple schemas that replace the same page, the tab displays the last page schema from the app that replaces all other schemas in the hierarchy.
You can execute the following actions with pages using the Pages tab:
-
Add a new page. Click New page on the toolbar.
-
Modify an existing page.
- Modify a Freedom UI page. Open and customize the page using Freedom UI Designer. Learn more in a separate article: Freedom UI Designer.
- Modify a Classic UI page. Open and customize the page using Client Module Designer. We recommend moving your customizations of Classic UI pages to Freedom UI. To do this, follow the instructions in a separate guide: Element setup examples.
-
Search for a page. Use the Search field on the toolbar.
-
Sort pages by caption or modified date. Use the drop-down menu on the toolbar.

Manage sections
Manage app sections using the Navigation and sections tab in the Application Designer.
You can execute the following actions with sections using the Navigation and sections tab:
-
Add a Freedom UI section. Click New Freedom UI section on the toolbar. Learn more: Add a Freedom UI section.
-
Modify properties of an existing section.
- Modify properties of a Freedom UI section. Click the section and change its title, icon, or color. Learn more: Change a Freedom UI section.
- Modify properties of a Classic UI section. Click the section to open its settings in a new tab. We recommend moving Classic UI sections to Freedom UI. Learn more: Move a Classic UI section to Freedom UI.
-
Search for a section. Use the Search field on the toolbar.
-
Sort sections by caption or modified date. Use the drop-down menu on the toolbar.

Add a Freedom UI section
To add or change sections, you need permission to the "Can manage configuration elements" (CanManageSolution code) system operation.
-
Open the Application Designer. To do this, click the app in the Application Hub.
-
Go to the Navigation and sections tab.
-
Click New Freedom UI section on the toolbar. This opens the New Section window.
-
Select the section icon and color in the Select icon and color field.
-
Enter the section name in the Title field.
-
Fill out the advanced parameters if needed. To do this, click Advanced parameters.
- Section code. The value Creatio uses to generate codes of the section elements, for example, object and page schemas. Creatio fills out the code automatically based on the section title. You can change the code before you create the section.
- Create pages for the mobile app. Selected by default. Clear the checkbox to create the section for the web app only.
- Link to an existing object. Select the checkbox to link the section to an existing object instead of creating a new object. Then select the object in the Object field.
-
Click Create.
As a result, Creatio adds the section to the app and saves it to the current app package. Learn more: Store Freedom UI app data.
Change a Freedom UI section
- Open the Application Designer. To do this, click the app in the Application Hub.
- Go to the Navigation and sections tab.
- Click the section to change. Freedom UI sections have the "Freedom UI" label, or the "External" label if external users can access the section. This opens the Edit Section window.
- Change the section icon and color in the Select icon and color field if needed.
- Change the section name in the Title field if needed.
- Click Save.
As a result, Creatio saves the section changes to the current app package. You cannot change the code of an existing section.
Manage objects
Manage app objects using the Data models tab in the Application Designer, similarly to the Object Designer in Creatio IDE. You can replace objects quickly and easily. To do this, open the inherited object and click Save / Save and publish. Learn more about inherited objects: Set up the app properties.
If the app contains multiple schemas that replace the same object, the tab displays the last object schema from the app that replaces all other schemas in the hierarchy. Learn more in developer documentation: Object.
You can execute the following actions with objects using the Data models tab:
- Add a new or replacing object. Use the New data model drop-down menu on the toolbar.
- Modify an existing object. Open and customize the object schema using Object Designer.
- Search for an object. Use the Search field on the toolbar.
- Sort objects by caption, modified date or name. Use the drop-down menu on the toolbar.

Manage business processes
Manage active and up-to-date app business processes using the Business processes tab in the Application Designer, similarly to the Process Designer. If the app contains multiple versions of the same process, the tab displays the latest business process version. Learn more in a separate guide: Business process setup.
You can execute the following actions with business processes using the Business processes tab:
- Add a new business process. Click New process on the toolbar.
- Modify an existing business process. Open and customize the business process using Process Designer.
- Search for a business process. Use the Search field on the toolbar.
- Sort business process by caption, modified date or status. Use the drop-down menu on the toolbar.
- View the current process version as well as the entire list of versions.

Manage web services
Manage REST and SOAP app web services using the Integrations tab in the Application Designer, similarly to the Web services section. Learn more in a separate guide: Web services.
You can execute the following actions with web services using the Integrations tab:
- Add a REST or SOAP web service. Use the New integration drop-down menu on the toolbar.
- Modify an existing web service. Open and customize the web service.
- Search for a web service. Use the Search field on the toolbar.
- Sort web services by caption, modified date, or type. Use the drop-down menu on the toolbar.

Manage AI agents
Manage the Creatio.ai agents of the app using the Creatio.ai tab in the Application Designer. The tab displays the prompt agents and Sub-agents that the app packages contain. Each tile shows the agent status and the model that the agent uses.
You can execute the following actions using the Creatio.ai tab:
- Add a prompt agent or a Sub-agent. Click New on the toolbar and select Prompt agent or Sub-agent.
- Modify an existing agent. Open the agent and customize it.
Manage schemas
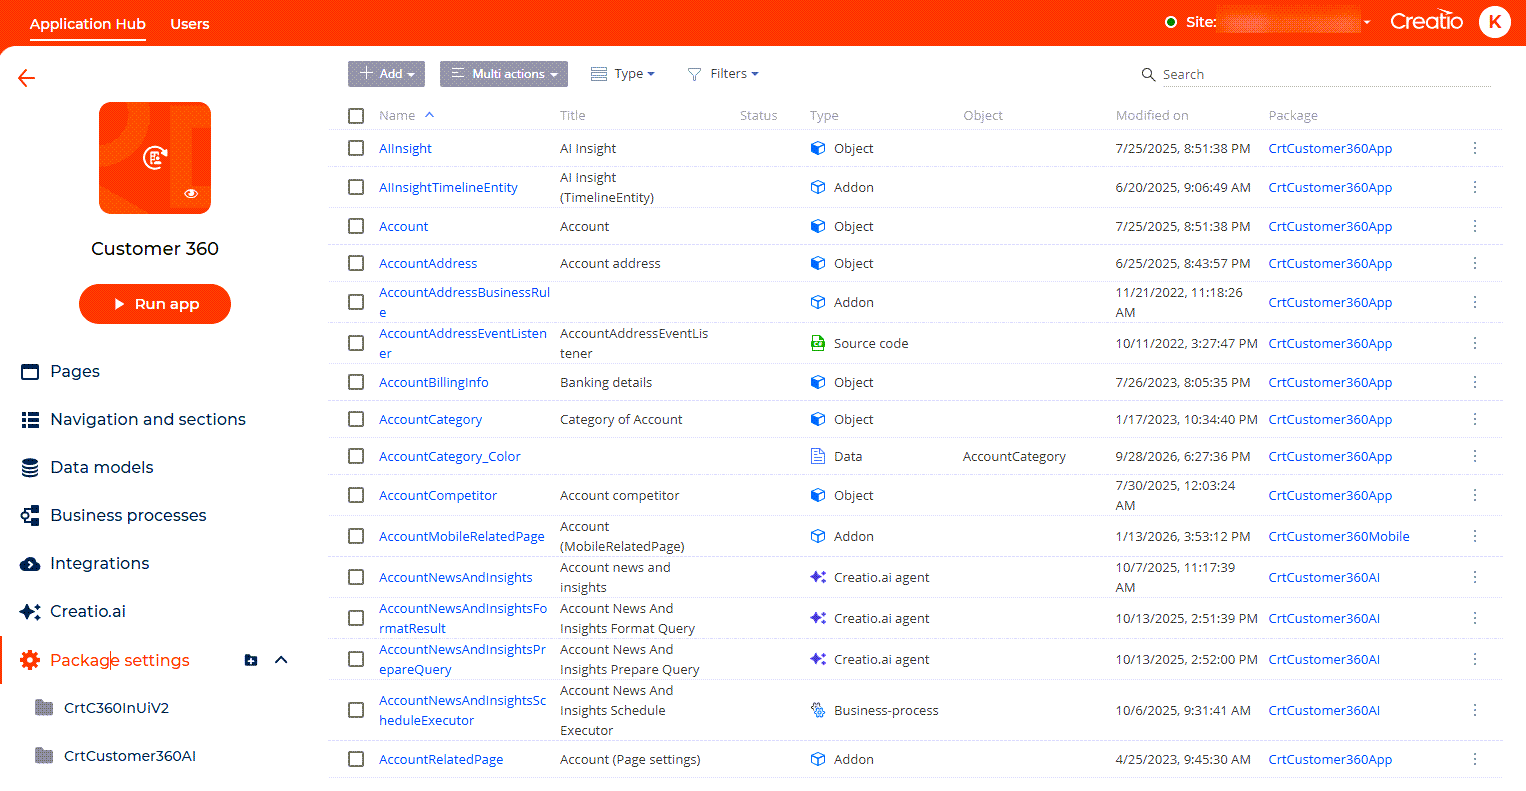
Manage app packages and their schemas using the Package settings tab in the Application Designer, similarly to Creatio IDE. You can execute the following actions with app packages:
- Create a new package. Click
 next to the tab name → Create new package.
- Add an existing package. Click next to the tab name → Add existing packages.
- Exclude a package from the app. Click
 next to the package → Exclude from application.
- Deactivate a package. Click next to the package → Deactivate. Learn more: Deactivate and activate packages.
- Set a package as the current app package. Click next to the package → Set as current package.
- Delete a package. Click next to the package → Delete. You can delete an unlocked package if it does not conflict with other packages, for example, through dependencies.
- Open package properties. Click next to the package → Properties.
The Application Designer marks the current app package using  . Learn more: Store Freedom UI app data.
If the app does not have a package you can modify, Creatio creates the current app package automatically. The name of this package includes the following parts, so you can identify the app of the package even in the Configuration section:
- Prefix specified in the "Prefix for object name" (
SchemaNamePrefixcode) system setting. If the app code already starts with this prefix, Creatio does not repeat it. - App code without special characters.
- Underscore followed by a unique suffix of 7 characters.
For example, the package name is UsrRequests_a1b2c3d for the app whose code is UsrRequests. If the name is longer than 70 characters, Creatio shortens the prefix and app code parts.
The tab includes the following app elements:
- Packages. The records of the
SysPackagedatabase table. If you select a package, Creatio displays the schemas of that package alphabetically. - Content. The schemas stored in the package. For example, objects, pages, bindings, etc.
- Showcase. The records of the
SysInstalledAppdatabase table. - Decoupling table. The table that binds to the
SysPackageInstalledApppackage, i. e. the table that binds packages to the app.
You can execute actions with schemas using the Package settings tab, similarly to Creatio IDE. Learn more in developer documentation: Operations in Creatio IDE.
Deactivate and activate packages
Deactivate a package to make its contents unavailable to users without deleting the package from the environment. Creatio keeps the package and its contents, so you can activate the package later. You can deactivate and activate packages on the Package settings tab of the Application Designer and in the Configuration section.
To deactivate a package:
- Open the Package settings tab in the Application Designer.
- Deactivate the package. To do this, click next to the package → Deactivate.
- Confirm the deactivation. If the package is included in other apps, the confirmation lists these apps. Creatio deactivates the package in these apps as well, which can make them lose functionality.
As a result, the package contents become unavailable. The Application Designer marks the package as inactive. If you select the package, the Application Designer displays a message that the package is inactive instead of the package contents.
Creatio does not deactivate a package in the following cases:
- Other packages or apps depend on the package.
- Elements of other packages inherit elements of the package.
- The package is the
Custompackage. - The package is connected to the SVN version control system and contains elements that you locked. This applies to .NET Framework only.
- The package is specified in the "Current package" (
CurrentPackageIdcode) system setting.
To activate a deactivated package, click next to the package → Activate. Alternatively, select the package and click Activate in the working area. Then confirm the activation. As a result, the package contents become available to users again.
To delete a deactivated package, click next to the package → Delete.
See also
Overview of Freedom UI Designer and its elements
Work with Classic UI sections in Freedom UI
"Object" type schema (developer documentation)