Set up campaign diagram
A campaign flow diagram (Fig. 1) includes:
-
Transitions between campaign elements.
Use the Campaign Designer to set up campaign flow diagrams. To open the Campaign Designer:
-
Open the needed record in the Campaigns section.
-
Go to the Campaign flow tab and click Create if no diagram exists or Edit to change an existing diagram.

Campaign Designer features
The Campaign Designer lets you:
-
Save and cancel changes using the toolbar (1).
Creatio saves campaigns automatically. If you close a campaign diagram without saving, you will be able to load the autosaved data later. Creatio also warns you if the number of potential campaign participants exceeds the remaining active contact licenses when you save the diagram. Review the starting elements to adjust the audience if needed.
Use the corresponding buttons on the toolbar to open the element setup area, open the Academy, or search the diagram for campaign elements by name.
-
Set up the campaign diagram using elements and transitions in the Campaign Designer working area (2). Select an element in the Elements area of the designer and drag it to the campaign area to add it to the diagram (Fig. 2).
Select an element and select "Delete" to delete it.
Fig. 2 Adding elements and flows to the working area 
-
Select elements and tools in the element area (3). The area contains the campaign elements, organized into groups by their role in the campaign flow, and the following tools:
 " Arrow." Use this tool to select and move separate elements on the diagram.
 " Lasso." Use this tool to select multiple elements on the diagram.
 " Space." Use this tool to move parts of the diagram left/right or up/down. For example, drag the cursor down to move all the elements below the cursor.
Learn more about these tools: Process designer.
Learn more: Campaign element groups.
-
Specify parameter values for campaigns and campaign elements in the element setup area (4).
-
Zoom and pan the campaign diagram (5).
Set up the campaign properties
Configure the campaign properties in the element setup area (4). Click anywhere on the Campaign Designer working area or click the  button to open the campaign properties area.
-
Default campaign execution frequency – determines how often to execute the campaign steps without a set execution period.
The frequency specified in this parameter applies to:
-
The campaign steps whose incoming flows do not specify an exact time.
-
The Add audience element that adds new participants to the campaign.
-
The Exit from campaign element that removes participants from the campaign.
-
-
Time zone – sets the time zone for all the campaign's time frames. For example, the execution time of conditional flows. By default, Creatio sets the campaign time zone to:
-
The time zone of the user who created the campaign.
-
The time zone specified in the "Default TimeZone" ("DefaultTimeZone" code) system setting if there is no time zone set in the user profile.
If Creatio cannot set the time zone according to the rules above, it will populate the Time zone field of the new campaign with the "(GMT) UTC Time Format" value. You can change the time zone at any time.
noteSet up the execution time according to additional time zones within the campaign using the Timer element.
-
-
Set the period for campaign emergency stop in case of critical delay – select the checkbox to define the critical delay time. If the campaign does not run during this period, for example, due to application updates, Creatio will stop it automatically, and the campaign owner will receive a notification.
-
Specify the delay units and their value after selecting the checkbox.
noteIf you do not select the Set the period for campaign emergency stop in case of critical delay checkbox, the default campaign frequency will equal the time of critical delay.
Use preset campaign steps
Save the element settings to reuse them in any campaign when setting up similar steps. This streamlines the campaign setup.
Save and reuse the settings of the Add audience element that adds contacts from the "Sales-ready" dynamic folder to the campaign.
Create an element template
-
Drag the Add audience element to the campaign diagram and fill out its properties:
- Select an object (entity) that holds the campaign audience data – "Contact."
- Specify which records will be converted to the campaign audience – "Records in a specific folder."
- Which folder to add participants from? – "Sales-ready." Read more: The Add audience element.
-
Click Save (Fig. 3). This will open a dialog box.
Fig. 3 Save the element settings 
-
Enter the template name and click OK in the box (Fig. 4).
Fig. 4 Save the element template 
As a result, Creatio will save the template to the Campaign element templates lookup. You will be able to reuse the element during the campaign setup.
Use a preset element in the campaign
-
Add the element to the diagram and click Select from lookup in the element settings (Fig. 5).
Fig. 5 Add the template from the lookup 
-
Select the relevant template from the list.
As a result, the Campaign Designer applies the template settings to the element.
This feature copies the element settings as opposed to the element itself. As such, you must create a new element of the corresponding type and load the template settings every time when using the preset step.
Use campaign templates
This functionality is available for Creatio 8.3.3 and later.
Start a new campaign from a ready-made flow instead of building the diagram from scratch. Creatio provides recommended templates for common marketing scenarios, and you can save your own campaign flows as templates to reuse proven structures across campaigns. A template includes all elements, flows, and their settings.
Create a campaign workflow template
-
Open the Campaigns section and open the campaign whose diagram to save as a template.
-
Click Edit campaign flow.
-
Set up the campaign diagram with the elements, flows, and settings to reuse in future campaigns.
-
Click Actions → Save as template in the Campaign Designer toolbar (Fig. 6).
Fig. 6 Save the campaign diagram as a template 
-
Enter a name for the template and click Save.
As a result, Creatio will save the campaign diagram as a template. You can apply it when creating new campaigns. In Creatio 8.3.4 and later, the template is also displayed on the Saved templates tab of the Select template window.
Use a preset campaign workflow
The Select template window is available in Creatio 8.3.4 and later. In Creatio 8.3.3, apply templates in the Campaign Designer. Learn more: Replace the campaign flow with a template.
Use the Select template window to design the flow of a campaign that does not have one yet. The window opens when you start designing the campaign flow from the campaign page.
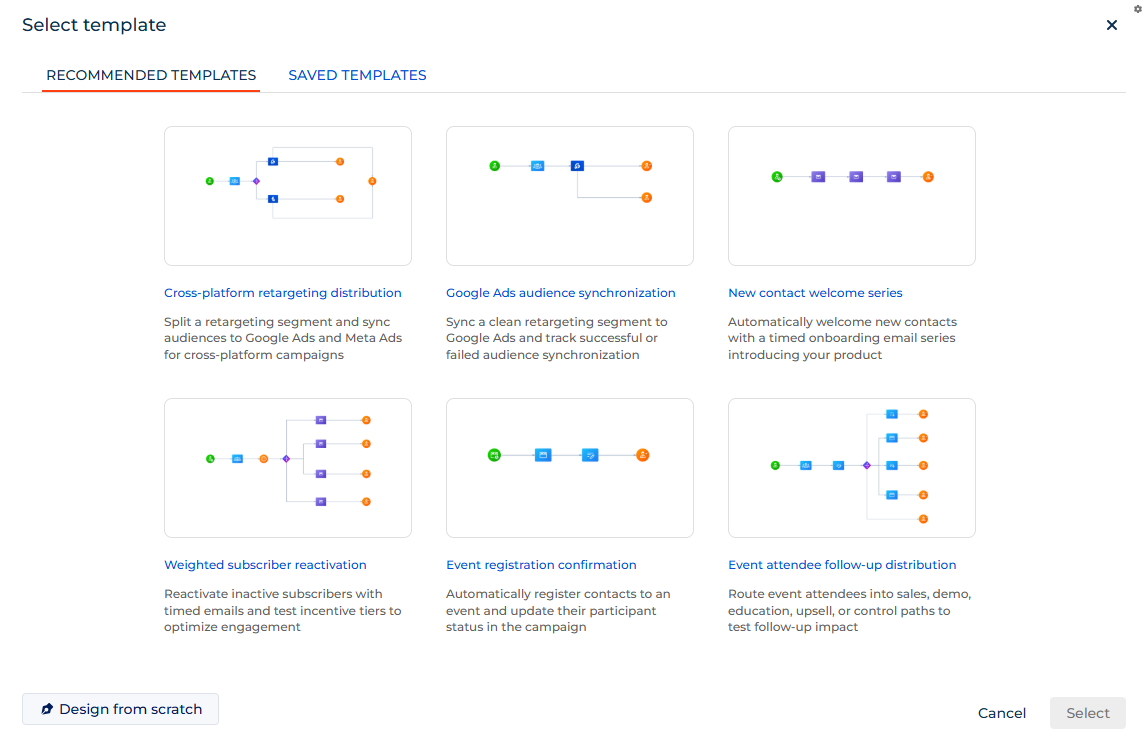
-
Open the Campaigns section and open the campaign without a flow.
-
Click Design campaign flow on the campaign page or on the Campaign flow tab. This opens the Select template window.
-
Select the template on one of the tabs:
- Recommended templates. Preconfigured templates for common marketing scenarios. Each template has a name, description, and preview. You cannot change or delete recommended templates. Learn more: Recommended campaign templates.
- Saved templates. Templates saved by users in the current environment. To delete a template you no longer need, open its menu and click Delete.
To build the flow without a template, click Design from scratch.
-
Click Select. The Campaign Designer opens with the template diagram.
-
Set up the elements for the current campaign and save the campaign flow.
The element structure and flow settings are preserved. Links to related records, for example, bulk emails, events, and Facebook forms, are not transferred and must be configured for the current campaign.
As a result, the campaign will get a flow based on the template. You can adjust any settings before you start the campaign.
Replace the campaign flow with a template
Use these steps to replace the flow of a campaign that already has one. In Creatio 8.3.3, use these steps for any campaign, including a campaign without a flow. You can only apply templates to campaigns whose Status is set to Planned.
-
Open the Campaigns section and open the campaign you want to configure.
-
Click Edit campaign flow.
-
Click Actions → Select template and select the template from the list (Fig. 8).
Fig. 8 Select the campaign workflow template 
The list shows all templates saved in the current environment.
-
Click the template name to apply it to the diagram.
If the campaign already has a configured flow, Creatio displays a confirmation window before replacing it. Confirm to remove the existing elements and apply the template instead. You cannot undo this action.
The element structure and flow settings are preserved. Links to related records, for example, bulk emails, events, and Facebook forms, are not transferred and must be configured for the current campaign.
As a result, the Campaign Designer will apply the template diagram to the campaign. You can adjust any settings before saving.
Recommended campaign templates
Recommended templates are available in Creatio 8.3.4 and later.
The Recommended templates tab of the Select template window contains the following templates.
Template | Use it to |
|---|---|
Cross-platform retargeting distribution | Split a retargeting segment and sync the audiences to Google Ads and Meta Ads for cross-platform campaigns. |
Google Ads audience synchronization | Sync a clean retargeting segment to Google Ads and track whether the audience synchronization succeeds or fails. |
New contact welcome series | Welcome new contacts with a timed series of onboarding emails that introduce your product. |
Weighted subscriber reactivation | Reactivate inactive subscribers with timed emails and test incentive tiers to find the most engaging one. |
Event registration confirmation | Register contacts for an event and update their participant status in the campaign. |
Event attendee follow-up distribution | Route event attendees to sales, demo, education, upsell, or control paths to test the impact of the follow-up. |
Webinar funnel with sales qualification | Run a full webinar funnel with reminders, attendance tracking, and automatic sales qualification. |
Pricing lead qualification and routing | Identify high-intent leads from pricing requests, create MQLs, and route the other leads to BDR follow-up. |
Web form lead capture and validation | Capture form submissions, remove duplicates, and create leads for qualified prospects. |
Facebook lead to webinar conversion | Turn Facebook leads into webinar registrations with an invitation sequence and automatic event registration. |
Product demo invitation with A/B test | Test two demo invitation messages, track clicks, and register interested leads for the demo event automatically. |