Chat workflow
Use Creatio omnichannel chats to communicate with customers and process requests through real-time communication channels that are convenient for customers.
Creatio creates new chats in the following cases:
- An incoming message from a new customer in Facebook Messenger, WhatsApp, Telegram bot, or SMS channel. SMS channel is available in Creatio 8.3.3 and later.
- A new message from an existing customer if the customer has no current active chats.
In other cases, Creatio displays new messages in the active chat.
Creatio adds new contacts based on incoming chats if the following conditions are met:
- A customer sent their first message using a Facebook page, Telegram bot, WhatsApp or SMS.
- No Creatio contact has a Facebook user ID, Telegram user ID, or phone number (for WhatsApp and SMS) from the incoming message.
When a new contact is created based on an incoming chat, Creatio will populate the following contact fields:
- A Facebook user's name, profile picture, and ID.
- A Telegram user's name, profile picture, and ID.
- A WhatsApp user's name, profile picture, and phone number.
- A phone number from SMS.
Messages of the same Creatio contact sent from different contact IDs within the same channel are combined in a single Creatio chat window. For example, if a customer messages support from multiple WhatsApp accounts listed under the same Creatio contact, the chat agent can view the entire communication history in a single place.
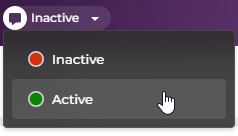
Change the agent status
The agent status determines whether they can receive and process chats in the Creatio Agent Inbox panel.
- Active. An active agent can see new messages and chats on the Agent Inbox, process them, and send responses.
- Inactive. An inactive agent can only see previously received chats, process them, and send responses. Creatio does not distribute new chats among inactive agents.
Out of the box, after the login the agent's status is "Inactive." Change it in the top panel. When an agent logs out, i.e., closes the session, their status will be changed to "Inactive" automatically and new chats will not be distributed to this agent.
Process chat messages
Agents can process chats using the Agent Inbox panel. Agents can access:
- New chats that are awaiting acceptance in New items area.
- Active chats that are already accepted in In progress area.
Chat notifications
When a new chat message comes in, the Agent Inbox panel opens automatically and agent receives a sound notification.
Administrator can customize the following:
- Specify which panel to open out of the box for chat processing in the "Default panel for chat processing" (
DefaultPanelForChatProcessingcode) system setting. - Change the notification alert about new chat messages to help the agents easily recognize them. Learn more: Set up chat processing.
If you permit Creatio to send you notifications in your browser, you will receive a browser notification whenever a new message is received.
Response overdue indicators
The response overdue indicator helps agents prioritize chats by displaying a real-time timer on chat tiles in the Agent Inbox. Agents can track response time based on queue-specific settings:
- "First response time, minutes" – defines the time allowed before the first agent reply.
- "Ongoing response time, minutes" – defines the time allowed between subsequent replies.
Learn more: Set up chat processing.
If the configured time limit is exceeded, an overdue timer appears on the chat tile. The timer shows how long the response has been overdue since the last customer message and resets after the agent sends a reply.
Accept new chat
To start processing the chat, click the Accept button on the chat tile. You will become the owner of this chat. After this you will have access to the following:
-
Chat messages – displays text messages and files shared in the chat conversation.
-
Contact profile – displays contact photo or initials and contact name, collapsed out of the box. You can go to the contact form page by clicking the contact name. Expand the contact profile to see more information about contact and chat:
- Chat channel
- Contact mobile phone
- Contact email address
System administrators can customize which fields to display.
-
Chat actions:
- transfer chat to another agent or queue
- run quick action
- enable chat translation
- complete chat
Reply in the chat
You can reply to chats using text or attach files to messages. Up to 10 files can be attached to a single message. File type and size limitations are enforced based on the following:
- the "File extensions DenyList" (
FileExtensionsDenyListcode) and "Attachment max size" (MaxFileSizecode) system settings - channel-specific restrictions
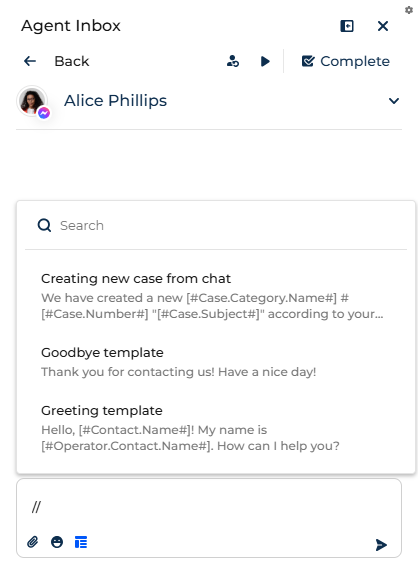
To use message templates:
- Enter
//in the message input field and start entering the template name or text. This opens the template selection window. - Select the appropriate response.
After you select a template, it appears in the Recently used group.
If you leave the chat without sending a reply, Creatio saves a draft of your message automatically. You can get back to editing the reply at any moment after you open the chat again. The draft will appear in the message input field.
Link chat to another contact
You can link an ongoing chat to an existing different contact if you identify the correct customer during the conversation. For example, a chat might initially be created with a new unknown contact. You can reassign it to the correct contact without losing the conversation history. To do this:
- Open the chat in the Agent Inbox.
- Click
 in the chat header → Link to another contact. This opens a window.
 - Select the required contact.
As a result:
- Creatio will link the chat to the selected contact.
- All messages in the chat will be associated with the selected contact profile.
- The previously linked contact record will be removed.
System administrators can customize relinking in the "Link chat to contact" business process.
Transfer the chat to another agent or queue
You can assign an ongoing conversation to another agent or queue if further handling is required. For example, transfer a chat if the request requires specific expertise or has to be processed by another team. To do this:
-
Open the chat in the Agent Inbox.
-
Click
 in the chat header. This opens a window.
 -
Select one of the tabs:
- Agent tab – transfer the chat to a specific agent. Each item shows the agent name and current status.
- Queue tab – transfer the chat to a queue. Each item shows the queue name and the number of available agents, excluding the current agent.
-
Select the required agent or queue.
As a result, Creatio will complete the current chat and create a child chat automatically. The chat becomes read-only for you and is removed from your In progress area after you deselect the chat tile. The status of the new chat depends on the way you transfer it:
- If you transfer the chat to a specific agent, Creatio adds the new chat to the agent’s In progress area and sets the chat status to "In progress."
- If you transfer the chat to a queue, Creatio sets the chat status to "Waiting for processing" and distributes the chat among the queue agents based on the queue routing rules. The chat appears in the New items area until a specific agent accepts the chat. After the chat is accepted, Creatio changes its status to "In progress." After the agent opens the chat, they can access the parent chat messages and carry on the conversation.
Run quick actions from the chat
Use quick actions to run predefined business processes directly from chat without leaving the conversation. Quick actions help automate routine operations, such as creating records or triggering workflows as well as using data from the current chat. To do this:
- Open the chat in the Agent Inbox.
- Click
 in the chat header. This opens a list.
 - Select the required action.
As a result:
- Creatio will launch the corresponding business process.
- The process will use data from the current chat as input parameters.
- The chat will remain open, allowing you to continue the conversation.
System administrators can configure the list of available actions in the Chat actions list on the Chat settings page. Learn more: Set up chat processing.
Create a case from a chat
This action is available in the Case Management app. If you run the action, Creatio adds a new case and populates the following fields:
- Subject: text of the first chat message
- Description: text of all incoming messages received before the agent answered in the chat
- Source: "Chat"
- Registration date: the case creation date
- Status: "New"
- Contact: contact from the chat
- Account: the account of the contact
- Assignee: chat agent
Translate chat messages
Use the chat translations to communicate with customers in different languages directly within the chat. Creatio can detect the customer’s language automatically and translate messages in real time.
System administrator must enable translations first. Learn more: Set up chat processing.
To enable translations in the current chat:
- Open the chat in the Agent Inbox.
- Click
 in the chat header. This opens the chat translation panel. The origin language of the chat messages will be detected automatically. The target language will be populated with the user language. You will be able to change languages if needed.
 - Click Translate in the translation panel.
As a result:
- Incoming customer messages will be automatically translated into your language.
- All subsequent incoming messages will be translated automatically.
- Outgoing messages will be translated automatically.
You will be able to do the following:
- Disable automatic translation by clicking the Cancel button in the chat translation panel.
- Toggle between the original and translated versions of each message.
- Disable translation for an outgoing message before sending it.
- Show or hide the translation panel in the chat header.
Complete chat
You can complete chats manually or allow them to be completed automatically based on Chat timeout, minutes parameter of the chat queue. To complete a chat manually:
- Open the chat in the Agent Inbox.
- Click Complete in the chat header.
As a result:
- The chat becomes read-only.
- The chat is removed from the In progress area after you deselect the chat tile.
- System message that confirms completion is added to the chat conversation.
Monitor message delivery status
Creatio displays the delivery status of each outgoing message directly in the chat conversation within the Agent Inbox panel. The status updates automatically based on provider responses, so you can immediately see whether messages were delivered successfully.
Point to the status indicator on a message to view a tooltip. For successfully delivered messages, the tooltip shows the status name. For failed messages, it shows the reason for the delivery failure.
The available statuses depend on the channel:
- Telegram: "Sending," "Sent," or "Failed."
- WhatsApp and SMS: "Sending," "Sent," "Delivered," "Read," or "Failed."
Creatio stores the message status and failure reason for each message.