Developing a simple application for Creatio Marketplace
Glossary Item Box
Introduction
Creatio Marketplace applications expand the features of the base Creatio products and provide additional business value. Developing an Creatio Marketplace application is similar to developing a customized Creatio configuration as part of an implementation project. The general principles of developing custom solutions for base Creatio products are covered in the “How to start development” article of the Development Guide.
Since Creatio Marketplace application are a form of customizing base Creatio products, they must somehow be deployed on existing Creatio applications. The deployment mechanism for Marketplace applications is implemented via packages. A Creatio package is a complex of configuration elements, that implement a set of functions.
The number of packages and their contents depend on the scope and complexity of functions that the packages implement. For example, calling a third-party service from an exiting record edit page requires replacing a couple of schemas that can be grouped in a single package. On the other hand, creating a new Creatio section with complex functions requires developing several dozens of schemas and modules.
The procedure for developing a simple Creatio Marketplace application is as follows:
1. Create a Web-service, if needed. A Web-service can be implemented via Creatio configuration elements or as a third-party solution.
2. Create a custom package.
3. Add a replacing view model schema for main menu.
4. Implement the necessary new functions in the replacing schema.
Application details
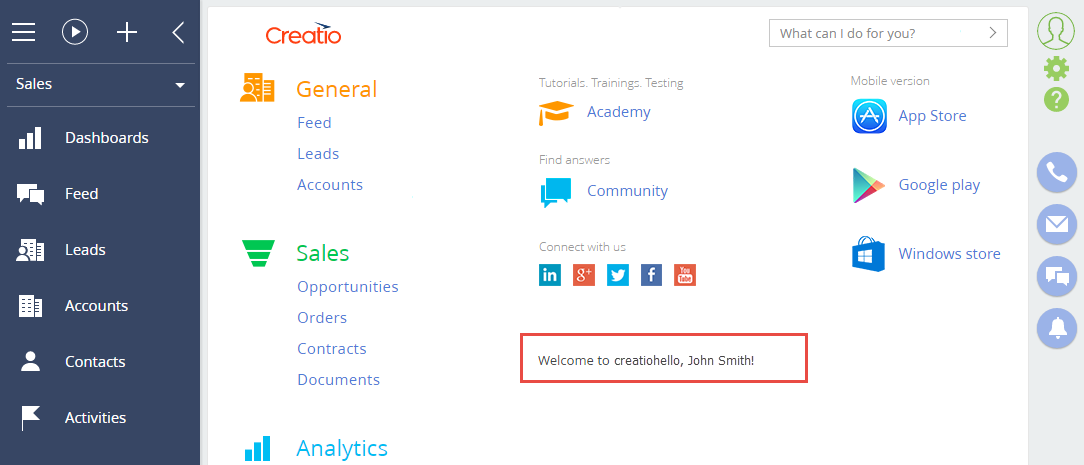
Create an application that would call a third-party Web-service that would display a greeting message on the main menu page of Sales Creatio, enterprise edition. Web-service calling is implemented via an HTTP POST request, that passes current user name as parameter. The result must be displayed under the social network links.
Implementation algorithm
1. Web-service implementation
There are a number of ways (different programming languages and platforms) to implement a Web-service. The best option depends on the purpose of the Web-service.
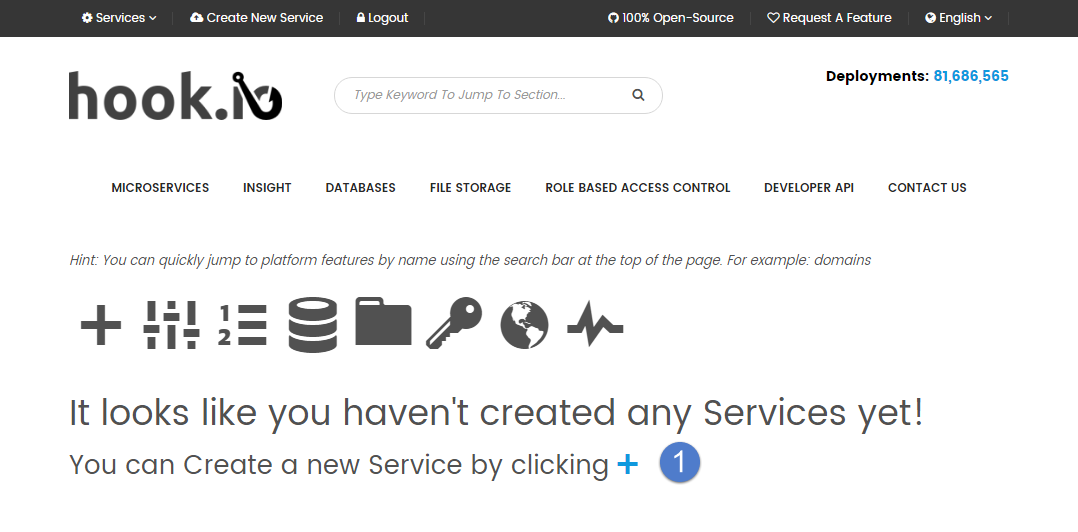
In this case, a simple “microservice” will be enough. Use any of the available platforms, such as open-source project https://hook.io to implement this service.
After you register and log in to the system, a miscoservice management page will open where you can add a new Web-service (Fig. 1, 1).
Fig. 1. hook.io microservice management page
Add a new service, specify its endpoint name (Fig. 2), select programming language for the source code of the service (Fig 3, 1) and add service source code (Fig 3, 2).
Fig. 2. Adding endpoint

Fig. 3. Adding microservice source code
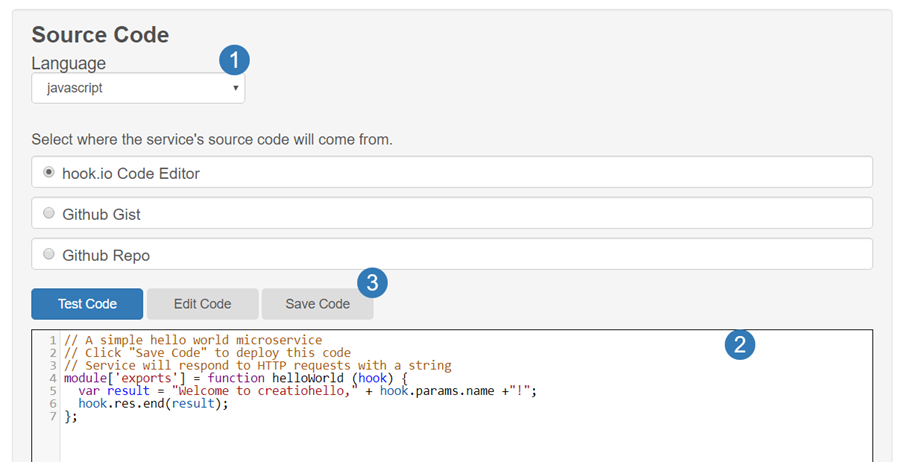
After saving the source code (Fig 3, 3) Endpoint address is https://hook.io/academy-creatio-com/creatiohello.
Service source code is a function that generates the greeting message, based on the name parameter of the HTTP request. Microservice source code:
module["exports"] = function helloWorld (hook) {
  // Generating a reply string.
  var result = "Welcome to creatiohello, " + hook.params.name + "!";
  // Sending responde to the client.
  hook.res.end(result);
};
NOTE
This source code works with both POST and GET methods of the received HTTP requests. For example, if you enter https://hook.io/academy-creatio-com/creatiohello?name=User in the browser address bar, the service will still process it correctly.
2. Creating a custom package
Creating and editing custom packages is done in the [Configuration] section.
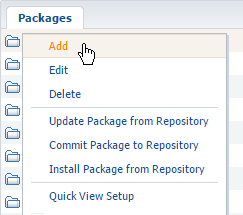
To create a new custom package, go to the [Configuration] tab of the [Advanced settings] window, right-click the [Packages] panel select and select [Add] (Fig 4).
Fig. 4. Adding a custom package
As a result, a package edit page will pop up, where you can fill out the properties of the new package (Fig. 5).
Fig. 5. Basic properties of a package

Package properties include:
- [Name] – package name. This is a required field. Package name cannot match other package names. The name must include developer’s prefix specified in the developer profile.
- [Description] – short package description, such as information about implemented functions. This field is optional.
Click [OK] to save the new package. The package will become available in the list of other packages on the [Packages] tab.
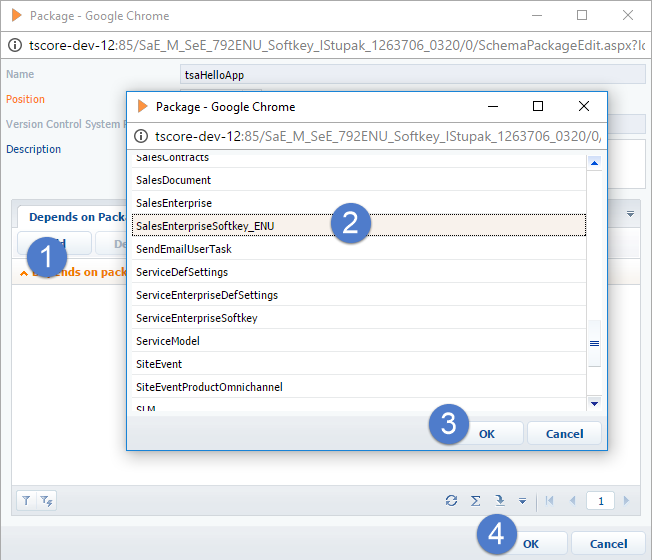
Set up dependencies for the new package to ensure that it includes existing functions. Specify the last element in the package hierarchy. Use the [Package Dependencies] tab in the [Configuration] section to determine the last package in the hierarchy. Find the first package located above the [Custom] package.
To add a dependency, click the [Add] button on the [Depends on packages] tab of the package edit page (Fig 6, 1). In the package lookup, select the needed package (Fig 6, 2) and click [OK] (Fig. 6, 3). Save the package after adding all dependencies (Fig. 6, 4).
Fig. 6. Adding package dependencies
3. Creating a replacing schema
Creatio main menu is based on several view model schemas that inherit each other hierarchically:
- The base schema of the main page (BaseIntroPageSchema, in the package UIv2), which is the parent view model schema where the primary containers of the main page are generated. Adds a left/right separator to the view model, as well as video and social network link panels.
- Base product main menu schema (SimpleIntro, in the package UIv2), which is inherited from the BaseIntroPageSchema. Adds the [General], [Analytics] and [Admin area] blocks to the main menu.
- Sales enterprise main menu schema (EnterpriseIntro, in the package SalesEnterprise), which is inherited from the SimpleIntro. Adds more [General] section links, as well as the [Sales] section. It also redefines the link to the overview video.
To make custom changes in the main menu of the sales enterprise product, replace the EnterpriseIntro schema and implement additional functions in the replacing schema.
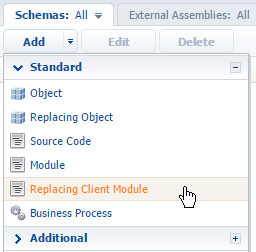
To create a replacing schema, select the package that you added earlier on the [Packages] panel of the [Configuration] tab of the advanced settings window. On the [Schemas] tab, select [Add] > [Replacing client module] (Fig. 7).
Fig. 7. Adding replacing client module
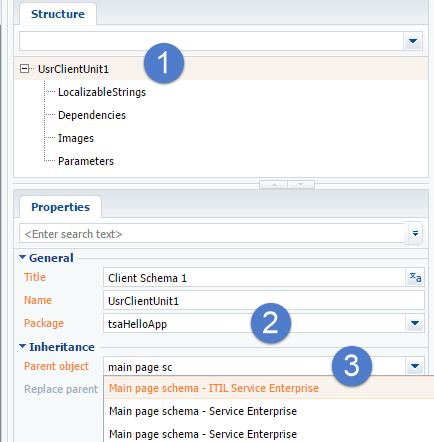
In the opened client schema designer window, open the root element in the [Structure] area (Fig 8, 1), then select the replacing schema in the [Parent object] field. You can start typing the title of the replacing schema in the [Parent object] field to filter the list of available schemas (Fig. 8, 3). Select “Main page schema - Sales Enterprise”.
Fig. 8. Selecting parent schema
As a result, a replacing schema for the main page view model will be added to the custom package.
4. Implementing functions
To implement custom functions in the new schema, add its source code.
To display the result of calling a custom microservice on the main page, add configuration objects for the container and the text in it to the diff array of the view model schema.
Develop a method for calling the SetHelloAttribute(), micriservice, in which the XMLHttpRequest JavaScript object will be used. This method must be called on page loading. To do this, override the Init() method of the parent schema and call SetHelloAttribute() in it. The result of executing the request to the microservice can be obtained from the callback unction of the onreadystatechange property of the XMLHttpRequest object. Since the request is executed asynchronously, the result must be saved in the HelloAttribute attribute. The attribute must be connected to the caption property of the text that will display the message.
Source code of the main page view model:
define("EnterpriseIntro", [], function() {
    return {
        attributes: {
            // Attribute that contains the message from the custom Web-service.
            "HelloAttribute": {
                // Data type of the attribute.
                "dataValueType": Terrasoft.DataValueType.TEXT,
                // Attribute type - virtual column.
                "type": Terrasoft.ViewModelColumnType.VIRTUAL_COLUMN,
                // Default value.
                "value": ""
            }
        },
        methods: {
            // Schema initialization method.
            init: function() {
                // Calling base functions.
                this.callParent(arguments);
                // calling custom service.
                this.SetHelloAttribute();
            },
            // Custom service call method.
            SetHelloAttribute: function() {
                // HTTP request.
                var xhr = new XMLHttpRequest();
                // Custom service call URL.
                var url = "https://hook.io/academy-creatio-com/creatiohello";
                // Determining current user name.
                var currUser = Terrasoft.SysValue.CURRENT_USER_CONTACT.displayValue;
                // Generating parameters for HTTP request.
                var params = "name=" + currUser;
                xhr.open("POST", url, true);
                xhr.setRequestHeader("Content-type", "application/x-www-form-urlencoded");
                // Saving context.
                var self = this;
                // Callback function that is called upon receiving reply.
                xhr.onreadystatechange = function() {
                    // If a reply with the needed status is received.
                    if (xhr.readyState === 4 && xhr.status === 200) {
                        // Setting attribute value.
                        self.set("HelloAttribute", xhr.responseText);
                    }
                    else {
                        self.set("HelloAttribute", "creatiohello is unavailable");
                    }
                };
                // Sending HTTP request.
                xhr.send(params);
            }
        },
        diff: [
            // Custom container, which will contain the greeting.
            {
                // Insert operation.
                "operation": "insert",
                // Element name.
                "name": "HelloContainer",
                // Name of the parent container element.
                "parentName": "RightContainer",
                // Parent element property name for embedded elements.
                "propertyName": "items",
                // Element properties configuration object.
                "values": {
                    // Element type - container.
                    "itemType": Terrasoft.ViewItemType.CONTAINER,
                    // Array of embedded elements.
                    "items": []
                }
            },
            // Greeting text label.
            {
                "operation": "insert",
                "name": "HelloLabel",
                "parentName": "HelloContainer",
                "propertyName": "items",
                "values": {
                    // Element type - label.
                    "itemType": this.Terrasoft.ViewItemType.LABEL,
                    // Link to an attribute with the label text.
                    "caption": { "bindTo": "HelloAttribute" }
                }
            }
        ]
    };
});
After saving the schema, update the main page in the browser. The result of the creatiohello microservice request will be displayed on it.
Fig. 9. Case result