


Designing product UX
Glossary Item Box
Introduction
The negative user experience (in installing, configuring and working with the product) is the one of the main factors that significantly reduce the probability of purchasing a product after a trial. Potential customers often perceive quality and useful products negatively of they require complex and time-consuming setup.
We have come up with a number of recommendations to help avoid typical errors with UX of product setup and user’s first impressions.
Clear navigation in the system
Convenient and logically organized navigation will help a new user to find the application, navigate to the necessary function and use it. When designing the navigation, consider following:
1. Displaying a section in the workplace
If the application functions include a new Creatio section, it should be displayed in at least one workplace. A workplace is a set of system sections available to a group of users. When adding a new section, take into account that Creatio workplaces are typically connected to specific functional and organizational user roles (i.e., sales, contact center, administration, etc.).
Case: “Adding the [Chats] section”
 Incorrect Incorrect |
Create separate workplace and add the [Chats] section to it |
| Incorrect |
Do not include section in any of the workplaces |
 Correct Correct |
Include the [Chats] section in the [Sales] and/or [Marketing] workplace |
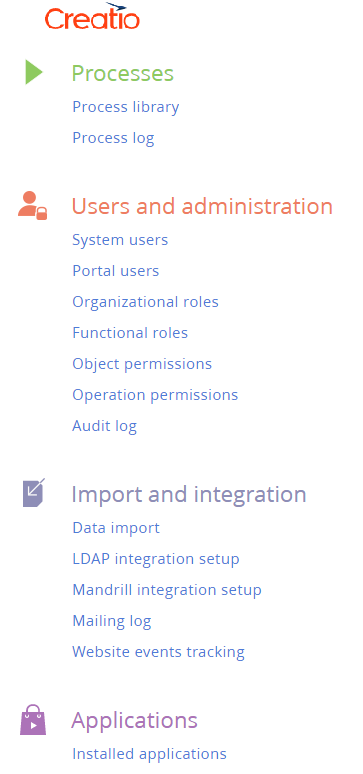
2. Accessing settings from the system designer
All custom sections and blocks used for setup and configuration should available in the system designer. The users can access the system designer by clicking the  button at the top right corner of the application window from anywhere in the system. The links to setup and configuration functions in the system designer are grouped into several blocks. The currently available blocks and their functions are listed in Table 1.
Table 1. Blocks of system designer settings
| Settings block | Usage |
|---|---|
| Import and integration | Contains links to setup functions of different types of integrations, as well as access to Excel import. Add links to connector setup pages here. |
| System setup | Contains links to setup functions that affect general system behavior. Add links to custom application settings and vertical solution settings here. |
Modify the system designer by adding links to your custom setup functions, such as:
- Custom settings pages
- Custom setup sections
- Lookups used as setup medium.
3. Accessing settings from the section actions menu
The user experience is commonly formed as follows: user opens a section with new functions, starts studying it and only then understands that further work requires additional setup.
To help users navigate and perform necessary settings, add required action to the [Actions] button menu. Please note, that the section page (list of the records) and the page of specific record are the different pages. For each page, the set of actions can be different and the [Actions] button is configured separately for the list of records and the record page. The action added to the [Actions] menu of the section will not be added in the [Actions] menu of the record page.
Case: “Implement transition to the custom login authorization page in the X external system (login/password) that cooperates with the [Integration] section implemented in the application”
| Incorrect |
Implement separate settings page accessible only by a direct URL address. |
| Correct |
Add the “Configure the connection to the X external system” item in the [Actions] button menu of the [Integration] section. |
Settings are simple and easy to find
Many Marketplace applications require initial configuration by the user. To do this, the Creatio has a set of custom tools.
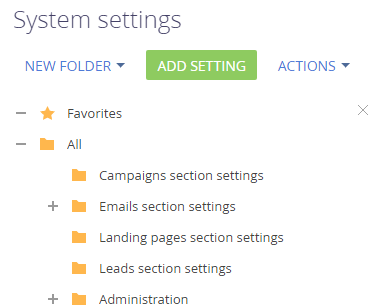
1. The [System settings] section
The [System settings] section is designed for additional setup of system sections. For example, set the color of overdue activities, parameters for sending emails, external service connection parameters, etc.
Case: “Add a new system setting”
| Use short and clear names for system settings. The name should reflect the essence of the setting and point on functions to which it belongs. |
|
| Group the settings. |
User has no chance to find a specific setting in the general settings list without knowing its exact name. Grouping of the settings is a simple and effective way to simplify application configuration.
|
| Add the description | The description of the system behavior that the system setting affects will answer most of user’s questions. |
2. The [Lookups] section
The [Lookups] section is used to manage all data (settings and system data) that can be displayed as a simple list.
The examples of using the [Lookups] section for different system tasks are given in the Table 2. It is highly recommended to use the lookups cases listed in the table.
Table 2. Lookup use cases
| Task | An example of a lookup used |
|---|---|
| A list of data for user selection |
[Document statuses] The lookup contains a list of all statuses that a document can have, for example, “Active”, “Inactive” or “Draft”. |
| Field autofill during integration |
[Lead channels] Lookup contains the list of all resource types that provided new leads, for example, “Social accounts”, “Search-based advertising” or “Email”. |
| Configured business logic |
[Case notification rule] Lookup contains a list of rules that manage sending notifications to contacts about their case progress (for example, “Send immediate ”, “Send after a delay”, “Disabled”). |
| System list | [Webitel users] |
| Configuring the displaying of functionality in different sections | [Gantt chart configuration] |
3. Settings in the user profile
Individual settings of a specific user (individual login/password or preferences for using certain product functions) can be added in the user profile.
Examples:
1. Integration connection settings:
- Id of the phone operator/phone number by which the user works with a phone integration connector.
- Settings for connecting the user to the mail service.
2. System behavior settings for the user:
- Notification settings.
- The default language settings that the user uses in the business card scanner.
4. Separate settings page
Putting all the settings on a separate page is the most convenient way for the user to manage the settings of the application. However, separate settings pages are also harder to implement (Fig. 1).
Fig. 1. Creatio settings page
You can open settings page from corresponding section and/or system designer.
It is recommended to put all application settings on a separate page in the following cases:
- If the settings should be carried out in a specific sequence.
- If a the setup requires both changes of settings and modification of lookups.
- If a the setup requires changes of settings, lookups and additional actions.
- If a user will need to update the settings during the work with the application on a regular basis.
Development according Creatio base logic
Correct filling of fields when creating leads
Creating leads when the Creatio is integrated with messengers, chats, landing pages or social networks is one of the typical integration tasks. When a lead is automatically created, it is necessary to keep correct logic of filling the fields of the lead page, including the information about lead generation channels.
When developing an application, make sure that Creatio users correlate each field name with its purpose and be able to use end-to-end analytics for the leads. An example of names of lead fields is given in the Table 3.
Table 2. Examples of lead page names
| Name | Usage |
|---|---|
| [Registration method] |
Lead registration method:
|
| [Channel] |
Type of the resource from which the lead was received:
|
| [Source] | The name of the specific resource from which the lead was received (Twitter, Google, etc.). |
| [Transition website] | The site where the user clicked a link to the landing page, which resulted in creation of a new lead. The field is not editable and is filled in automatically when receiving a lead from the landing page. |
UI minimum
Section icon
An icon should be added for each new section. The section icon requirements:
- PNG, or SVG image
- 38 х 38px
- A flat white color image without small elements/lines, without background.
You can find suitable icons in the Marketplace template library (Section icons for Creatio). You can also use the free service to search and convert flat icons.