


Setting up reports in Creatio
Glossary Item Box

Introduction
You can set up custom reports using Creatio version 7.15.3 and up.
The [Report setup] section enables users to create reports using Creatio tools and configure these reports via the FastReport designer. You can learn more about the section and find the interface description (Fig. 1) in the "The "Report setup" section” article.
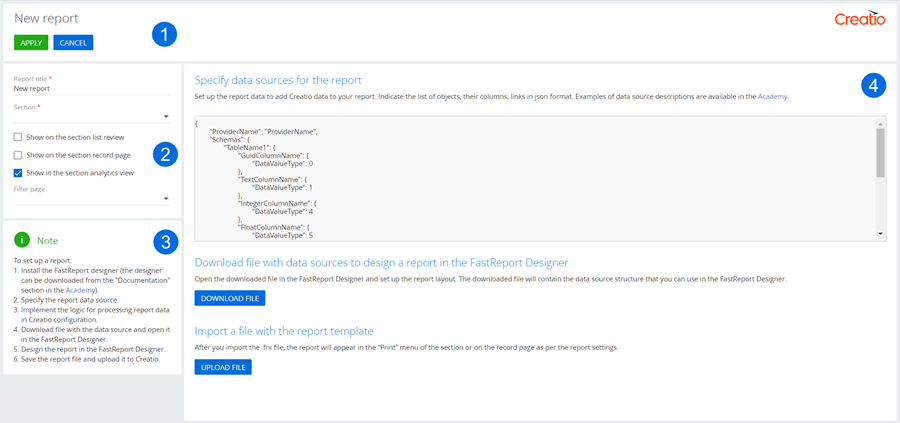
Fig. 1. – The report setup page
General algorithm of creating a report:
- Install the FastReport Designer (you only perform it once).
- Create a report in the [Report setup] section.
- Specify the data sources for the report.
- Create a report data provider that will implement processing of data logic.
- Download the file with data sources and set it up in the FastReport Designer.
- Upload the configured report template to Creatio.
Installing the FastReport Designer
You will need the following components to work with the Report Designer:
- Windows OS.
- 64-bit Microsoft .Net Framework 4.7.2.
To install the FastReport Designer, use the following link and download the zip archive.
Creating a new report
To create a new report:
- Open the System Designer by clicking
 . In the [System setup] block, click the [Report setup] link.
 - Click [New report] —>[FastReport] .
- In the parameter setup area (Fig. 1, 2) specify the report title, the section for the report, the display parameters.
Specifying the report data sources
In the [Specify data sources for the report] block of the working area (Fig. 1, 4), specify the list of objects, their columns and connections that will be used to receive data. Specify the localizable strings if needed. Use the JSON format. Example of providing a data source:
{
    // Name of the data provider class.
    "ProviderName": "YourProviderName",
    // Table structure for the report template.
    "Schemas": {
        // Name of the database table or virtual tables, whose columns need to be added to the report.
        "TableName1": {
            // Name of the column that needs to be added to the report.
            "ColumnName1": {
                // Column data type.
                "DataValueType": DataValueType1
            },
            "ColumnName2": {
                "DataValueType": DataValueType2
            }
        },
        "TableName2": {
            "ColumnName1": {
                "DataValueType": DataValueType1
            },
            "ColumnName2": {
                "DataValueType": DataValueType2
            }
        },
        // Report localizable strings.
        "LocalizableStrings": {
            // Name of the report localizable string.
            "LocalizableString1": {
                // Data type of the localizable string.
                "DataValueType": 1
            },
            "LocalizableString2": {
                "DataValueType": 1
            }
        }
    }
}
The DataValueType parameter contains a value from the Terrasoft.core.enums.DataValueType enumeration.
Click [Apply] in the toolbar (Fig. 1, 1) to save the data.
Creating a report data provider
The report data provider is a custom class written in C#. To create the provider:
- In the custom development package, create a [Source code] type schema.
- Create a service class in the schema source code. Use the Terrasoft.Configuration namespace or any of its embedded namespaces. Mark the class with the [DefaultBinding] attribute containing the necessary parameters. The service class must be the inheritor of Terrasoft.Configuration.Reporting.FastReport.IFastReportDataSourceDataProvider.
- Add the GetLocalizableStrings(UserConnection) method implementation to the class. The method implements localization of the report fields.
- Add the ExtractFilterFromParameters(UserConnection, Guid, IReadOnlyDictionary) method implementation to the class. This method is responsible for adding the interface filters.
- Add the GetData(UserConnection, IReadOnlyDictionary) method implementation to the class. This method must return a Task<ReportDataDictionary> type value. Describe the logic of receiving the report data in the method.
- Publish the source code schema.
Example of implementing the report data processing logic:
namespace Terrasoft.Configuration
{
    using System.Collections.Generic;
    using System.Threading.Tasks;
    using Terrasoft.Configuration.Reporting.FastReport;
    using Terrasoft.Core;
    using Terrasoft.Core.Factories;

    // Name of the data provider class for the report, whose logic needs to be implemented.
    [DefaultBinding(typeof(IFastReportDataSourceDataProvider), Name = "YourProviderName")]
    public class YourProviderName : IFastReportDataSourceDataProvider
    {
        // The code for implementing the logic of getting data for the report.

        // Localization of the report strings.
        private IEnumerable<IReadOnlyDictionary<string, object>> GetLocalizableStrings(UserConnection userConnection) {
            var localizableStrings = _localizableStringNames.ToDictionary(
                x => x,
                x => (object)(new LocalizableString(userConnection.ResourceStorage, _resourceManagerName, $"LocalizableStrings.{x}.Value")).Value);
            return new[] { localizableStrings };
        }

        // Adding the interface filters.
        private IEntitySchemaQueryFilterItem ExtractFilterFromParameters(UserConnection userConnection, Guid entitySchemaUId,
                IReadOnlyDictionary<string, object> parameters) {
            var managerItem = userConnection.EntitySchemaManager.GetItemByUId(entitySchemaUId);
            return parameters.ExtractEsqFilterFromReportParameters(userConnection, managerItem.Name) ?? throw new Exception();
        }

        // Adding data to the report.
        public Task<ReportDataDictionary> GetData(UserConnection userConnection, IReadOnlyDictionary<string, object> parameters) {

        }
    }
}
Setting up templates in the FastReport Designer
Download the file with data sources. Click the [Download file] button in the [Download file with data sources to design a report in the FastReport Designer] block (Fig. 1, 4) of the working area. The file must have the *.frx extension.
Double click the downloaded file to open it in FastReport and configure the template layout. Learn more about configuring the template in the FastReport documentation.
The file saves the structure of the data source implemented in the [Report setup] section.
The FastReport Designer is a third party application. The template preview function is not available.
Uploading the configured template to Creatio
Click the [Upload template] button in the [Import a file with the report template] block (Fig. 1, 4) of the working area to upload the prepared template to Creatio. After you upload the template, you can generate a report in the section dashboard view or on a record page. You can specify this in the parameter setup area (Fig. 1, 2). The generated report will be saved in the pdf format.
The [Print] and [Reports] buttons display in corresponding sections and on record pages if there is at least one report configured and published for a specific section.
Multilingual interface elements in reports
The [Translations] section in the System Designer enables setting the values of interface elements for a multilingual report. To find the previously localized strings of the report, use the Configuration:SchemaName key (e.g., Configuration:UsrContactDataSourceCode). You can find a report field using the following key: Configuration:SchemaName:FieldName (e.g., Configuration:UsrContactDataSourceCode:LocalizableStrings.ReportTitle.Value).
If the [Show on the section list review] and [Show on the section record page] checkboxes are selected, translate the report title. You can find the report title using the following key:Configuration:SchemaName:Caption(e.g., Configuration:UsrContactDataSourceCode:Caption). If the [Show in the section analytics view] checkbox (Fig. 1, 2) is selected, translate the report title. You can find the report title using the following key: Data:SysModuleAnalyticsReport.Caption:FieldIdentificator (e.g., Data:SysModuleAnalyticsReport.Caption:d52e8b78-772b-77ee-3394-bdb3616d859a).
Learn more about working with the [Translations] section in the "How to translate the interface and system elements in Creatio” article.
Transferring the package to another development environment
To transfer the package with the report to another environment, go to the [Configuration] section -> the [Data] tab and bind the data of the following elements:
- FastReportTemplate_ReportName – the report template. To bind it, use the template Id from the [dbo.FastReportTemplate] database table.
- FastReportDataSource_ReportName – the source of the report data. To bind it, use the source Id from the [dbo.FastReportDataSource] database table.
- SysModuleReport_ReportName – the report. To bind it, use the report Id from the [dbo.SysModuleReport] database table.
You can view the record Id in the database table even if you do not have access to the database. To do this, display the Id system column in the window of binding data to packages.
See also: