


Setting up the report
Glossary Item Box

Case description
You can set up custom reports using Creatio version 7.15.3 and up.
Create a "Contact Data” base report that would display the following information about the contacts:
- [Full name];
- [Birthday];
- [Gender];
- [Account].
Source code
You can download the package with case implementation using the following link.
Case implementation algorithm
1. Set up the report display parameters
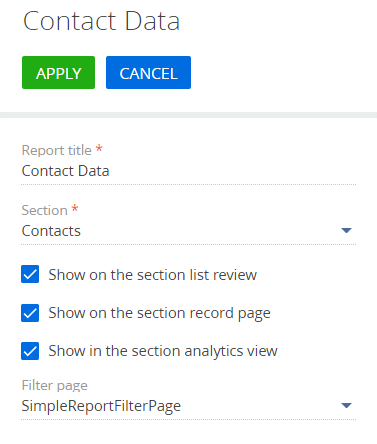
Specify the following values (Fig. 2) for the created report in the parameter setup area (Fig. 1, 2):
- [Report title] – "Contact Data”;
- [Section] – "Contacts”;
- [Show in section] – select the checkbox;
- [Show in section] – select the checkbox;
- [Show in the section analytics view] – select the checkbox;
- [Filter page] – SimpleReportFilterPage.
SimpleReportFilterPage – a client schema that implements standard simple filters.
Fig. 1. – The report setup page
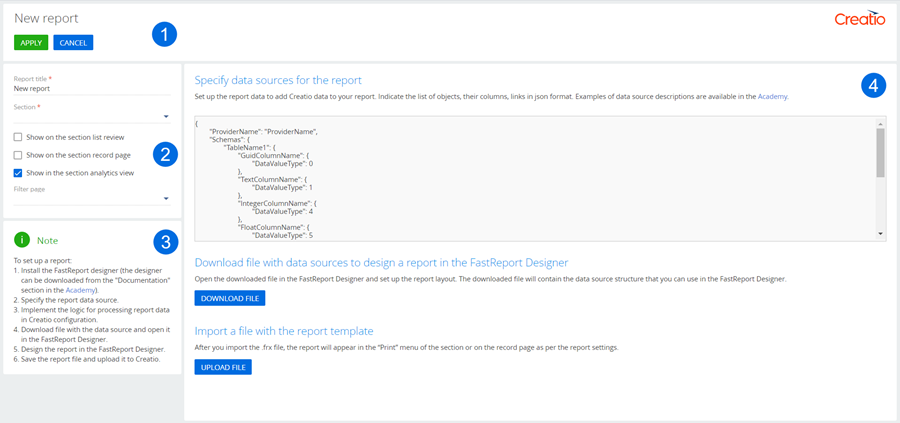
Fig. 2. – Setting up the report display parameters
2. Specify the data sources
In the [Specify data sources for the report] block of the working area (Fig. 1, 4), add the code below:
{
    // Name of the data provider class.
    "ProviderName": "ContactDataProvider",
    "Schemas": {
        "ContactData": {
            "Full name": {"DataValueType": 1},
            "Birthday": {"DataValueType": 1},
            "Gender": {"DataValueType": 1},
            "Account": {"DataValueType": 1}
        },
        // Added for localization.
        "LocalizableStrings": {
            "ReportTitle": {"DataValueType": 1},
            "FullNameLabel": {"DataValueType": 1},
            "BirthdayLabel": {"DataValueType": 1},
            "GenderLabel": {"DataValueType": 1},
            "AccountLabel": {"DataValueType": 1}
        }
    }
}
Click [Apply] to save and apply the changes (Fig. 1, 1).
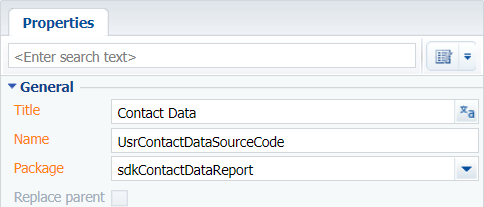
3. Create the report data provider
Go to the [Advanced settings] section -> [Configuration] -> [Custom package] -> the [Schemas] tab. Click [Add] -> [Source code]. Learn more about creating a schema of the [Source Code] type in the “Creating the [Source code] schema” article.
Specify the following parameters for the created object schema (Fig. 3):
- [Title] – "Contact Data";
- [Name] – "UsrContactDataSourceCode".
Fig. 3. – Setting up the [Source Code] type object schema
The complete source code of the module is available below:
namespace Terrasoft.Configuration
{
    using System;
    using System.Collections.Generic;
    using System.Collections.ObjectModel;
    using System.Linq;
    using System.Threading.Tasks;
    using Terrasoft.Common;
    using Terrasoft.Configuration.Reporting.FastReport;
    using Terrasoft.Core;
    using Terrasoft.Core.Entities;
    using Terrasoft.Core.Factories;
    using Terrasoft.Nui.ServiceModel.Extensions;
    using EntitySchema = Terrasoft.Core.Entities.EntitySchema;
    using EntitySchemaColumn = Terrasoft.Core.Entities.EntitySchemaColumn;

    // Name of the data provider class for the report, whose logic needs to be implemented.
    [DefaultBinding(typeof(IFastReportDataSourceDataProvider), Name = "ContactDataProvider")]
    public class ContactDataProvider : IFastReportDataSourceDataProvider
    {

        private Guid _entitySchemaUId = new Guid("16BE3651-8FE2-4159-8DD0-A803D4683DD3");
        // Name of the source code schema.
        private readonly string _resourceManagerName = "UsrContactDataSourceCode";
        private readonly string[] _localizableStringNames = new[] {
            "ReportTitle",
            "FullNameLabel",
            "BirthdayLabel",
            "GenderLabel",
            "AccountLabel"
        };

        // Populating the report columns.
        private IEnumerable<IReadOnlyDictionary<string, object>> GetContactData(
            UserConnection userConnection,
            Guid entitySchemaUId,
            IEntitySchemaQueryFilterItem filter) {
                // Getting the object schema.
                var entitySchema = userConnection.EntitySchemaManager.GetInstanceByUId(entitySchemaUId);
                // Creating the object of the EntitySchemaQuery class.
                EntitySchemaQuery query = new EntitySchemaQuery(entitySchema);
                // Adding columns to query.
                query.AddColumn("Name");
                query.AddColumn("BirthDate");
                var gender = query.AddColumn("Gender.Name");
                var account = query.AddColumn("Account.Name");
                // Adding the created filter.
                query.Filters.Add(filter);
                // Getting the collection of contacts.
                var contacts = query.GetEntityCollection(userConnection);
                var contactsCollection = new Collection<Dictionary<string, object>>();
                // Populating the report columns.
                foreach (var entity in contacts)
                {
                    contactsCollection.Add(new Dictionary<string, object> {
                        ["Full name"] = entity.GetTypedColumnValue<string>("Name"),
                        ["Birthday"] = entity.GetTypedColumnValue<string>("BirthDate"),
                        ["Gender"] = entity.GetTypedColumnValue<string>(gender.Name),
                        ["Account"] = entity.GetTypedColumnValue<string>(account.Name)
                    });
                }
                return contactsCollection;
        }

        // Localization of the report title.
        private IEnumerable<IReadOnlyDictionary<string, object>> GetLocalizableStrings(UserConnection userConnection) {
            var localizableStrings = _localizableStringNames.ToDictionary(
                x => x,
                x => (object)(new LocalizableString(userConnection.ResourceStorage, _resourceManagerName, $"LocalizableStrings.{x}.Value")).Value);
            return new[] { localizableStrings };
        }

        // Adding the interface filters.
        private IEntitySchemaQueryFilterItem ExtractFilterFromParameters(UserConnection userConnection, Guid entitySchemaUId,
                IReadOnlyDictionary<string, object> parameters) {
            var managerItem = userConnection.EntitySchemaManager.GetItemByUId(entitySchemaUId);
            return parameters.ExtractEsqFilterFromReportParameters(userConnection, managerItem.Name) ?? throw new Exception();
        }

        // Getting data.
        public Task<ReportDataDictionary> GetData(UserConnection userConnection, IReadOnlyDictionary<string, object> parameters) {
            var filter = ExtractFilterFromParameters(userConnection, _entitySchemaUId, parameters);
            var result = new ReportDataDictionary {
                // Populating the report columns.
                ["ContactData"] = GetContactData(userConnection, _entitySchemaUId, filter),
                ["LocalizableStrings"] = GetLocalizableStrings(userConnection)
            };
            return Task.FromResult(result);
        }
    }
}
Populate the localizable strings of the report with the following values (table 1):
Table 1. Setting up the localizable strings
| Name | English (United States) |
|---|---|
| ReportTitle | Contact Data |
| FullNameLabel | Full name |
| BirthdayLabel | Birthday |
| GenderLabel | Gender |
| AccountLabel | Account |
Learn more about working with localizable strings in the "Source code designer” article.
Publish the schema.
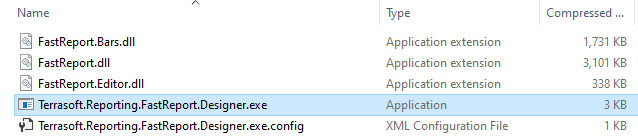
4. Download the template and set up its layout in FastReport
Download ContactData.frx. Click [Download file] in the [Download file with data sources to design a report in the FastReport Designer] block (Fig. 1, 4) of the working area.
To open the template in the Report Designer:
-
Run the Terrasoft.Reporting.FastReport.Designer.exe file from the zip archive (Fig. 4) and open the FastReport designer.
Fig. 4. – The FastReport Designer file
-
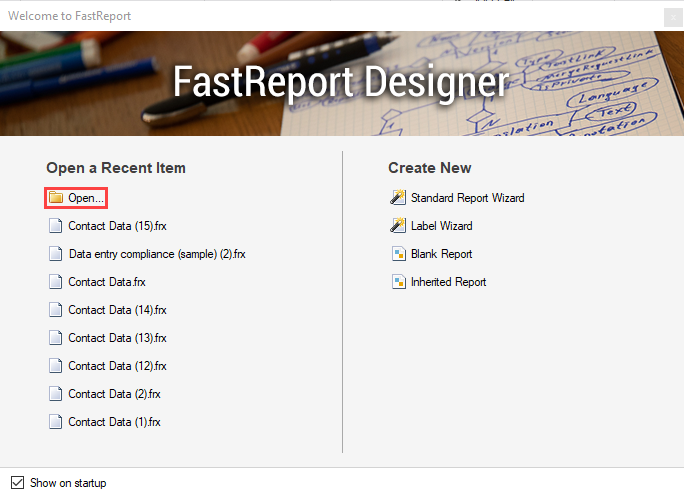
Click [Open...] in the window that pops up (Fig. 5).
Fig. 5. – The [Open...] button
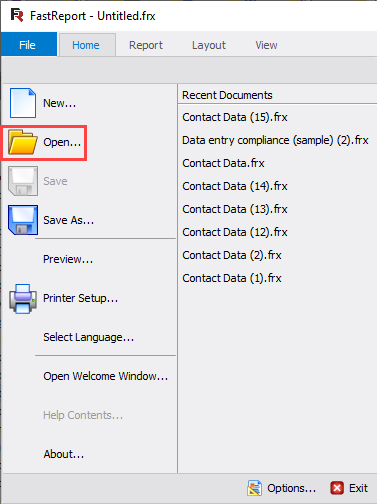
You can also open the report template from the [File] menu -> [Open...] or by pressing [Ctrl+O] key combination.Fig. 6. – The [File] menu with the [Open...] option
-
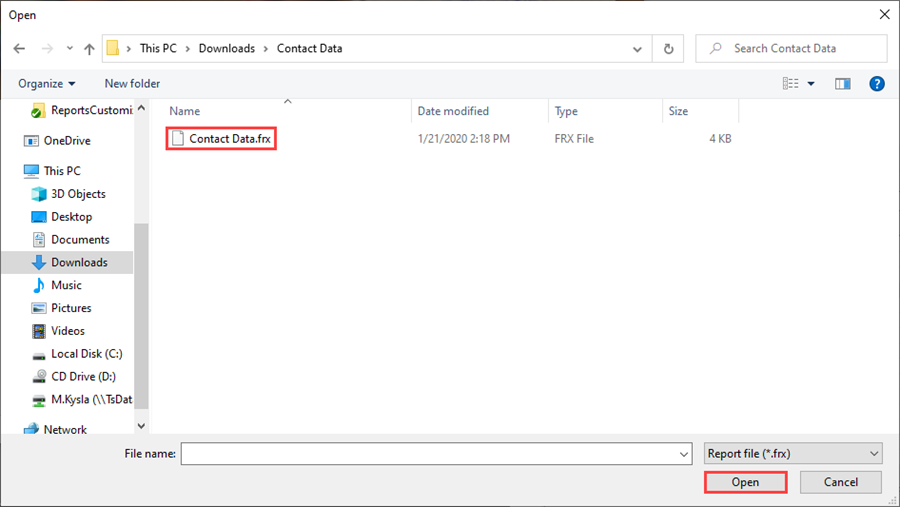
Navigate to the folder containing the downloaded report (usually, it is the “Downloads” folder), select the file with the template and click [Open] (Fig. 7).
Fig. 7. – Opening the report template in FastReport
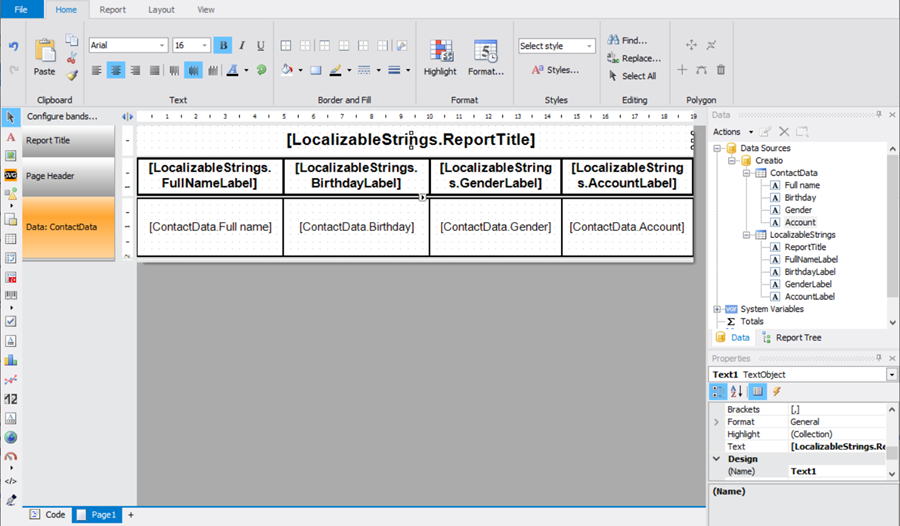
Set up the template layout (Fig. 8).
Fig. 8. – Setting up template layout in the FastReport Designer
5. Upload the configured report template to Creatio
To upload the ContactData.frx, file, click [Upload template] in the [Import a file with the report template] block of the section working area (Fig. 1, 4). Confirm that the template has been uploaded successfully.
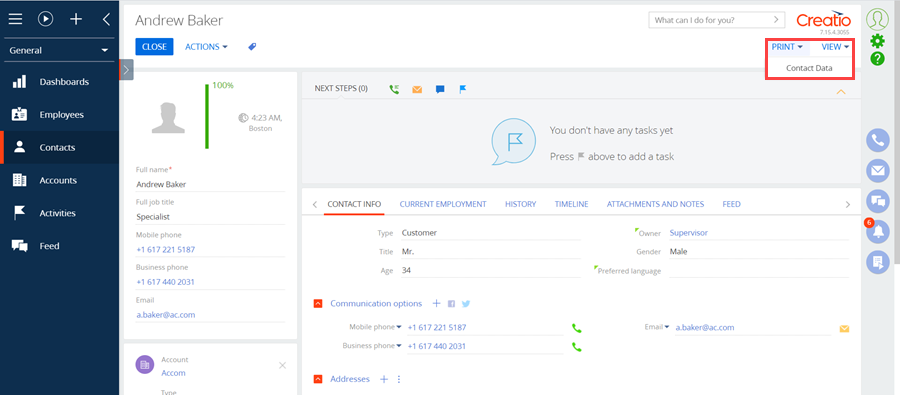
As a result, the "Contact Data” report will be available on the contact page under the [Print] (Fig. 9).
Fig. 9. – The “Contact Data” report displayed on the record page of the [Contacts] section
You can also find the report on the [Contacts] sectin dashboard view, under the [Reports] button (Fig. 10).
Fig. 10. – The “Contact Data” report displayed in the [Contacts] section dashboard view

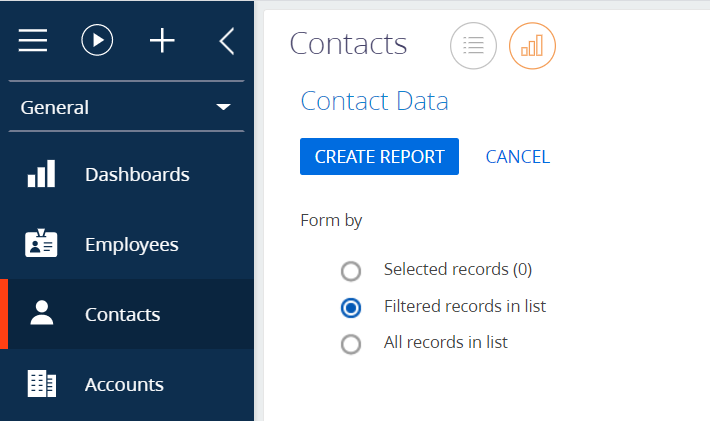
The report is generated as per the selected [Filtered records in list] option in the filtering page (Fig. 11). To upload the report, click [Create report]. To close the filtering page and cancel generating the report, click [Cancel].
Fig. 11. – The filtering page of the "Contact Data” report
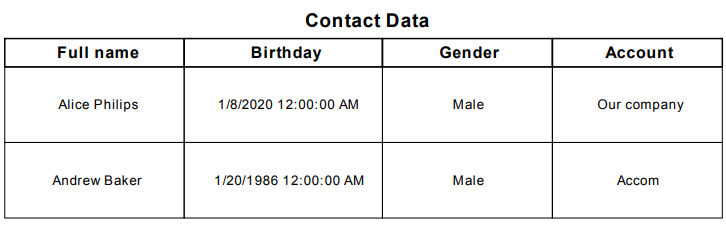
The report looks as follows (Fig. 12):
Fig. 12. – Example of the “Contact Data” report

Report by several records in a section
You can generate a report based on data from several records. To this, set up the following elements:
- [Show in section] – select the checkbox (Fig. 2).
- [Filtered records in list] – select the checkbox (Fig. 11).
- [All records in list] – select the checkbox (Fig. 11).
To include information from several section records to your report (Fig. 13):
- Open the needed section.
- Apply filters if needed.
- Click [Actions] —> [Select multiple records].
- Select the needed report in the [Print] button drop-down list.
Fig. 13. – Getting the “Contact Data” report from several records in the [Contacts] section
The report looks as follows (Fig. 14):
Fig. 14. – Example of the "Contact Data” report based on several section records
See also: