


Creating the entity schema
Glossary Item Box

Introduction
The ORM (Object-relational mapping) objects in Creatio are based on Creatio objects — entities. An entity is a business model that allows you to declare a new class of ORM model on the server core level. At the base level, creating an entity means creating a table with the same name and with the same columns as the created object. In most cases, each entity is a system representation of a table in the database.
Creatio configuration is based around schemas. Every type of the configuration item is represented by a schema of the appropriate type. From the implementation view point, any type of schema is a kernel class that is inherited from the base Schema class. More information about schemas and their properties can be found in the "Configuration architectural elements” article.
An entity as a configuration element is presented by entity schema that is implemented by the EntitySchema class. The composition of the columns indexes and methods is described in entity schemas.
There are base and custom entity schemas.
Base entity schemas are not available for editing and are located in the pre-installed packages.
Custom entity schemas can be created as part of configuration and placed in custom packages. Base schemas can be replaced by custom schemas.
Creating a custom object schema
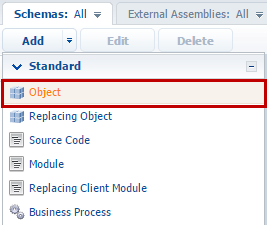
To create a custom schema, open the [Configuration] section, select a custom package, go to the [Schemas] tab and select [Add] > [Object] command (Fig.1). As a result, the Object designer window will open, where you can configure the created entity.
Fig. 1. Creating a new object schema
You need to assign values to the following required properties for the created entity schema (Fig. 2):
- [Title] – localized schema title. The default value is set by object designer and can be modified.
- [Name] – schema name. The default value is set by object designer and can be modified. Contains the prefix specified in the [Prefix for object name] system setting (SchemaNamePrefix). By default the prefix is “Usr”.
Prior to 7.9.1 version, the maximum allowed length of the entity name was 30 characters. Starting with version 7.9.1, the maximum length of the entity name is 128 characters.
Entities with names longer than 30 characters can not be used on Oracle databases that are earlier than version 12.2.
- [Package] – a package where the entity schema will be placed after the publication. By default, it contains a package name that was selected before the schema creation. Select one of the available packages from the drop-down list.
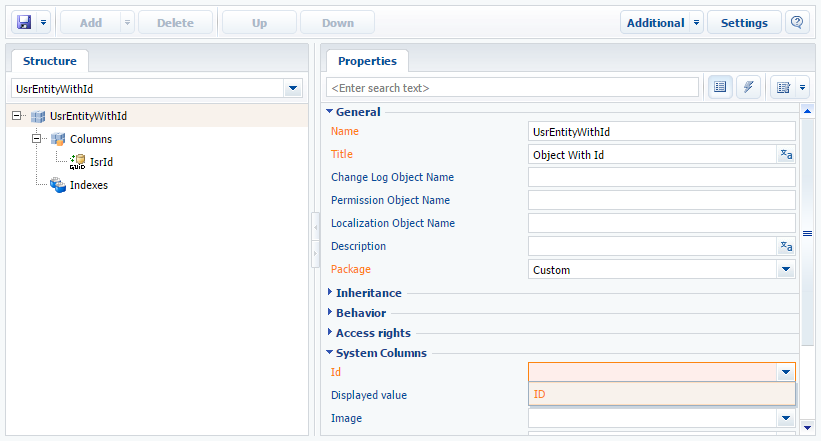
- [Id] – a system column used as a primary key in the database table. It is displayed in the extended view of the "Workspace of the Object Designer”.
Fig. 2. Required entity schema properties in the object designer

To display all schema properties in the object designer, select the [All] option in the display menu of the “Workspace of the Object Designer” object properties.
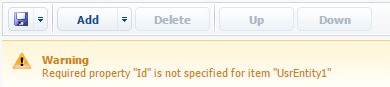
The entity is the representation of the table record in the database and it must have the id column used as a table primary key. If you try to save an object schema without an Id, a warning will pop up (Fig. 3).
Fig. 3. Empty [Id] property warning
You can set the [Id] property value by selecting the column of specific type from the drop-down list (Fig. 4) or by specifying one of base system object as a parent object.
Fig. 4. Setting the Id column
The procedure for adding the column is covered in the “Adding the custom column to the entity” section.
Specifying the parent object
The inheritance mechanism is implemented for Creatio objects. It is used when the created entity schema must have the functionality already implemented in one of the existing entities. The [Base object] and the [Base lookup] system objects are used as parent objects in most cases.
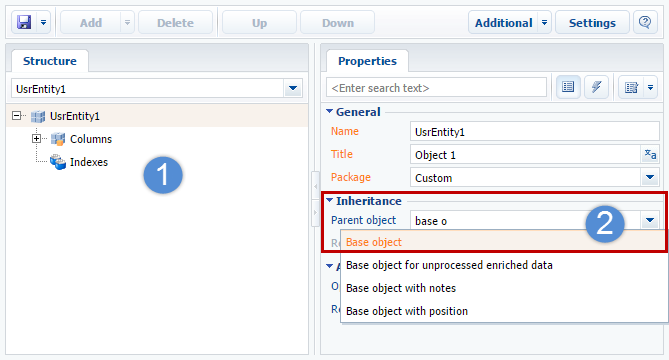
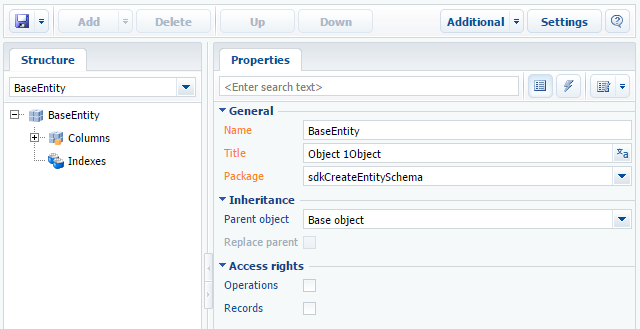
To implement the inheritance of a new entity schema from an existing entity schema you need to select the root element of the data structure in the entity schema (Fig. 5.1). In the [Parent object] field of the schema properties, select the base entity schema whose functionality you need to inherit. To inherit the functionality of the [Base object] schema, start typing the schema title in the [Parent object] field and select the schema from the drop-down list.
Fig. 5. Selecting the parent schema
After confirming the selected parent object (Fig. 6), the columns inherited from that object will be added to the entity structure.
Fig. 6. The confirmation dialog for using the parent object
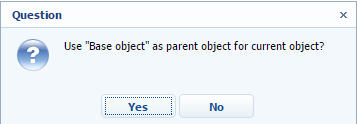
Fig. 7. Columns inherited in the entity structure
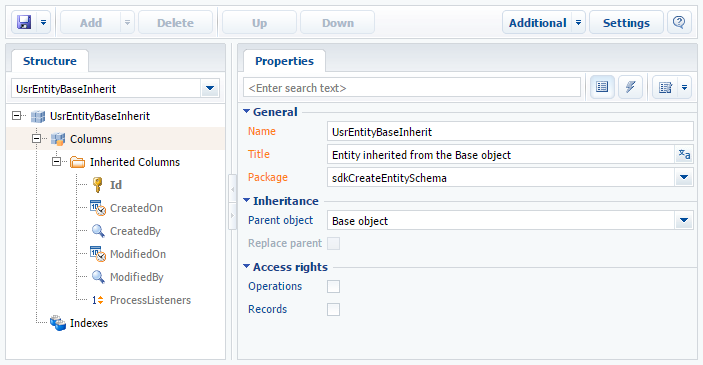
Select the [Show system columns] checkbox in the settings window of the object designer (see “Workspace of the Object Designer”) to display inherited columns.
Save the object schema to preserve the metadata changes. Publish the schema to create the corresponding table in the database and make the changes available to Creatio users.
Adding a custom column to an entity
This section covers adding an Id column to an entity schema.
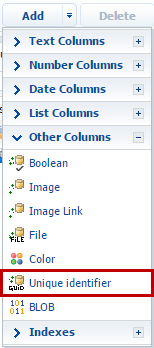
Use [Add] button (Fig. 8) or [Add] command from the context menu of the Columns node in the entity structure to add a custom column. Select the column type from the drop-down list and specify column properties. To add an Id column, execute [Add] > [Unique identifier] command.
Fig. 8. Adding an Id column
Enable the [Show Entire List of Column Types] option in the properties window of the "Workspace of the Object Designer” to display all types of columns in the “add” menu.
Specify the properties of the Id column (Fig. 9):
- [Title] – column localized title. The default value is set by the object designer and can be modified.
- [Name] – column name. The default value is set by the object designer and can be modified.
- [Data type] – the type of the data in the column. The default value is set by object designer depending on the selected command and can be changed.
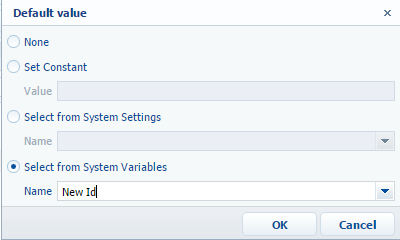
- [Required] – specify that the column is required. Since the Id column cannot be empty, select “Application Level” for this property.
- [Default value] – set the column’s default value. Choose “Select from System Variables” from the default value dialog box (Fig. 10). Then select the name of the system variable in the [Name] field. Select the “New Id” variable, which generates unique Ids.
- [Usage mode] – select the “Advanced” mode.
Fig. 9. Adding the Id column
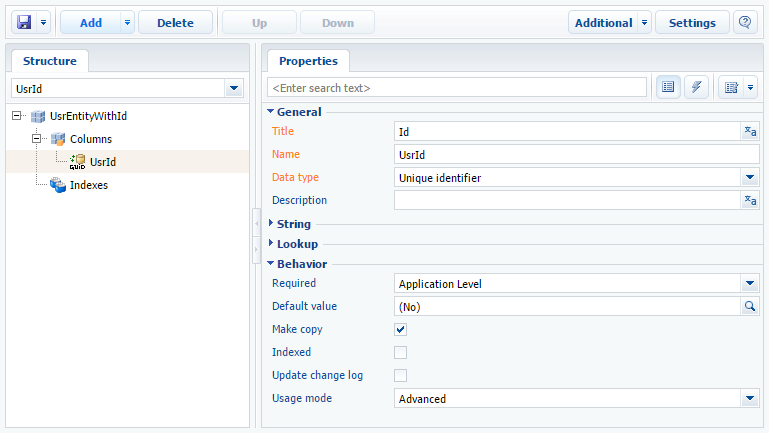
Fig. 10. Setting the default value
Save the schema after setting values for all required attributes.
Adding indexes to the object
Indexes also can be added to the object. They will be automatically created in the database table when the object is published.
To create an index by one column, select the [Indexed] checkbox in the [Behavior] property block. All reference columns are indexed by default.
You can create a composite index in a following way:
- Select [Add] > [Index] in the context menu of the [Indexes] element. You can specify a custom name for the index or select the [Generate Name Automatically] option. After that, the unique index name will be generated by the system.
- To implement an integrity constraint for the columns of the index, i.e. to exclude the possibility of inserting duplicate combinations of values, select the [Unique] checkbox for the index.
- Then add the necessary columns to the index. Select [Add] > [Indexed column] in the context menu of the [Indexes] element. Select the object column and specify the sorting direction for the added indexed column.
Creating the replacing object schema
Replacing object schemas are used to extend the functions of the already existing schemas. The existing schemas also may be replacing and belong to the different packages.
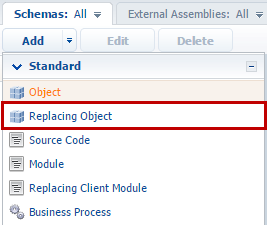
To create a replacing object schema, go to [Configuration] section and select custom package to add new module schema. On the [Schemas] tab, select [Add] > [Replacing Object] (Fig. 11).
Fig. 11. Command for creating a replacing object schema
To implement the replacement of the new entity schema, select the root element of the data structure in the entity schema (Fig. 5, 1). In the [Parent object] field of the schema properties, select the base entity schema whose functionality you need to replace. To replace the functionality of [Base object] schema, start typing the schema title in the [Parent object] field and select the corresponding value from the drop-down list.
After confirmation of the selected parent object (Figure 6), the other property fields are filled in automatically (Fig. 12, 1).
Fig. 12. Main properties of the replacing object schema
After implementing the changes, publish the replacing object schema.
Saving and publishing objects
All structure changes of a business object are stored in RAM.
Save the schema to preserve the changes at the metadata level. To do this, select the [Save] command in the object designer.
To implement changes at the database level, the object must be published. The created (or modified) physical objects in the database (tables, columns, indexes) are the result of successful publication of an object in the [Configuration] section.