Integration of third-party sites via iframe
Glossary Item Box

Introduction
One way to integrate external solutions in the bpm’online is to use the iframe HTML element.
The iframe HTML element is used to display third-party web page inside the web page where the element is placed. The iframe element is implemented in the HTML code of the page via the <iframe> and </iframe> tags. URL of the displayed page is set using the src attribute. More information about this element can be found in the article.
The third-party web application can be implemented to bpm’online with the iframe element. The advantage of this approach is the convenience of viewing the third-party web resources (pages, video, etc.) directly from the bpm’online. The main disadvantage is the need of a custom implementation of data exchange between the bpm’online and the web resource displayed in the iframe.
ATTENTION
Note, that some sites prohibit uploading of their pages into the iframe element.
ATTENTION
To exchange data between bpm'online and third-party web applications it is recommended to use the DataService service or the OData protocol.
The Terrasoft.controls.IframeControl component is implemented in the client part of the bpm’online core. This component is used to display custom HTML markup in the bpm’online. For example, it is used, on the email templates edit page of the [Email templates] lookup. The disadvantage of this component is the lack of the ability to bind data to the src property, that is, the inability to display a third-party web resource.
An alternative to using the Terrasoft.controls.IframeControl component is to add view model schemas of the common container to the diff array and specify the iframe element in it’s HTML property. The case of adding a container with the iframe element is described in the “Developing an advanced marketplace application” marketplace development article. The disadvantage of this approach is the inability to reuse the developed code in other sections of the bpm'online.
Integration case
Case description
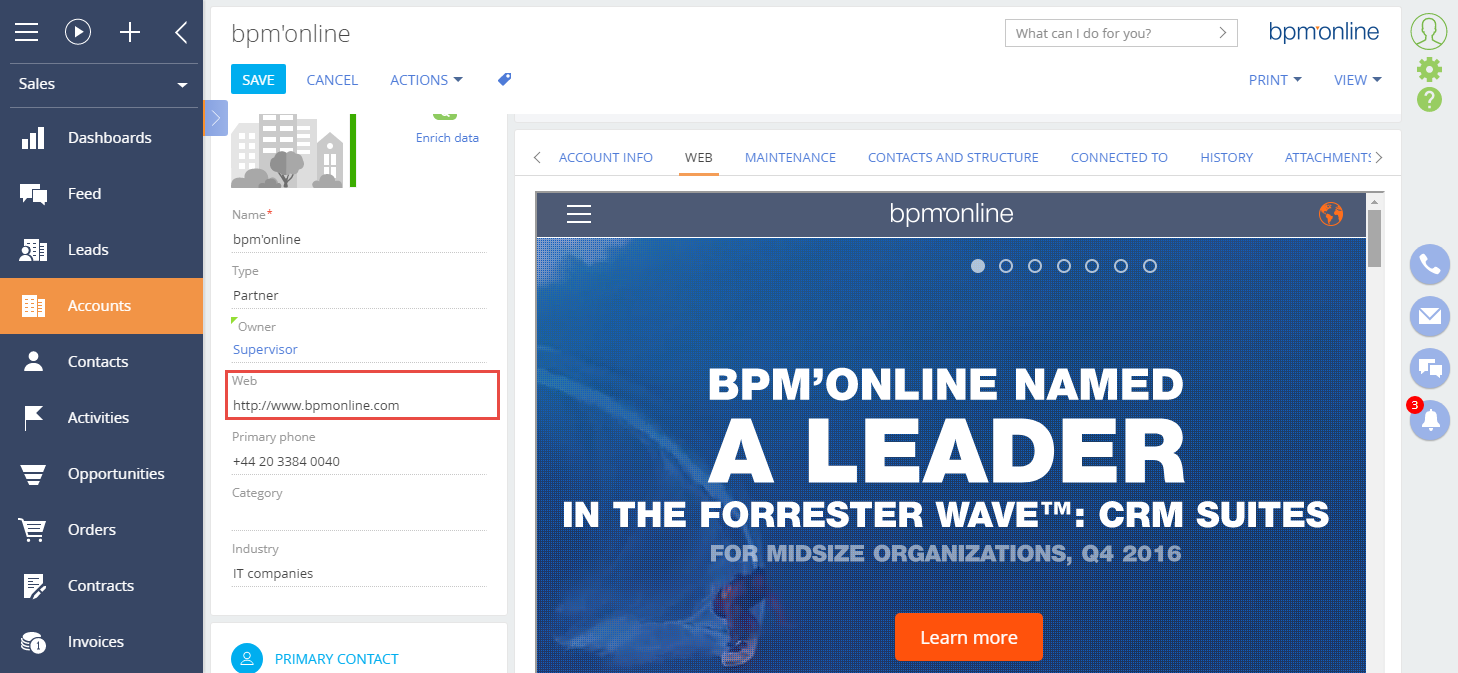
Create a [WEB] tab on the record edit page in the [Accounts section]. The tab will contain a site which URL will be specified in the [Web] field.
Case implementation algorithm
1. Create a component where the displaying of the web page by specified URL will be implemented.
For this, create a new module in the custom package. The procedure for creating a module is covered in the “Creating a custom client module schema” article. Set the following parameter values for created module:
- [Name] — UsrIframeControl.
- [Title] — UsrIframeControl.
Create the Terrasoft.controls.UsrIframeControl class in this module using the Ext.define() method. The class should inherit the Terrasoft.Component as parent class. Main properties of the new class:
- tpl – an array of strings that contains a template of HTML markup of the component that will use the iframe element.
- id – a string that contains id of the component.
- src – a string that contains URL of the site to display in the iframe.
- wrapClass – a string with the name of the component CSS class.
The complete source code of the schema is available below:
Ext.define("Terrasoft.controls.UsrIframeControl", {
    extend: "Terrasoft.Component",
    alternateClassName: "Terrasoft.UsrIframeControl",
    // HTML template of a component.
    tpl: [
        /*jshint quotmark:true */
        '<iframe id="{id}" src="{src}" class="{wrapClass}"></iframe>'
        /*jshint quotmark:false */
    ],
    // Component ID.
    id: null,
    // URL of the website implemented in the iframe.
    src: null,
    // CSS class of the component.
    wrapClass: ["usr-iframe"],
    // Sets the URL of a website.
    setIframeSrc: function(value) {
        value = value || "";
        if (this.src !== value) {
            this.src = value;
            this.safeRerender();
        }
    },
    // Initializes a component.
    init: function() {
        this.callParent(arguments);
        var selectors = this.selectors = this.selectors || {};
        selectors.wrapEl = selectors.wrapEl || "#" + this.id;
    },
    // Loads a website to the iframe.
    LoadPageBySrc: function() {
        var iframe = this.getWrapEl();
        iframe.dom.src = this.src;
    },
    // The event handler for the first drawing of the component.
    onAfterRender: function() {
        this.callParent(arguments);
        this.LoadPageBySrc();
    },
    // The event handler of re-drawing of the component.
    onAfterReRender: function() {
        this.callParent(arguments);
        this.LoadPageBySrc();
    },
    // Returns the configuration object of binding the component properties.
    getBindConfig: function() {
        var bindConfig = this.callParent(arguments);
        return Ext.apply(bindConfig, {
            src: {
                changeMethod: "setIframeSrc"
            }
        });
    },
    // Returns data about the component template.
    getTplData: function() {
        var tplData = this.callParent(arguments);
        return Ext.apply(tplData, {
            src: this.src,
            wrapClass: this.wrapClass
        });
    }
});
Add the CSS styles for correct displaying of the component. To do this, add the following code to the LESS tab of the created module:
.usr-iframe {
width: 100%;
height: 600px;
}
Save the module schema to apply changes.
2. Place the component on the record edit page of the [Accounts] section.
For this, create the [Account edit page] replacing schema in the custom package. The procedure for creating a replacing schema is covered in the “Creating a custom client module schema”. Add the following source code to the replacing schema:
// Add a module in which the component is implemented in an array of dependencies.
define("AccountPageV2", ["UsrIframeControl", "css!UsrIframeControl"], function() {
    return {
        entitySchemaName: "Account",
        diff: /**SCHEMA_DIFF*/[
            // Adding the [WEB] tab.
            {
                "operation": "insert",
                "name": "WebTab",
                "values": {
                    "caption": "WEB",
                    "items": []
                },
                "parentName": "Tabs",
                "propertyName": "tabs",
                "index": 1
            },
            // Adding a custom component.
            {
                "operation": "insert",
                "parentName": "WebTab",
                "propertyName": "items",
                "name": "UsrIframe",
                "values": {
                    "generator": function() {
                        return {
                            "className": "Terrasoft.UsrIframeControl",
                            "src": {"bindTo": "getSource"}
                        };
                    }
                }
            }
        ]/**SCHEMA_DIFF*/,
        methods: {
            // Used to bind data.
            getSource: function() {
                return this.get("Web");
            }
        }
    };
});
Here, the configuration objects of the [WEB] tab and the custom component for displaying a component are added to the array of modifications of the view model
Terrasoft.UsrIframeControl. Binding the data of the [Web] column to the src property of the component is performed with the getSource() method.
After saving the schema and reloading the application page, the [WEB] tab will appear on the edit page of a section record.The tab will display a web page by the URL specified in the [Web] field (Fig. 1). If the [Web] field is empty then the tab will be empty too.
Fig. 1. Case result