Developing the configuration server code in the user project
Glossary Item Box
Introduction
Before the 7.11.1 version, only the preconfigured Visual Studio solution which is distributed with bpm’online, was used to develop configuration server code in the file system More information about the Terrasoft.Configuration.sln solution and development of the server code in the file system is given in the "Development in the file system" and "Working with the server side source code in Visual Studio" articles.
This development approach is inconvenient because of low performance connected with recompilation of all bpm’online configuration (Terrasoft.Configuration.dll). This is significantly if the application contains several bpm'online products. In addition, the development of server code in the file system could only be performed by interacting with the database of the application deployed on-site.
Due to the described inconveniences, this approach can be efficiently used to perform complex configuration revision of the bpm'online. It is more efficient to use the built-in bpm'online development tools to develop a simple server code (see the "Built-in development tools" article). But the built-in development tools do not support full IDE functions: debugging, IntellSense, Refactoring, etc.
Starting with version 7.11.1 the bpm’online you can develop simple server code in the Visual Studio custom projects.
To develop and debug separate classes or small blocks of server functionality, you can create a separate class library project and configure it. Then, connect corresponding bpm’online class libraries (for example, Terrasoft.Core) and perform development and debugging of the server code. To debug and test the development result you can use a local database (use the WorkspaceConsole utility to connect to the database) or an application located in the cloud by connecting to it via the Executor utility.
Advantages of this approach:
- High speed of testing modifications, compiling and execution
- Full usage of the Visual Studio functions
- Ability of using any tools for Continuous Integration, for example Unit testing.
- Simplicity of configuration – you do not need configuration source codes
- You can use the database of an application deployed on-site or in Cloud.
Preliminary settings
For connecting the libraries of the bpm'online classes, deploying the local database from an archive copy and working with the WorkspaceConsole utility, you can use the bpm'online installed locally. In all examples of this article used the bpm’online installed to the C:\bpmonline7.11.1 local folder.
The Executor utility located in the C:\Executor folder is used as an example of working with the bpm’online Cloud service. You can use following link to download the utility configured for processing the example.
Development of the configuration server code for on-site application
If you have an access to the bpm’online local database, to develop configuration server logic do the following:
1. Restore the database from a backup (if need)
The process of restoring the bpm’online database from backup is described in the "Installing bpm’online application" article. Backup of the application database is located in the db folder of the application (for example, C:\bpmonline7.11.1\db).
2. Configure the WorkspaceConsole utility
To operate with the database, you need to configure the WorkspaceConsole utility using the application files. More information about configuration of the utility is described in the "WorkspaceConsole settings" article. To configure the utility:
- Open the Terrasoft.WebApp\DesktopBin\WorkspaceConsole folder of the application (for example, C:\bpmonline7.11.1\Terrasoft.WebApp\DesktopBin\WorkspaceConsole).
- Execute one of the .bat files: PrepareWorkspaceConsole.x64.bat or PrepareWorkspaceConsole.x86.bat, depending on the Windows version.
 |
NOTE Ensure that the SharpPlink-xXX.svnExe and SharpSvn-DB44-20-xXX.svnDll files were copied to the Terrasoft.WebApp\DesktopBin\WorkspaceConsole folder from the corresponding folder (x64 and x86) after executing the .bat file. |
- Specify parameters of connection to the database in the Terrasoft.Tools.WorkspaceConsole.exe.config file from the Terrasoft.WebApp\DesktopBin\WorkspaceConsole folder of the application (for example, C:\bpmonline7.11.1\Terrasoft.WebApp\DesktopBin\WorkspaceConsole). For example, if the bpmonline7.11.1DB database is deployed on the dbserver server, the connection string will be as follows:
<connectionStrings>
<add name="db" connectionString="Data Source=dbserver; Initial Catalog=bpmonline7.11.1DB; Persist Security Info=True; MultipleActiveResultSets=True; Integrated Security=SSPI; Pooling = true; Max Pool Size = 100; Async = true; Connection Timeout=500" />
</connectionStrings>
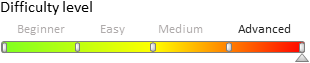
3. Create and configure Visual Studio project
For this, create standard class library project (Fig. 1). More information about creating a new Visual Studio solution and managing projects is described in the "Solutions and Projects in Visual Studio" Microsoft documentation article.
Fig. 1. Creating the solution and project of the classes library in the Visual Studio
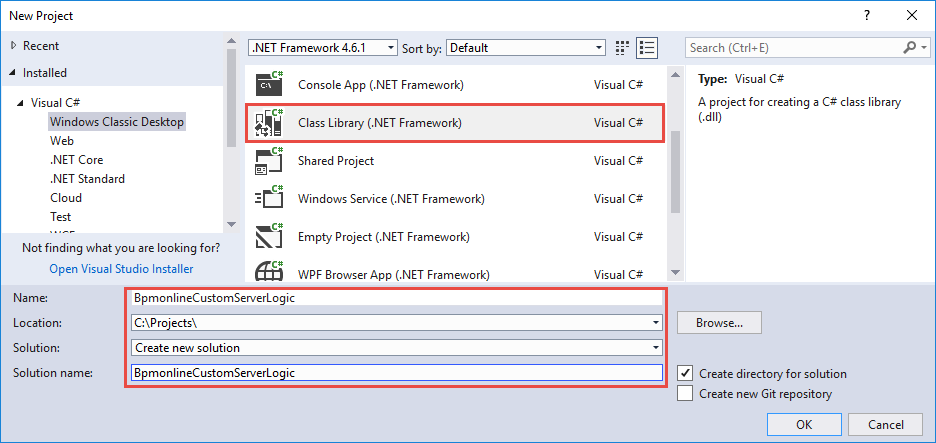
On the [Debug] tab of the properties window of the created class library project, specify the full path to the configured WorkspaceConsole utility in the [Start external program] property (Fig. 2). The WorkspaceConsole is used as the external application for debugging the developed program logic.
Fig. 2. The [Debug] tab properties
In the [Command line arguments] properties specify following launch arguments of the WorkspaceConsole.
- filename – full path to the debug version of developed class library.
- typeName – full name of the class in which the program logic (including the names of all namespaces) is being developed. For example, BpmonlineCustomServerLogic.MyContactCreator.
- Operation – WorkspaceConsole operation. The "ExecuteScript" value should be specified.
- workspaceName – the workspace name. The "Default" value should be specified.
The example of the WorkspaceConsole launch arguments:
-filename="C:\Projects\BpmonlineCustomServerLogic\BpmonlineCustomServerLogic\bin\Debug\BpmonlineCustomServerLogic.dll" -typeName=BpmonlineCustomServerLogic.MyContactCreator -operation=ExecuteScript -workspaceName=Default
More information can be found in the "WorkspaceConsole parameters" article.
 |
ATTENTION In the properties of the Visual Studio project that operates with the bpm'online 7.11.0 or higher, you need to specify the version of the .NET Framework 4.7 (the [Target framework] property of the [Application] tab). |
To work with the classes of the server side of bpm’online core, set the dependencies from the necessary bpm’online class libraries in the created project. For example, add the dependency from the Terrasoft.Core.dll library (Fig. 3). More information about adding the dependencies can be found in the "Managing references in a project" Microsoft documentation article.
Fig. 3. Terrasoft.Core library in the project dependencies
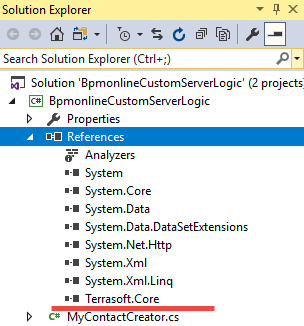
Class libraries of the bpm’online namespace can be found in the Terrasoft.WebApp\DesktopBin\WorkspaceConsole folder of the application.
|
NOTE Class libraries are being copied to the Terrasoft.WebApp\DesktopBin\WorkspaceConsole folder when executing the .bat files (see Step 2. Configure the WorkspaceConsole utility"). |
4. Develop the functions
For this, add a new class to the created class library project. The name of the class should match the name specified in the typeName launch argument of the WorkspaceConsole (for example, BpmonlineCustomServerLogic.MyContactCreator). Class should implement the Terrasoft.Core.IExecutor interface.
The implementation of the class is available below:
using System;
using Terrasoft.Core;

namespace BpmonlineCustomServerLogic
{
    public class MyContactCreator : IExecutor
    {
        public void Execute(UserConnection userConnection)
        {
            // Getting an instance of the [Contacts] schema.
            var schema = userConnection.EntitySchemaManager.GetInstanceByName("Contact");
            var length = 10;
            for (int i = 0; i < length; i++)
            {
                // Create a new contact.
                var entity = schema.CreateEntity(userConnection);
                // Set contact properties.
                entity.SetColumnValue("Name", string.Format("Name {0}", i));
                entity.SetDefColumnValues();
                // Save the contact to the database.
                entity.Save(false);
            }
            // Output message to the console.
            Console.WriteLine($"{length} contacts created");
        }
    }
}
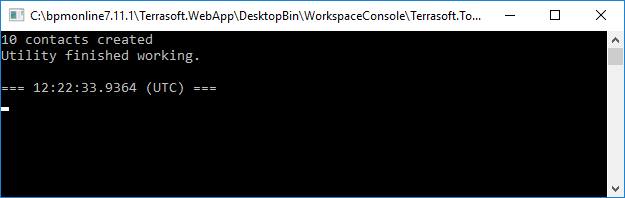
After running the project (F5 key) the WorkspaceConsole window with the corresponding message will be displayed (Fig. 4).
Fig. 4. Displaying the result of running the program in the WorkspaceConsole window.
You can also set a breakpoint on any line of the source code and view the current values of variables at the time of program execution (ie, debuging). More information about breakpoints in the Visual Studio can be found in the Use Breakpoints in the Visual Studio Debugger" Microsoft documentation article.
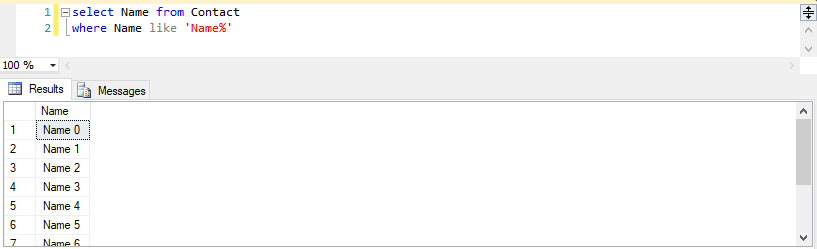
The result of execution the above code can be found in the [Contacts] section of the bpm'online application (Fig. 5) or by executing the request to the database (Fig. 6).
Fig. 5. Added contacts
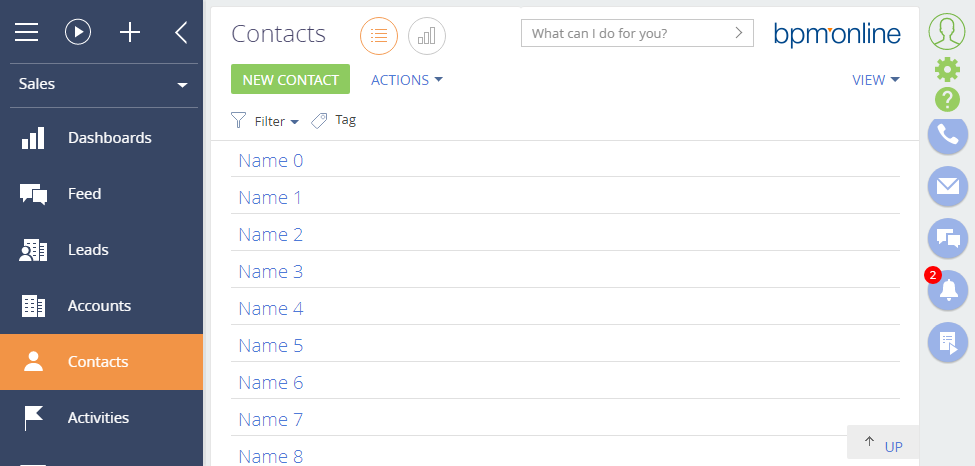
Fig. 6. Request to the table of contacts of the database
Development of the configuration server code for Cloud application
To develop configuration server logic without direct access to the bpm’online database:
1. Create class library project.
Create standard class library project (Fig. 1). More information about creating a new Visual Studio solution and managing projects is described in the "Solutions and Projects in Visual Studio" Microsoft documentation article. Set the name of the project (for example, "BpmonlineCustomServerLogic.Cloud").
To work with the classes of the server side of bpm’online core, set the dependencies from the necessary bpm’online class libraries in the created project. For example, add the dependency from the Terrasoft.Core.dll library (Fig. 3). More information about adding the dependencies can be found in the "Managing references in a project" Microsoft documentation article.
|
NOTE Class libraries of the bpm’online namespace can be found in the bin folder of the application. Class libraries are being copied to the Terrasoft.WebApp\DesktopBin\WorkspaceConsole folder when executing the .bat files (see Step 2. Configure the WorkspaceConsole utility" of the example of configuration server code development for on-site application). |
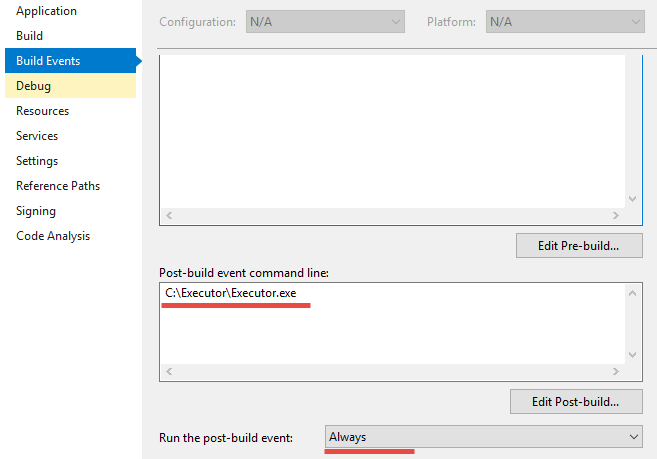
In the created class library project, specify the full path to the configured Executor utility in the [Post-build event command line] property on the [BuildEvents] tab of the properties window (Fig. 7), for example C:\Executor\Executor.exe. Also, you must select the condition for starting the library build event on this tab.
|
NOTE The configuration process is given below on the Step "3. Executor utility configuration". |
Fig. 7. [Build Events] tab properties
2. Develop the functions
For this, add the class that will implement the Terrasoft.Core.IExecutor interface to the created library project. The implementation of the class is available below:
using System;
using System.Web;
using Terrasoft.Core;
using Terrasoft.Core.Entities;

namespace BpmonlineCustomServerLogic.Cloud
{
    public class MyContactReader : IExecutor
    {
        public void Execute(UserConnection userConnection)
        {
            // Getting an instance of the [Contacts] schema.
            var entitySchema = userConnection.EntitySchemaManager.GetInstanceByName("Contact");
            // Create an instance of the query class.
            var esq = new EntitySchemaQuery(entitySchema);
            // Adding all the columns of the schema to the query.
            esq.AddAllSchemaColumns();
            // Getting the collection of records in the [Contacts] section.
            var collection = esq.GetEntityCollection(userConnection);
            foreach (var entity in collection)
            {
                // The output in the http-response of the request from the Executor utility of the necessary values.
                HttpContext.Current.Response.Write(entity.GetTypedColumnValue<string>("Name"));
                HttpContext.Current.Response.Write(Environment.NewLine);
            }
        }
    }
}
3. Executor utility configuration
|
NOTE You can use following link to download the utility configured for processing the example. |
Open the Executor utility folder, for example, C:\Executor. Then, specify the values for the following configuration items in the configuration file:
- Loader – URL of the bpm’online application loader. Usually this is the URL of the bpm’online site, for example "https://mycloudapp.bpmonline.com".
- WebApp – URL of the bpm’online application. Usually this is a path to default configuration of bpm’online, for example "https://mycloudapp.bpmonline.com/0".
- Login – the name of the bpm’online user, for example, "Supervisor".
- Password – the password of bpm’online user.
- LibraryOriginalPath – the path to the initial copy of the class library. Usually, this is the path by which a class library is created after compilation in Visual Studio, for example, "C:\Projects\BpmonlineCustomServerLogic\BpmonlineCustomServerLogic.Cloud\bin\Debug\BpmonlineCustomServerLogic.Cloud.dll".
- LibraryCopyPath – the path by which a copy of the class library will be created for work with the remote server. This can be a temporary folder that contains the Executor utility, for example, "C:\Executor\BpmonlineCustomServerLogic.Cloud.dll".
- LibraryType – full name of the class in which the developed program logic is implemented, including the names of all namespaces. For example, "BpmonlineCustomServerLogic.Cloud.MyContactReader".
- LibraryName – name of the class library, for example, "BpmonlineCustomServerLogic.Cloud.dll".
4. Run the developed program code
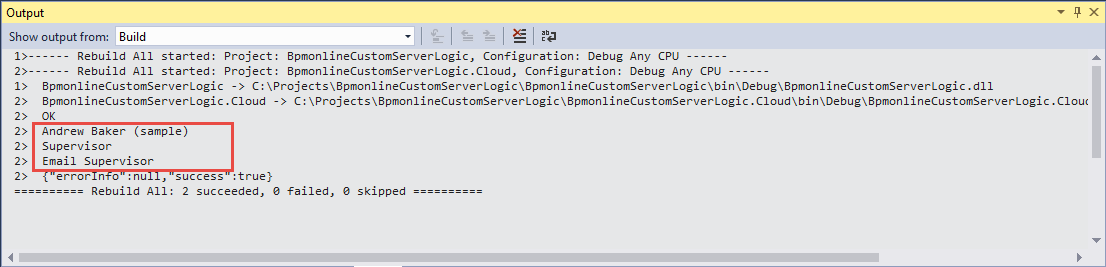
The result of execution the development program code can be observed in the [Output] window of the Visual Studio after successful building of the class library (Fig. 8).
Fig. 8. Result of program code execution
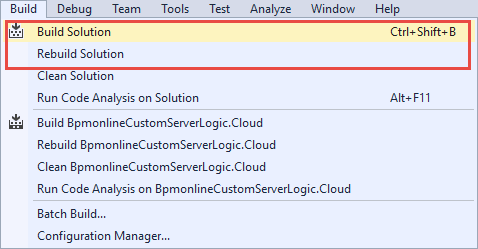
To launch the building process use the [Build Solution] and [Rebuild Solution] menu commands (Fig. 9).
Fig. 9. [Build] menu commands