Adding an edit page detail
Glossary Item Box
General provisions
Details are special elements of section edit pages, which display additional data that is not stored in the fields of the section primary object. The details are displayed on the edit page tabs in the tab container.
There are four basic types of details:
- details with a record edit page;
- details with edit fields;
- details with editable list;
- details with lookup selection.
For more information on details, please see the "Details" article in the "Application interface and structure" section.
An edit page detail is a standard bpm'online detail that can be added to sections using the Detail WIzard. Below is an example of adding an edit page detail without the use of the Detail Wizard.
General procedure for adding an edit page detail to an existing section
To add a custom edit page detail:
- Create a detail object schema.
- Create a detail schema.
- Create a detail edit page schema.
- Set up the detail in a replacing section edit page schema.
- Register links between object, detail and detail page schemas, using special SQL queries to system tables.
- Set up the detail fields.
 |
NOTE! To bind custom schemas, make changes to the SysModuleEdit, SysModulentity and SysDetail system tables in the bpm'online database, using SQL queries. Be extremely careful when composing and executing SQL queries to the database. Executing an invalid query may damage existing data and disrupt system operation. |
Case description
Create a custom [Couriers] detail in the [Orders] section. The detail must contain the list of couriers for the current order.
Case implementation algorithm
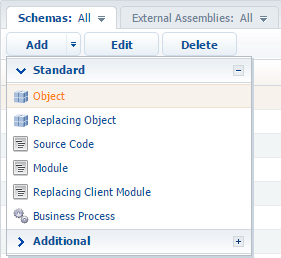
1. Create detail object schema
In the settings mode, go to the [Configuration] section, open the [Schemas] tab and execute the [Add] > [Object] menu command (Fig. 1).
Fig. 1. Adding a detail object schema
In the opened Object Designer, fill out the properties of the detail object schema, as shown on Fig. 2.
Fig. 2. Setup of detail object schema properties
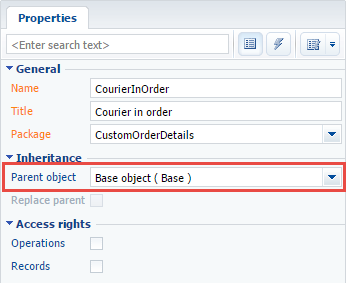
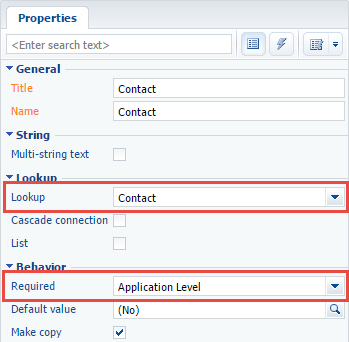
Add a lookup column [Order], which will connect the detail object with the section object, and a lookup [Contact] column where the courier's contact will be stored. Both columns must be required. Column properties setup is shown on Fig. 3 and Fig. 4.
Fig. 3. Specifying the properties of the [Order] column
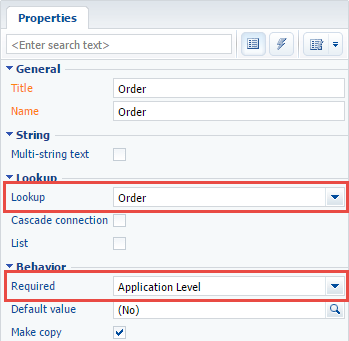
Fig. 4. Specifying the properties of the [Contact] column
Object schema must be saved and published.
2. Create detail schema
In the settings mode, go to the [Configuration] section, open the [Schemas] tab and execute the [Add] > [Module] menu command (Fig. 1).
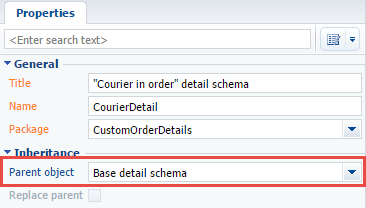
The new module must inherit the functionality of the base detail schema with list BaseGridDetailV2, which is available in the NUI package. To do this, specify this schema as the parent for the created detail schema (Fig. 5). The rest of the properties must be set up as shown on Fig. 5. In the [Package] property, the system will specify the current package name.
Fig. 5. Detail schema properties
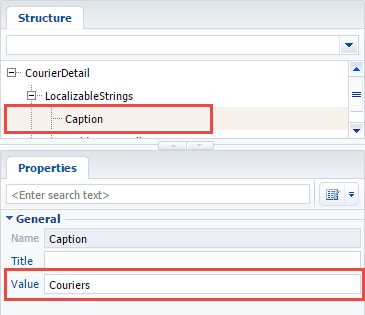
Set the Couriers value for the [Caption] localizable string of the detail schema (Fig. 6). The [Caption] string contains detail title, shown on the edit page.
Fig. 6. Setting the value of the [Caption] string
Below is the detail schema source code, which must be added to the [Source code] section of the client module designer. The code defines the schema name and its connection to the object schema.
define("CourierDetail", [], function() {
    return {
        // Detail object schema name.
        entitySchemaName: "CourierInOrder",
        details: /**SCHEMA_DETAILS*/{}/**SCHEMA_DETAILS*/,
        methods: {},
        diff: /**SCHEMA_DIFF*/[]/**SCHEMA_DIFF*/
    };
});
Save the detail schema to apply the changes.
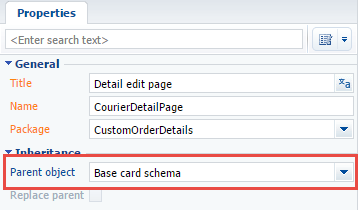
3. Create detail edit page schema
In the settings mode, go to the [Configuration] section, open the [Schemas] tab and execute the [Add] > [Module] menu command (Fig. 1).
The created detail edit page schema must inherit the functionality of base page schema BasePageV2, which is available in the NUI package. To do this, specify this schema as parent (Fig. 7). The rest of the properties must be set up as shown on Fig. 7. In the [Package] property, the system will specify the current package name.
Fig. 7. Detail edit page schema properties
To set up fields displayed on the detail edit page, add the following code to the [Source code] section of the client module designer. In this code, in the diff array, configuration objects of metadata for adding, setting location and binding the order and courier fields are specified.
define("CourierDetailPage", [], function() {
    return {
        // Detail object schema name.
        entitySchemaName: "CourierInOrder",
        details: /**SCHEMA_DETAILS*/{}/**SCHEMA_DETAILS*/,
        // Array with modifications.
        diff: /**SCHEMA_DIFF*/[
            // Metadata for adding the [Order] field.
            {
                "operation": "insert",
                //НField name.
                "name": "Order",
                "values": {
                    // Field position setup on the edit page.
                    "layout": {
                        "colSpan": 12,
                        "rowSpan": 1,
                        "column": 0,
                        "row": 0,
                        "layoutName": "Header"
                    },
                    // Binding to the [Order] column of the object schema.
                    "bindTo": "Order"
                },
                "parentName": "Header",
                "propertyName": "items",
                "index": 0
            },
            // Metadata for adding the [Contact] field.
            {
                "operation": "insert",
                //Field name.
                "name": "Contact",
                "values": {
                    // Field position setup on the edit page.
                    "layout": {
                        "colSpan": 12,
                        "rowSpan": 1,
                        "column": 12,
                        "row": 0,
                        "layoutName": "Header"
                    },
                    // Binding to the [Contact] column of the object schema.
                    "bindTo": "Contact"
                },
                "parentName": "Header",
                "propertyName": "items",
                "index": 1
            }
        ]/**SCHEMA_DIFF*/,
        methods: {},
        rules: {}
    };
});
Save the detail edit page schema to apply the changes.
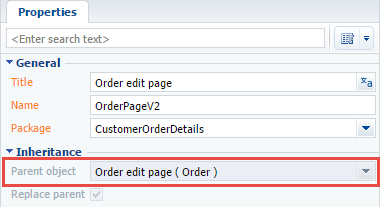
4. Set up detail in replacing section edit page schema
To display the detail on the order edit page, first create a replacing client module, and specify the order edit page OrderPageV2 (located in the Order package) as the parent (Fig. 8). For more information on creating replacing schemas, please see the "Creating a custom client module schema" article.
Fig. 8. Order edit page replacing schema properties
To display the [Couriers] detail on the [Delivery] tab of the order edit page, add the following source code. In the details section, a new CourierDetail model will be defined, and its location on the edit page will be specified in the modification section of the diff array.
define("OrderPageV2", [], function() {
    return {
        // Name of the edit page object schema.
        entitySchemaName: "Order",
        // List of edit page details being added.
        details: /**SCHEMA_DETAILS*/{
            // [Couriers] detail setup.
            "CourierDetail": {
                // Detail schema name.
                "schemaName": "CourierDetail",
                // Detail object schema name.
                "entitySchemaName": "CourierInOrder",
                // Filtering contacts for current order only.
                "filter": {
                    // Detail object schema column.
                    "detailColumn": "Order",
                    // Section object schema column.
                    "masterColumn": "Id"
                }
            }
        }/**SCHEMA_DETAILS*/,
        // Array of modifications.
        diff: /**SCHEMA_DIFF*/[
            // Metadata for adding the [Couriers] detail.
            {
                "operation": "insert",
                // Detail name.
                "name": "CourierDetail",
                "values": {
                    "itemType": 2,
                    "markerValue": "added-detail"
                },
                // Parent container ([Delivery] tab).
                "parentName": "OrderDeliveryTab",
                // Container where detail is located.
                "propertyName": "items",
                // Index in the list of added elements.
                "index": 3
            }
        ]/**SCHEMA_DIFF*/,
        methods: {},
        rules: {}
    };
});
To apply the changes, the replacing page schema must be saved.
After this, the detail will be displayed on the edit page of the [Orders] section. New records cannot be added to the detail until the connections between the detail schemas are registered.
5. Register connections between the schemas using SQL queries to system tables
To register connection between a detail object schema and detail schema, execute the following SQL query.
DECLARE
-- Schema name of the created detail.
@DetailSchemaName NCHAR(100) = 'CourierDetail',
-- Detail title.
@DetailCaption NCHAR(100) = 'Couriers',
--Schema name of the object, to which the detail is bound.
@EntitySchemaName NCHAR(100) = 'CourierInOrder'

INSERT INTO SysDetail(
    ProcessListeners,
    Caption,
    DetailSchemaUId,
    EntitySchemaUId
)
VALUES (
    0,
    @DetailCaption,
    (SELECT TOP 1 UId
    FROM SysSchema
    WHERE name = @DetailSchemaName),
    (SELECT TOP 1 UId
    FROM SysSchema
    WHERE name = @EntitySchemaName)
)
To register connection between the detail object schema and edit page schema, execute the following SQL query.
DECLARE
-- Schema name of the detail page
@CardSchemaName NCHAR(100) = 'CourierDetailPage',
-- Object schema.
@EntitySchemaName NCHAR(100) = 'CourierInOrder',
-- Detail page caption.
@PageCaption NCHAR(100) = 'Page of detail "Courier In Order"',
-- Empty string.
@Blank NCHAR(100) = ''

INSERT INTO SysModuleEntity(
    ProcessListeners,
    SysEntitySchemaUId
)
VALUES(
    0,
    (SELECT TOP 1 UId
    FROM SysSchema
    WHERE Name = @EntitySchemaName
    )
)

INSERT INTO SysModuleEdit(
    SysModuleEntityId,
    UseModuleDetails,
    Position,
    HelpContextId,
    ProcessListeners,
    CardSchemaUId,
    ActionKindCaption,
    ActionKindName,
    PageCaption
)
VALUES (
    (SELECT TOP 1 Id
    FROM SysModuleEntity
    WHERE SysEntitySchemaUId = (
        SELECT TOP 1 UId
        FROM SysSchema
        WHERE Name = @EntitySchemaName
        )
    ),
    1,
    0,
    @Blank,
    0,
    (SELECT TOP 1 UId
     FROM SysSchema
     WHERE name = @CardSchemaName
    ),
    @Blank,
    @Blank,
    @PageCaption
)
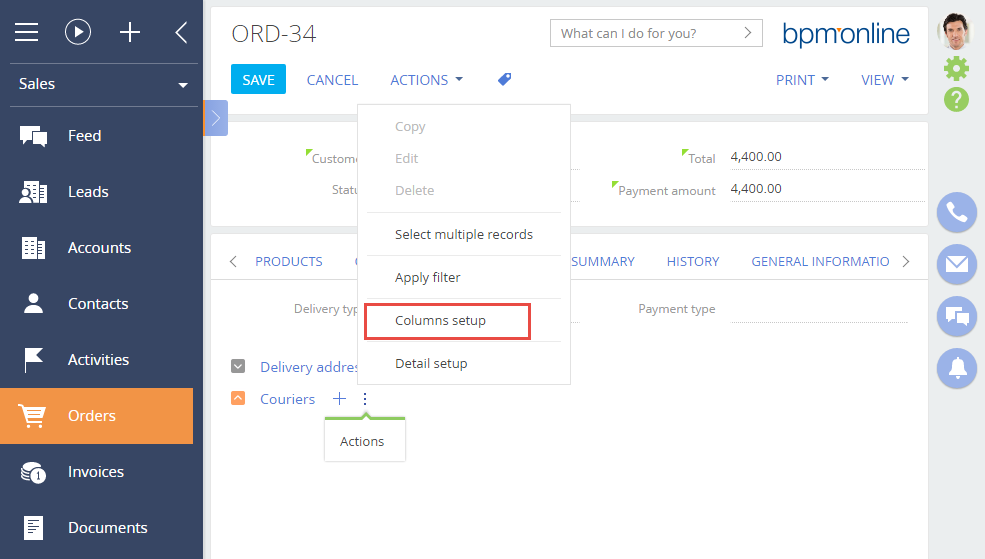
6. Set up detail list columns
At this stage, the detail is completely operational, however contacts are not displayed on the detail, because the detail list does not have displayed columns specified for it. Go to the detail menu and set up columns to display (Fig. 9).
Fig. 9. Detail actions menu