Adding the [Attachments] detail to the section in mobile application
Glossary Item Box
Introduction
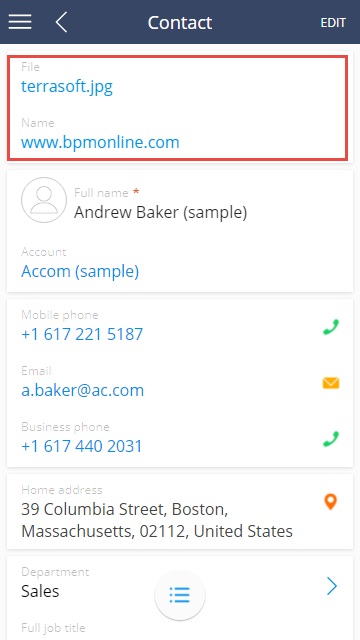
The [Attachments] detail is used to store files and web-links connected to corresponding section record. Detail is available in all bpm’online sections (see “How to work with attachments and notes”) and in the [Opportunities] section of mobile application.
The [Attachments] detail is implemented in the mobile application via embedded detail. The embedded detail is used to facilitate the data edit process without opening the separate page.
Steps to add a detail to the record page in the section of mobile application:
1. Create section schema and define an embedded detail based on the object for the [Attachments] detail.
2. Create schemas of the view and edit pages of the section record in the mobile application.
3. Add information about new schemas to the mobile application manifest.
Case description
Add the [Attachments] detail on the edit page of the [Contacts] section of mobile application.
Case implementation algorithm
1. Create section schema and define an embedded detail there
Create a new module schema in the [Configuration] section of a custom package with the following property values:
- [Title] – "UsrMobileContactModuleConfig".
- [Name] – "UsrMobileContactModuleConfig".
- [Package] – the name of the package used for development.
Add localized strings to the created schema (Fig. 1) with properties given in the table 1.
Fig. 1. Adding of the localizable string in the module schema designer
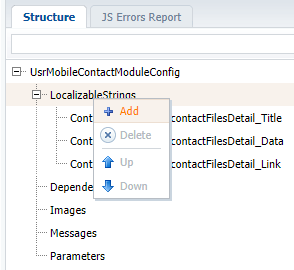
| Localizable string | Value | Description |
|---|---|---|
| ContactRecordPage_contactFilesDetail_Title | Attachments | Detail title. |
| ContactRecordPage_contactFilesDetail_Data | File | Field title for the file. |
| ContactRecordPage_contactFilesDetail_Link | Link | Field title for the web-link. |
Add following source code on the [Source Code] tab of the schema in the module designer:
// Adding an embedded detail.
Terrasoft.sdk.RecordPage.addEmbeddedDetail("Contact", {
    name: "contactFilesDetail",
    position: 5,
    title: "ContactRecordPage_contactFilesDetail_Title",
    modelName: "ContactFile",
    primaryKey: "Id",
    foreignKey: "Contact",
    displaySeparator: false
},
// An array of configuration objects of the detail columns.
[
    {
        name: "Data",
        displayColumn: "Name",
        label: "ContactRecordPage_contactFilesDetail_Data",
        placeHolder: "ContactRecordPage_contactFilesDetail_Data"
    },
    {
        name: "Type",
        hidden: true
    },
    {
        name: "Name",
        label: "ContactRecordPage_contactFilesDetail_Link",
        placeHolder: "ContactRecordPage_contactFilesDetail_Link",
        viewType: Terrasoft.ViewTypes.Url
    }
]);
Save the schema to apply changes.
The process of calling the addEmbeddedDetail() method occurs here and the following values are passed as arguments:
- Name of the main section object to which the detail will be added.
- Configuration object of the detail properties.
- Array of configuration objects of the properties of detail columns.
2. Create schemas of the view and edit pages of the record
Page of the section record can be displayed in the mobile applications in two modes: in the view mode and in the edit mode. To display the detail correctly in both modes you need to add corresponding controllers and views.
To display the detail correctly in the view mode add the new module schema to the custom package with following values of the properties:
- [Title] – "UsrMobileContactPreviewPage".
- [Name] – "UsrMobileContactPreviewPage".
- [Package] – the name of the package used for development.
Add following source code on the [Source Code] tab of the schema in the module designer:
// Storing of the viewed pages and sections.
Terrasoft.LastLoadedPageData = {
    controllerName: "ContactPreviewPage.Controller",
    viewXType: "contactpreviewpageview"
};
// Detail view in the view mode.
Ext.define("ContactPreviewPage.View", {
    extend: "Terrasoft.view.BasePreviewPage",
    xtype: "contactpreviewpageview",
    config: {
        id: "ContactPreviewPage"
    }
});
// Detail controller in the view mode.
Ext.define("ContactPreviewPage.Controller", {
    extend: "FileAndLinksPreviewPage.Controller",
    statics: {
        Model: Contact
    },
    config: {
        refs: {
            view: "#ContactPreviewPage"
        }
    },
    fileModel: "ContactFile"
});
Save the schema to apply changes.
To display the detail correctly in the edit mode add the new module schema to the custom package with following values of the properties:
- [Title] – "UsrMobileContactEditPage".
- [Name] – "UsrMobileContactEditPage".
- [Package] – the name of the package used for development.
Add following source code on the [Source Code] tab of the schema in the module designer:
// Storing of the viewed pages and sections.
Terrasoft.LastLoadedPageData = {
    controllerName: "ContactEditPage.Controller",
    viewXType: "contacteditpageview"
};
// Detail view in the edit mode.
Ext.define("ContactEditPage.View", {
    extend: "Terrasoft.view.BaseEditPage",
    xtype: "contacteditpageview",
    config: {
        id: "ContactEditPage"
    }
});
// Detail controller in the edit mode.
Ext.define("ContactEditPage.Controller", {
    extend: "FileAndLinksEditPage.Controller",
    statics: {
        Model: Contact
    },
    config: {
        refs: {
            view: "#ContactEditPage"
        }
    },

    fileModel: "ContactFile"
}, function() {
    this.addDefaultBusinessRules();
});
Save the schema to apply changes.
3. Add information about new schemas to the mobile application manifest
The information about new schemas should be added to the mobile application manifest to apply the changes. For this, create the MobileApplicationManifestDefaultWorkplace extending schema in the custom package. Learn more about application manifest in the “Mobile application manifest” article. The procedure for creating a replacing client schema is covered in the “Creating a custom client module schema” article.
Add following source code on the [Source Code] tab of the MobileApplicationManifestDefaultWorkplace extending schema in the module designer:
{
    "SyncOptions": {
        "SysSettingsImportConfig": [],
        // Configuratio of the import of the required models.
        "ModelDataImportConfig": [
            // File type.
            {
                "Name": "FileType",
                "SyncColumns": []
            },
            //The [Attachment] detail object pf the [Contacts] section.
            {
                "Name": "ContactFile",
                "SyncByParentObjectWithRights": "Contact",
                "SyncColumns": [
                    "Contact",
                    "Type",
                    "Data",
                    "Size"
                ]
            }
        ]
    },
    // Used models.
    "Models": {
        "Contact": {
            // Configuration of the view mode.
            "Preview": "UsrMobileContactPreviewPage",
            // Configuration of the edit mode.
            "Edit": "UsrMobileContactEditPage",
            "RequiredModels": [
                "ContactFile",
                "FileType"
            ],
            // Configuration of the section.
            "ModelExtensions": [
                "UsrMobileContactModuleConfig"
            ]
        }
    }
}
Save the schema to apply changes.
As a result, the [Attachments] detail will appear on the record page of the [Contacts] section (Fig. 2).
Fig. 2. The [Attachments] detail on the contact page