


Setting up a forecast includes the following general steps:
1.Creating a forecast. At this step, you select the forecast entity and period, as well as group the data and set the calculation running method. Read more >>>
2.Setting up columns. Read more >>>
3.Adding data for calculation. Read more >>>
4.Setting up permissions. Read more >>>
Let’s have a look at how to set up a forecast for product sales. Forecast parameters are as follows:
-
Forecast entity: “Product.”
-
Grouping of data: by category, type, and brand.
-
Calculation method: automatically, once a day.
-
Forecast period: Quarter.
-
The calculation must be based on paid invoices.
-
When you add new products to the forecast, Creatio automatically distributes the forecast metrics by the embedded elements.
-
Sales managers and their owners should have access to the forecast.
1.In the [Sales] workplace, open the [Forecasts] section.
2.In the top left corner of the workspace, click  .
.
3.In the opened window:
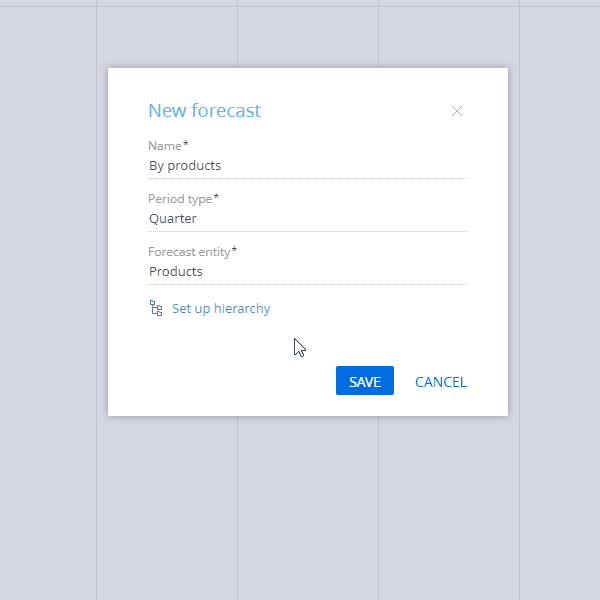
a.Enter the name of the new forecast. In our case, it is “By product.”
b.Select the period. In our case, it is “Quarter.” After you save the forecast, this parameter becomes locked.
c.Specify the forecast entity. In our case, it is “Products.”
Some of the parameters, including the period type and forecast entity cannot be modified. The forecast name and data hierarchy are editable. Click  on the forecast tab panel to edit them.
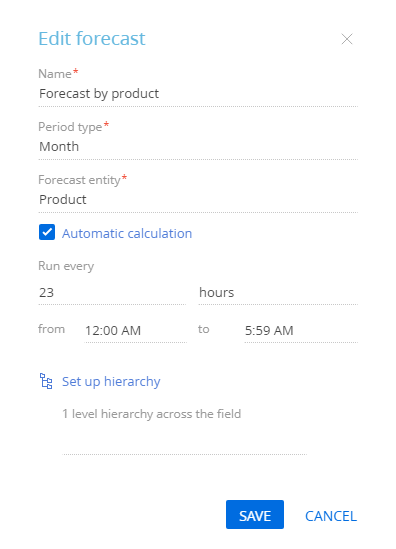
d.Select the [Automatic calculation] checkbox. Specify the frequency and timeframe of automatic calculation in the now visible fields. For example, set up to run calculations every 23 hours during the off-peak time – from 12:00 AM to 5:59 AM (Fig. 1).
Fig. 1 Example of setting up automatic forecast calculation
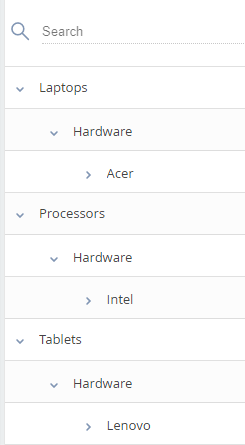
e.Set up the hierarchy – specify the fields, whose values will be used to group the data in the forecast. In our example, these are “Category,” “Type,” and “Brand” (Fig. 2). You can modify the hierarchy later, if necessary.
Fig. 2 Setting up the forecast hierarchy
4.Save the new forecast.
As a result, a new table will be created. You will be able to use it for populating data. To display the data, refresh the browser.
Setting up distributing the expected metrics
You can avoid entering the expected metrics for each element in the forecast structure manually. Only the parent element's expected indicators are editable with automatic distribution set up. Creatio will calculate the values for the child elements automatically. To do this, set up the [Expected] column:
1.Hover the mouse pointer over the column title and click the  button that appears on the left.
2.Select the [Allow editing of group indicators] checkbox in the column setup box.
As a result, when you add new products to the forecast, only the expected group indicator is editable for the group that includes those products. Expected values for new group records will be calculated proportional to the number of child elements. At the low level, the indicators will be uneditable and always equal to the “Expected indicators of the upper level / number of the nested levels” ratio. However, intermediate indicators are editable. The values of both child and parent elements will be recalculated.
Setting up the actual metrics
To set up the [Actual] column:
1.Click  to the right of the [Expected] column.
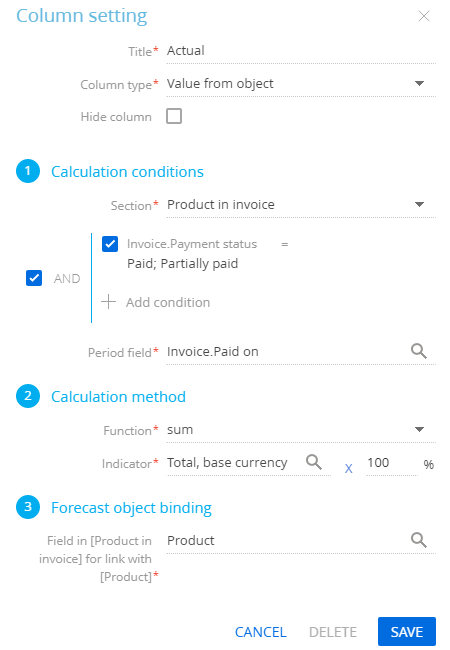
2.In the opened window, specify the name of the new column (“Actual”) and its type (“Value from object”). The window will display a list of column parameters.
3.Populate the column parameters.
•[Section] – Creatio object that has the needed data. In our case, it is “Product in invoice.” Apply filters that would consider only the paid or partially paid invoices within the specified time when calculating the actual forecast data.
•[Function] – method of calculation. The function can be “sum,” “count,” or “average.” For this case, select “sum.”
•[Indicator] – the value that is the base for calculation. In our case, it is “Total, base currency.”
•[Forecast object binding] – a field that connects the data object (“Product in invoice”) and the forecast entity (“Product”). In our case, this is the “Product” field.
4.Click [Save].
Fig. 3 Example of setting up a column of the “Value from object” type
To set up the [Actual, %] column:
1.Click  to the right of the [Actual] column.
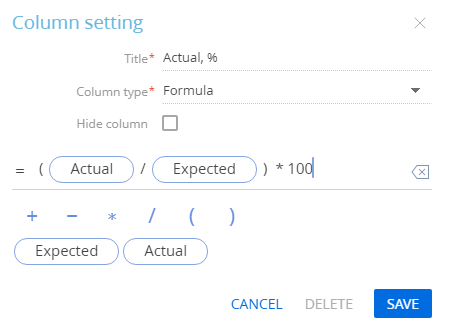
2.In the opened window, specify the name of the new column (“Actual, %”) and its type (“Formula”). The window will display a field for entering the formula, available columns, and mathematical operations.
3.Set up the formula that will calculate the column value (Fig. 4).
4.Click [Save].
Fig. 4 Example of setting up a column of the “Formula” type
Note
Drag&drop the forecast columns to change their order.
To add forecast data:
1.On the forecast tab, click [Add].
2.In the opened window, select the needed records of the forecast entity. In our case, you will be selecting from the list of products. To add all available records to the forecast, click [Actions] –> [Select all].
3.Click [Select].
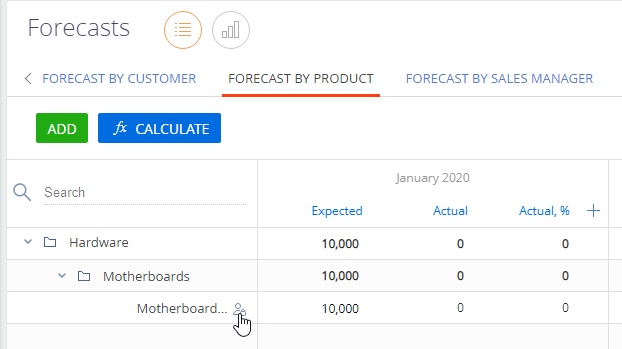
As a result, the list of selected records will appear on the left panel of the forecast. The records in the list will be grouped as per the pre-configured hierarchy (Fig. 5).
Fig. 5 Example of configuring a list of forecast records
To remove a specific record from the forecast, hover the mouse pointer over the record and click  .
.
Click  on the forecast tab panel to change the forecast hierarchy.
You can set up permissions for forecasts, separate records within them, and forecast calculation .
Set up permissions for a forecast
To enable only sales managers and their superiors to access the configured forecast, assign the access permissions for the forecast tab. To set up access permissions:
1.Go to the [Forecasts] section and open the needed forecast tab.
2.Click  –> [Set up access rights].
3.On the opened page, set access permissions to the created forecast.
a.Click [New] and select the “Read access right” option in the menu. In the opened window, select the “Sales managers” role.
b.Similarly, set the read, edit, and delete permissions for the superiors of the sales managers.
4.Save the changes. As a result, the forecast will be available only for sales department employees.
Set up permissions for a forecast record
You can manage permissions to separate records in a forecast. For example, you can restrict specific employees from viewing or modifying forecasts for specific products or customers, giving exclusive access to specific types of employees, e.g., executives. To do this:
1.Go to the [Forecasts] section and open the needed forecast tab.
2.Select the record, whose permissions you need to set up.
3.Hover your cursor over the record and click  (Fig. 6).
Fig. 6 Example of selecting a record to configure access permissions
4.On the page that opens, click [New] and select “Read access right”, “Edit access right”, or “Delete access right” in the drop-down menu (Fig. 7). Read more about the types of permissions in the “Managing object operation permissions” article.
Fig. 7 Example of setting up record access permissions
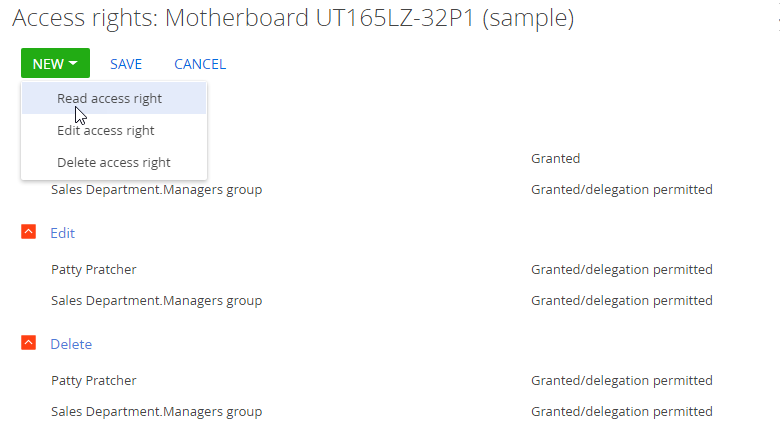
5.In the opened window, select a user or a role, e.g., “Sales Department Managers group” role. You can also enable permissions to this record for separate users.
6.Click [Save]. As a result, only the the employees of the selected role (e.g., Sales Department Managers) will be able to view, edit, or delete the forecast record.
Set up permission for calculation of forecast metrics
Permission to run calculations on forecast indicators is managed by the “Can Calculate Forecast” system operation (“CanCalculateForecast”). By default, any user in the “All employees” role can run this operation. You change this setting, for example, by restricting this operation to sales department managers and the finance department. Read more about system operation permissions in the “Granting access permissions to system operations” article.
Calculating the forecast metrics
In the [Forecasts] section, the calculation of the actual metrics is triggered by the [Calculate] action.
After the calculation is finished, you will receive a notification on the communication panel. As a result, the calculated forecast metrics – in our case these are the [Actual] and [Actual, %] columns – will be populated with values derived from the system and calculated using the specified formula.
Next