


Each Creatio application contains a set of out-of-the-box sections. The pre-configured sections depend on the Creatio product and the installed Marketplace add-ons. You can add new custom sections to your application. When adding a custom section, add a new configuration object or use an existing one.
Create a new section based on a new object
Case
Add a custom [Requests] section to manage employee internal requests in Creatio.
To add a new section:
1.Click  -> System Designer -> [Section Wizard].
Attention
You can open the Section Wizard only if you have access to the [Access to “Configuration” section] system operation.
2.Populate the primary properties of the new section (Fig. 1).
Fig. 1 Section base properties
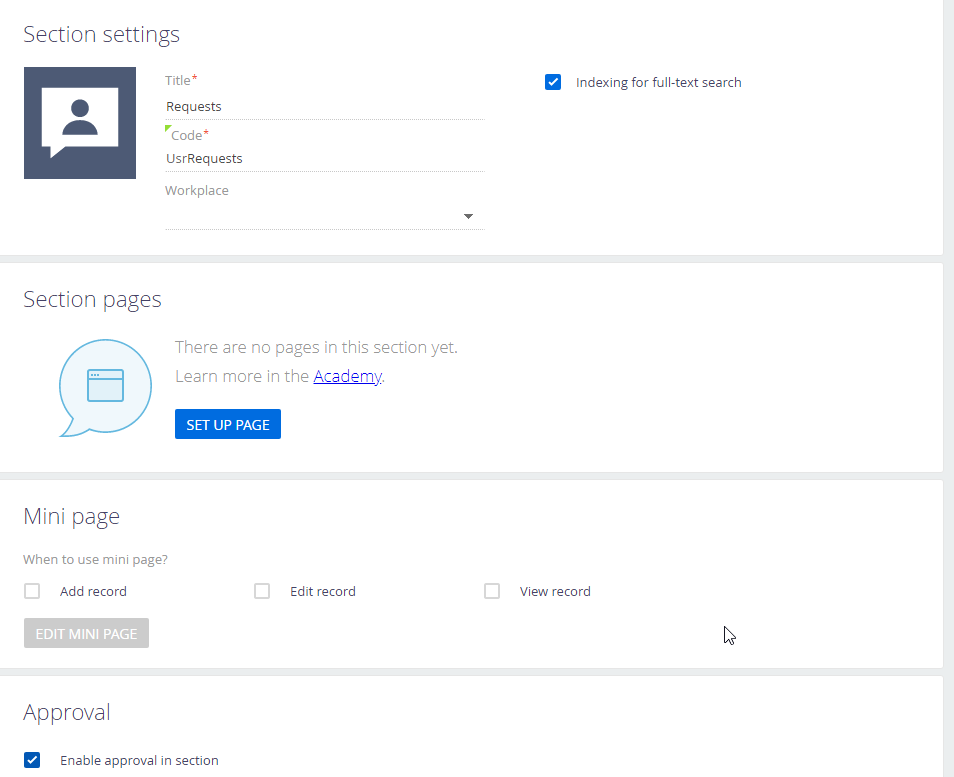
a.In the [Title] field, enter the name for the new section, e.g., “Requests.”
b.In the [Code] field, enter the unique name that Creatio will use to generate section objects. For example, for a custom section named [Requests], the section code can be "UsrRequests." The code can only contain integers and Latin characters. After saving the changes or switching to the edit mode, the field becomes locked.
Note
The section code must contain a prefix, which identifies the author of the configuration changes. The prefix is specified in the “Prefix for object name” system setting. The default prefix is “Usr.”
Attention
Make sure that you DO NOT USE any of the following prefixes or suffixes:
c.Select the [Indexing for full-text search] checkbox, if you want to display the section data in the global search results.
3.Replace the standard section icon displayed in the application side panel. Hover the cursor over it and click  . Upload a new image.
Note
We recommend using a white icon on a transparent background. Image format: PNG or SVG, size: 38x38 px. You can use the Marketplace icon library to search for section icons.
4.In the [Workplace] field, select a workplace from the drop-down list of available workplaces. A section can later be included in other workplaces. One section can belong to several workplaces.
Note
Detailed information about configuring workplaces is available in the “Workplace setup” article.
5.After you add the new section, customize the primary section page. Read more >>>
6.To use mini pages in the section, select the corresponding checkboxes. You can set up mini pages for adding, editing and viewing section records. Read more >>>
7.Select the [Enable approval in section] checkbox to enable approval functions in the section.
Note
Learn more about working with approvals in Creatio in the “Approvals” article.
8.Click [Save] to apply the changes.
As a result, the new [Request] section will be created and added to the workplace you specified in step 4. In the back-end, the corresponding objects will be added for the new section automatically:
-
<Code> – e.g., UsrRequests – the section object that will contain the section data structure.
-
<Code>File – e.g., UsrRequestsFile – the object for storing section attachments.
-
<Code>Folder – e.g., UsrRequestsFolder – the object for storing the folder structure of the section.
-
<Code>InFolder – e.g., UsrRequestsInFolder – the object for storing information on which section record is placed in which folder.
-
<Code>Tag – the object for storing section tags.
-
<Code>InTag – the object for storing information on which section record is tagged with which tags.
-
<Code>RequestsVisa – the object for storing information on section approvals.
To see the section in the application workplace, update the page and clear the cache. Alternatively, you can log out of the application and log back in, which will make Creatio clear the cache and apply the changes.
Create a new section based on an existing object
For example, imagine that Creatio has a [Requests] section that uses a request types lookup. The goal is to separate the request types into a separate section to handle the increase in the number of request types, and for the convenience of maintaining the request types, categories, and owners, as well as to set up permissions. You can create such a section based on an existing object.
Case
Add a custom [Request types] section to manage all request types in Creatio. To create a new section, use the existing [Request types] lookup object.
To do this:
1.Click  -> System Designer -> [Section Wizard].
Attention
You can open the Section Wizard only if you have access to the [Access to “Configuration” section] system operation.
2.On the page that opens, click [Select an existing object].
3.Select “Request types” in the window for object selection. Use the search string for convenience.
Note
In sections created based on built-in Creatio objects, the functionality of groups and tags is not available. When such an object is selected, Creatio will display a corresponding notification.
After selecting an existing object, the [Title] and [Code] fields will be populated automatically.
4.Edit the title of the section in the [Title] field if necessary.
5.Check the value in the [Code] field. The field contains a prefix that identifies the author of the configuration changes, as well as the code of the object used to create the new section. For example, for a section named [Request types], the section code can be as follows: “UsrRequestType”. This is a non-editable field.
Note
The prefix is specified in the “Prefix for object name” system setting. The default prefix is “Usr.”
6.Populate the rest of the fields in the same way as with adding a section based on a new object. More information is available in the “Create a new section based on a new object” article.
7.Click [Save].
As a result, the new [Request types] section will be created and added to the workplace you specified in step 4. To see the section in the application workplace, update the page and clear the cache. Alternatively, you can log out of the application and log back in, which will make Creatio clear the cache and apply the changes.
See also
•Add a BPMN business process to a section
Video tutorials