


To install bpm'online the following components are required:
1.Database management system (DBMS). The following DBMS are supported:
•MS SQL Server 2012 SP3 or higher
•Oracle Database 11g Release 2 or higher
•PostgreSQL, the last official version on the bpm’online release date You can use PostgreSQL:
from version 7.13.0 and up - with the Studio product
from version 7.13.3 and up - with the Customer Center and Service Enterprise products
from version 7.14.2 and up - with the Sales Enterprise product
Note
PostgreSQL setup files are available for download at postgresql.org.
Note
If you have all the components of the database server installed by default, no additional DBMS settings are required to deploy bpm'online. To ensure correct operation of bpm’online when using MS SQL, install Database Engine.
2.64-bit Microsoft .Net Framework 4.7.2 (for versions bpm’online 7.13.2 and up);
Microsoft .Net Framework 4.7 and up (for versions bpm’online 7.11.1 - 7.13.1).
3.IIS 8.0 or higher;
4.Redis Server 3.0 or 3.2.
Attention
To deploy bpm’online database on Oracle, set up Oracle Data Access Components (ODAC) of version 11..
5.Starting from version 7.14.4, download and install .NET Core SDK 2.2.300 and .NET Framework SDK v 4.7.2 to ensure the correct compilation of the application.
Grant permissions to read, create and delete files and the embedded catalogs for the \Terrasoft.WebApp\Terrasoft.Configuration catalog to the user who runs the application pool in IIS.
Download 64-bit .NET Core SDK 2.2.300
Download 64-bit .NET Framework SDK v 4.7.2
The general procedure for bpm'online application on-site deployment is as follows:
-
Install and/or enable required Windows components.
-
Install the Redis server.
-
Deploy the database.
-
Modify the ConnectionStrings.config file.
-
Create and set up application website using IIS.
Please note that the specifics of the deployment procedure may vary, depending on the chosen DBMS.
Note
MS SQL Server, Oracle Database and SVN server deployment procedures are covered in the documentation of these products.
The procedure for running PostgreSQL in Docker is covered in the Docker documentation.
Attention
It is not recommended to unpack any bpm’online setup files using the built-in Windows archiver. Use 7-Zip, WinRAR or WinZIP instead.
Contents
•Deploying the bpm’online database
•Setting up the ConnectionStrings.config file
•Web.config configuration (Oracle only)
•Checking Windows mandatory components
•Creating and setting up application website using IIS
See also
Deploying the bpm’online database
Deploy the bpm'online database on the database server by restoring it from a backup copy file located in the application folder. You can also use a backup copy of an existing bpm’online database if you are deploying a website for development or testing environment.
Note
The procedure for creating a MS SQL Server DB backup is described in a separate article.
The procedure for restoring the database from a backup copy depends on the chosen DBMS.
Deploying the MS SQL Server DB
To restore a database:
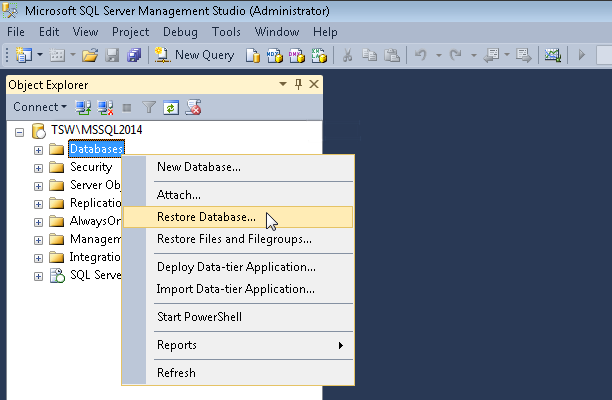
1.Log in to Microsoft SQL Server Management Studio.
2.Click the [Databases] catalog and select the [Restore Database] option from the context menu (Fig. 1).
Fig. 1 Selecting database backup command
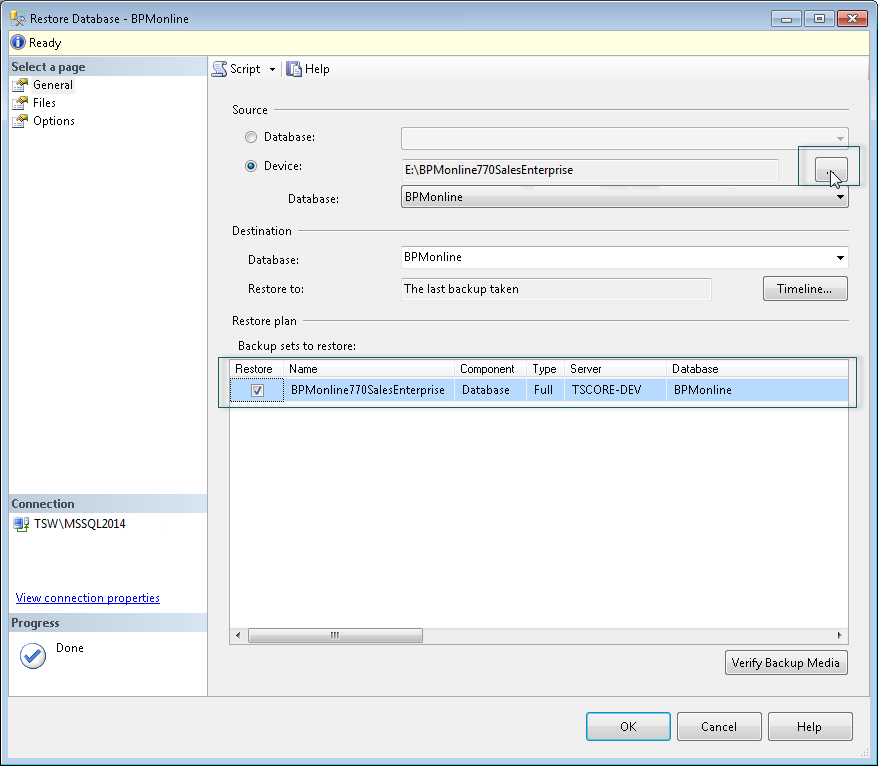
3. In the [Restore Database] window:
a.Specify the name of the database in the [Database] field;
b.Specify the [Device] checkbox and specify the path to the database backup copy file. By default, the backup file is supplied together with executable files and is located in the “~\DB” folder (Fig. 2).
Fig. 2 Selecting database backup
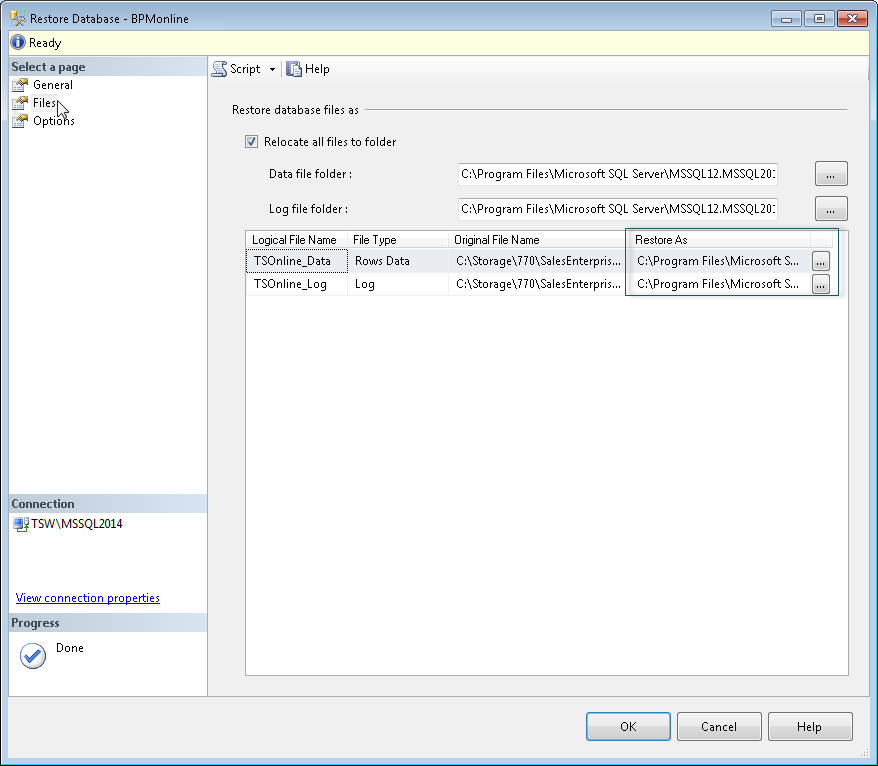
4.Go to the [Files] tab. In the [Restore the database files as] area, specify the paths and the names of the database files (Fig. 3). Specify the paths to the TS_Data.mdf and TS_Log.ldf database files.
Attention
It is required to create a folder that will be used for database files restoring beforehand, as the SQL Server may not create directories.
Fig. 3 Specifying the names and paths to TS_Data.mdf and TS_Log.ldf files.
5.Click the [OK] button and wait for the database restore process to be finished.
Download and unzip the archive with the SQL scripts that are used to restore the database from the Oracle backup file.
To restore the database:
1.Open the CreateUser.sql and RecompileSchema.sql scripts in the editor and modify the following macros:
•YOUR_SCHEMA_NAME – schema name
•YOUR_SCHEMA_PASSWORD – schema password
•\\your_server.com\Share – path to the backup (.dmp file).
Note
By default the Oracle DB backup file is located in the ~\db folder with the bpm’online executable files. If the backup file is located not on the Oracle server, it should be located in the network folder with general access.
2.Open the backup file in a text editor, find and save the name of the used schema located before the “.SYS_EXPORT_SCHEMA” record (Fig. 4).
Fig. 4 The schema name in the backup file

3.Remove the modified scripts on the Oracle server. To create a new schema, execute the following command from the folder with the scripts:
sqlplus.exe "SYS/SYS_PASSWORD@your_server.com:1521/YOUR_SERVICE_NAME AS SYSDBA" @CreateUser.sql
•SYS_PASSWORD – a password for authorization on the Oracle server
•your_server.com – network address of the Oracle server
•YOUR_SERVICE_NAME – Oracle service name.
4.Run import of the DB backup copy in the created schema:
impdp "YOUR_SCHEMA_NAME/YOUR_SCHEMA_NAME@//your_server.com:1521/BPMBUILD"
REMAP_SCHEMA=ORIGINAL_SCHEMA_NAME:YOUR_SCHEMA_NAME
DIRECTORY=BACKUPDIR DUMPFILE=filename.dmp NOLOGFILE=YES
•YOUR_SCHEMA_NAME – the name of the schema specified in the CreateUser.sql
•your_server.com – network address of the Oracle server
•ORIGINAL_SCHEMA_NAME – the name of the schema from the backup file (step 2).
Note
The sqlplus and impdp utilities are installed with the Oracle server.
5.Consistently run:
sqlplus.exe "YOUR_SCHEMA_NAME/YOUR_SCHEMA_PASSWORD@your_server.com:1521/YOUR_SERVICE_NAME"
@tspkg_UtilitiesGlobalTypes.sql
sqlplus.exe "YOUR_SCHEMA_NAME/YOUR_SCHEMA_PASSWORD@your_server.com:1521/ YOUR_SERVICE_NAME"
@RecompileSchema.sql
PostgreSQL database deployment
To restore a PostgreSQL database from a backup file, you will need psql and pg_restore utilities. They are located in the PostgreSQL software setup folder.
To restore the database from a backup file:
1.Enter DB connection password in the environment variable:
set PGPASSWORD=pg_password (“env PGPASSWORD=pg_password” – for linux)
•pg_password – user password for connecting to the PostgreSQL server.
2.Create a database where the backup data will be restored:
psql --host pg_server_ip --port pg_server_port --username=pg_user --dbname=pg_dbname –c ”CREATE DATABASE pg_dbname WITH OWNER = pg_user ENCODING = 'UTF8' CONNECTION LIMIT = -1”
•pg_server_ip – PostgreSQL server address;
•pg_server_port – PostgreSQL server port;
•pg_user – user for connecting to the PostgreSQL server;
•pg_dbname – name of the PostgreSQL DB where the instructions will be executed.
3.Restore the database from the backup file:
pg_restore --host pg_server_ip --port pg_server_port --username=pg_user --dbname=pg_dbname --verbose \\path\to\db.backup
•pg_server_ip – PostgreSQL server address;
•pg_server_port – PostgreSQL server port;
•pg_user – user for connecting to the PostgreSQL server;
•pg_dbname – name of the PostgreSQL DB where the instructions will be executed.
4.Execute type converstion:
psql --host pg_server_ip --port pg_server_port --username=pg_user --dbname=pg_dbname --file=CreateTypeCastsPostgreSql.sql
•pg_server_ip – PostgreSQL server address;
•pg_server_port – PostgreSQL server port;
•pg_user – user for connecting to the PostgreSQL server;
•pg_dbname – name of the PostgreSQL DB where the instructions will be executed;
•file – path to the CreateTypeCastsPostgreSql.sql file.
Use the following link to download Redis Server setup file.
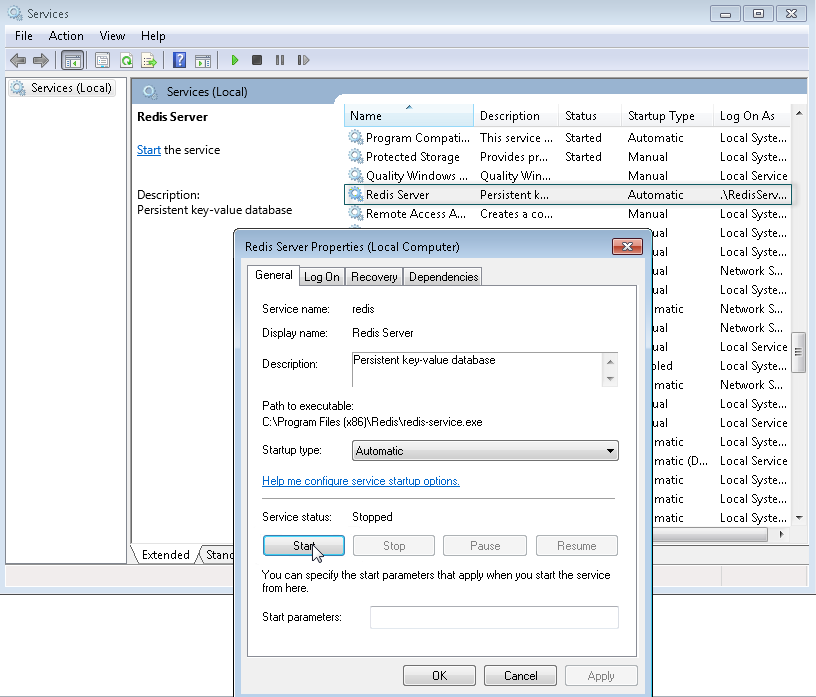
Run the redis-server.exe file to start Redis Server setup. During the installation, a number of commands will be run sequentially. After the completion of each command, click [Next] and wait for the process to complete.
Start the Redis Server after the installation. To do this, go to the menu [Control Panel]-[Administrative Tools]-[Services] or enter "Services.msc" in the command line (Fig. 5).
Fig. 5 Redis Server service start window
Attention
The application setup files should correspond to the DBMS that you use.
Examples of the setup files:
For Oracle DBMS: 7.14.3.1686_SalesEnterprise_Softkey_Oracle _ENU.zip;
For PostgreSql DBMS: 7.14.3.1686_SalesEnterprise_Softkey_PostgreSQL_ENU.zip
Setting up the ConnectionStrings.config file
Use the following parameters in the ConnectionStrings.config file:
Db – the element that ensures connection with the database. In this element, you configure the path to the database you need to establish connection with and the method of authorization on the database server.
<add name="db" connectionString="Data Source=[The database server name];
Initial Catalog=[The database name];
Persist Security Info=True; MultipleActiveResultSets=True;
[Authorization method on the database server]; Pooling = true; Max Pool Size = 100; Async = true" />
redis the element that ensures interaction with the Redis server.
<add name="redis" connectionString="host=[Computer name];db=[Redis DB number];port=6379;
maxReadPoolSize=10;maxWritePoolSize=500" />
Attention
The number of Redis database must be unique for each application site.
defPackagesWorkingCopyPath – the path to the working copy of application (if version control system is used):
<add name="defPackagesWorkingCopyPath" connectionString=[Path to the working copy of application in version storage system (SVN)] />
tempDirectoryPath – path to the temporary directory used by the package installation mechanism:
<add name="tempDirectoryPath" connectionString=[Path to the temporary directory used by the package installation mechanism] />
sourceControlAuthPath – path to the authorization data of the version storage system (SVN, if used):
<add name="sourceControlAuthPath" connectionString=[Path to the authorization data of the version storage system (SVN)] />
elasticsearchCredentials – ElasticSearch authorization data for the global search operation:
<add name="elasticsearchCredentials" connectionString="User=[The ElasticSearch user name]; Password=[The ElasticSearch user password];" />
The settings in the ConnectionStrings.config depend on the chosen DBMS.
-
Setting up the ConnectionStrings.config for the MS SQL Server
-
Setting up the ConnectionStrings.config for the Oracle Database
Setting up the ConnectionStrings.config for the MS SQL Server
1.Edit the ConnectionStrings.config file that is located in the root folder of bpm'online. Specify the connection parameters (connectionString) for the restored database (name=”db”) and Redis Server (name=”redis”).
<?xml version="1.0" encoding="utf-8"?>
<connectionStrings>
<add name="db" connectionString="Data Source=[The database server name];
Initial Catalog=[The database name];
Persist Security Info=True; MultipleActiveResultSets=True;
Integrated Security=SSPI; Pooling = true; Max Pool Size = 100; Async = true" />
<add name="redis" connectionString="host=[Computer name];db=[Redis DB number];port=6379;
maxReadPoolSize=10;maxWritePoolSize=500" />
Integrated Security=SSPI" />
<add name="defRepositoryUri" connectionString="" />
<add name="defWorkingCopyPath" connectionString="%TEMP%\%WORKSPACE%" />
<add name="defPackagesWorkingCopyPath"
connectionString="%TEMP%\%APPLICATION%\%WORKSPACE%\TerrasoftPackages" />
<add name="clientUnitContentPath"
connectionString="%TEMP%\%APPLICATION%\%WORKSPACE%\ClientUnitSrc" />
<add name="sourceControlAuthPath"
connectionString="%TEMP%\%APPLICATION%\%WORKSPACE%\Svn" />
<add name="elasticsearchCredentials" connectionString="User=[The ElasticSearch user name]; Password=[The ElasticSearch user password];" />
</connectionStrings>
2.You can see the database server name (Data Source) in the authorization window while connecting to the server using Microsoft SQL Server Management Studio (Fig. 6).
Fig. 6 SQL server authorization window
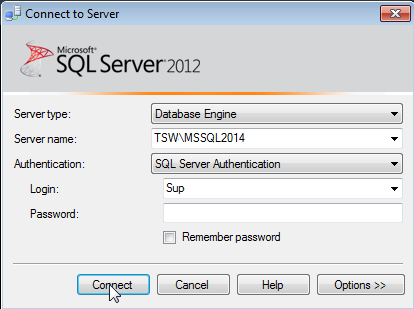
3.The (Initial Catalog) database name should match the [Database] field value that you specified when restoring database (Fig. 2).
4.The Integrated Security authentication based on the SPPI interface) is used by default to connect bpm’online to the database server. To ensure successful connection to the database, it is necessary to specify the Windows user under which the connection to the database server will be performed.
If you want to log in to the MS SQL server with the user's login and password, you need to modify the ConnectionStrings.config file located in the bpm'online site root folder. Replace the Integrated Security=SSPI variable with the UserID and Password variables in the database connection string (add name=”db”):
<add name="db" connectionString="Data Source=TSW\MSSQL2014;
Initial Catalog=7.10.2.1416_SalesEnterprise_Demo;
Persist Security Info=True; MultipleActiveResultSets=True;
User ID=Sup; Password=password; Pooling = true; Max Pool Size = 100; Async = true" />
In the case of using the login and password, it is also necessary to create a login and password for corresponding user on the MS SQL server.
Setting up the ConnectionStrings.config for the Oracle Database
1.Edit the ConnectionStrings.config file that is located in the root folder of bpm'online. Specify the connection parameters (connectionString) for the restored database (name=”db”) as well as Redis Server (name=”redis”).
<?xml version="1.0" encoding="utf-8"?>
<connectionStrings>
<add name="db" connectionString="Data Source=(DESCRIPTION =
(ADDRESS_LIST = (ADDRESS = (PROTOCOL = TCP)(HOST = [Database server name])(PORT = 1521))) (CONNECT_DATA = (SERVICE_NAME = [Oracle service
name]) (SERVER = DEDICATED)));User Id=[Schema name];Password=[Schema
password];Statement Cache Size = 300" />
<add name="redis" connectionString="host=[Computer name];db=[Redis DB
number];port=6379;
maxReadPoolSize=10;maxWritePoolSize=500" />
<add name="defRepositoryUri" connectionString="" />
<add name="defWorkingCopyPath" connectionString="%TEMP%\%WORKSPACE%" />
<add name="defPackagesWorkingCopyPath"
connectionString="%TEMP%\%APPLICATION%\%WORKSPACE%\TerrasoftPackages" />
<add name="clientUnitContentPath"
connectionString="%TEMP%\%APPLICATION%\%WORKSPACE%\ClientUnitSrc" />
<add name="sourceControlAuthPath"
connectionString="%TEMP%\%APPLICATION%\%WORKSPACE%\Svn" />
</connectionStrings>
Attention
The number of Redis database must be unique for each application site.
Specify the server network address, Oracle service name, name of the restored database and password.
ConnectionStrings.config setup for PostgreSQL
Edit the ConnectionStrings.config file that is located in the root folder of bpm'online. Specify the connection parameters (connectionString) for the restored database (name=”db”) as well as Redis Server (name=”redis”).
<?xml version="1.0" encoding="utf-8"?>
<connectionStrings>
<add name="db" connectionString="Server=[Database server name];Port=[Database server port];Database=[Database name];User ID=[PostgreSQL user for connecting to the database];password=[PostgreSQL user password];Timeout=500; CommandTimeout=400;MaxPoolSize=1024;" />
<add name="redis" connectionString="host=[Computer name];db=[Redis DB number];port=6379;maxReadPoolSize=10;maxWritePoolSize=500" />
<add name="redisSentinel" connectionString="sentinelHosts=localhost:26380,localhost:26381,localhost:26382;masterName=mymaster;scanForOtherSentinels=false;db=1;maxReadPoolSize=10;maxWritePoolSize=500" />
<add name="defPackagesWorkingCopyPath" connectionString="%TEMP%\%APPLICATION%\%APPPOOLIDENTITY%\%WORKSPACE%\TerrasoftPackages" />
<add name="tempDirectoryPath" connectionString="%TEMP%\%APPLICATION%\%APPPOOLIDENTITY%\%WORKSPACE%\" />
<add name="sourceControlAuthPath" connectionString="%TEMP%\%APPLICATION%\%APPPOOLIDENTITY%\%WORKSPACE%\Svn" />
<add name="elasticsearchCredentials" connectionString="User=[The ElasticSearch user name]; Password=[The ElasticSearch user password];" />
<add name="influx" connectionString="url=http://10.0.7.161:30359; user=; password=; batchIntervalMs=5000" />
</connectionStrings>
Web.config configuration (Oracle only)
If you are deploying an Oracle-based bpm’online application, you will need to configure the Web.config file located in the bpm’online root folder:
1.In the general parameter of the <db> block, change the value of the currentSchemaName attribute to the schema name that is specified in ConnectionStrings.config:
<db>
<general securityEngineType="Terrasoft.DB.Oracle.OracleSecurityEngine, Terrasoft.DB.Oracle"
executorType="Terrasoft.DB.Oracle.OracleExecutor, Terrasoft.DB.Oracle"
isCaseInsensitive="true" maxAnsiJoinCount="0"
engineType="Terrasoft.DB.Oracle.OracleEngine, Terrasoft.DB.Oracle"
metaEngineType="Terrasoft.DB.Oracle.OracleMetaEngine,
Terrasoft.DB.Oracle"
metaScriptType="Terrasoft.DB.Oracle.OracleMetaScript,
Terrasoft.DB.Oracle" typeConverterType="Terrasoft.DB.Oracle.OracleTypeConverter,
Terrasoft.DB.Oracle" connectionStringName="db"
binaryPackageSize="1048576" useOrderNullsPosition="true"
currentSchemaName="[Oracle DB schema name]" maxEntitySchemaNameLength="30" />
</db>
2.Make sure that the 4.112.1.2 library version is specified.
<system.data>
<DbProviderFactories>
<remove invariant="Oracle.DataAccess.Client" />
<add name="Oracle Data Provider for .NET"
invariant="Oracle.DataAccess.Client" description="Oracle Data
Provider for .NET" type="Oracle.DataAccess.Client.OracleClientFactory, Oracle.DataAccess,
Version=4.112.1.2, Culture=neutral, PublicKeyToken=89b483f429c47342"/>
</DbProviderFactories>
</system.data>
3.Specify the quartz.dataSource.SchedulerDb.provider key value in the <quartz> block:
<add key="quartz.dataSource.SchedulerDb.provider" value="OracleODP-1123-40" />
4.Save changes.
Checking Windows mandatory components
Make sure that you install the following components on the web server before you create and set up a website:
-
Windows components. Note that the Microsoft Visual C++ 2010 component is required.
-
Web Server IIS components.
Component
Component items
Common HTTP Features
Static Content
Default Document
HTTP Errors
HTTP Redirection
Application Development
ASP.Net
.Net extensibility
ISAPI extensions
ISAPI Filters
WebSocket Protocol
Microsoft .Net framework 3.5.1
Windows Communication Foundation HTTP Activation
Windows Communication Foundation Non-HTTP Activation
Microsoft .Net Framework 4.7 Advanced Services and up (Windows 8, Windows 10, Windows Server 2012, Windows Server 2016).
ASP.NET 4.6.2 or 4.7;
WCF services
HTTP Activation
Message Queuing (MSMQ) Activation
Named Pipe Activation
TCP Activation
TCP Port Sharing
Health and Diagnostics:
HTTP Logging
Logging Tools
Request Monitor
Custom Logging
Security
Basic Authentication
Request Filtering
IP and Domain Restriction
To check the availability of the needed components:
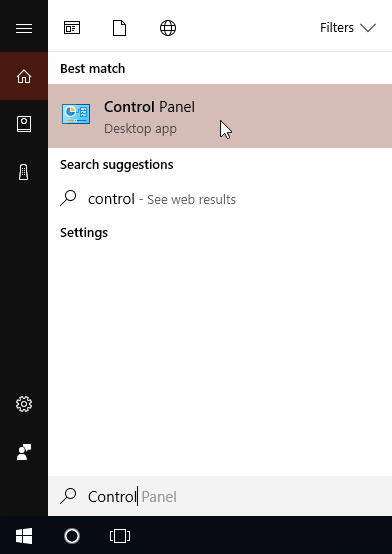
1.Enter the “control panel” in the [Start] menu and select the [Control Panel] (Fig. 7).
Fig. 7 The [Control Panel] section in the [Start] menu
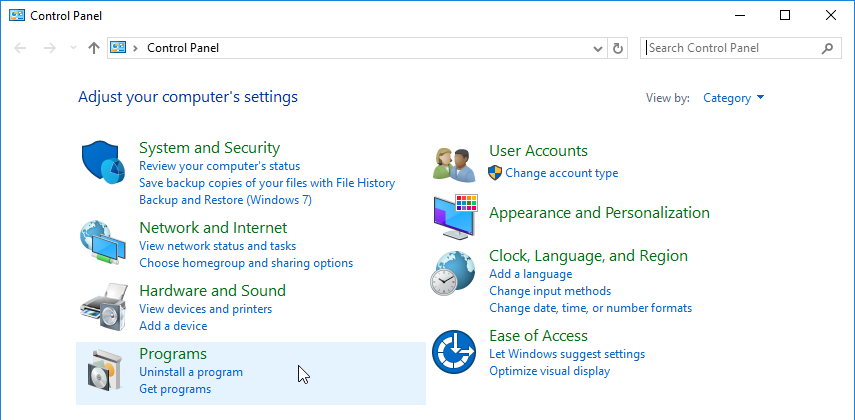
2.Select the [Programs] option in the opened window (Fig. 8).
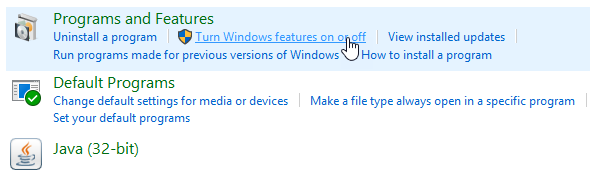
3.From the [Programs and Features] menu, select the [Turn Windows features on or off] option (Fig. 9).
Fig. 9 Selecting the [Turn Windows features on or off] option
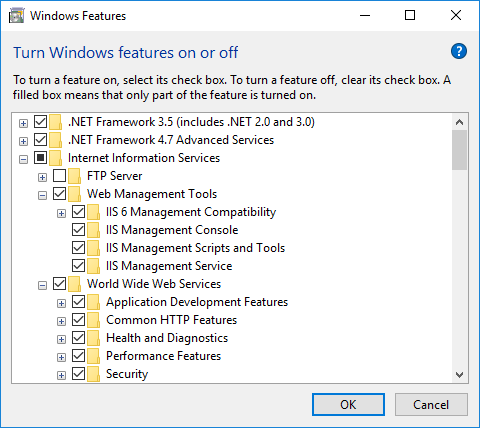
4.Select all required components in the [Windows Features] window (Fig. 10).
Fig. 10 Selecting Web Server IIS and Windows components
Creating and setting up application website using IIS
To create and set up a website:
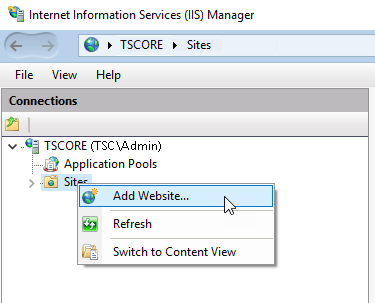
1.In the IIS control window, click the [Sites] folder and select the [Add Website] option from the context menu (Fig. 11).
Fig. 11 Creating a website for bpm'online application
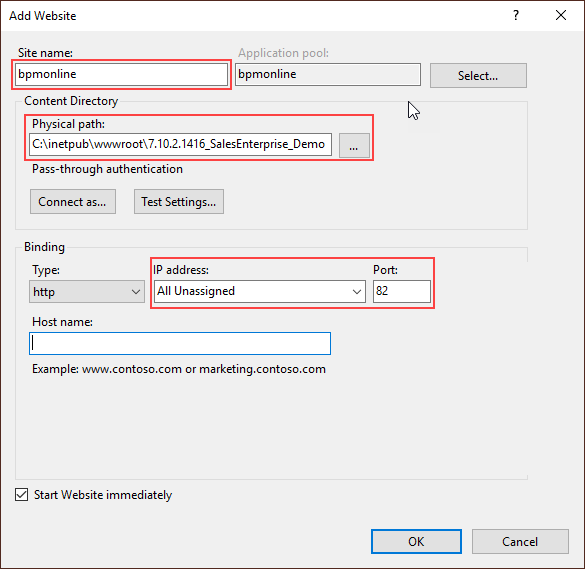
2.Specify the name of the website, the path to the root folder with bpm’online files, IP address and website port (Fig. 12).
Attention
The following path C:\Inetpub\wwwroot is used by default. If needed, specify your own IP address.
Fig. 12 New website parameters window
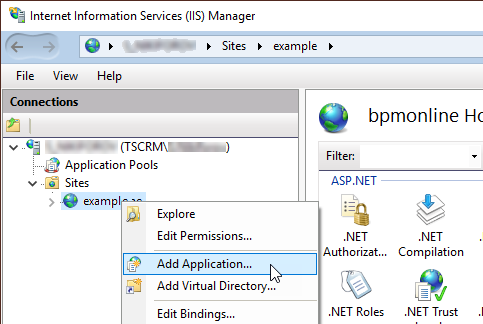
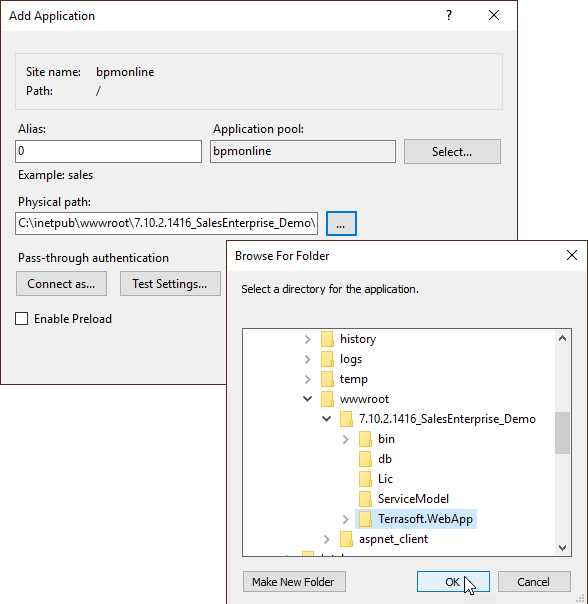
3.In the [Connections] field, click the created website and select the [Add Application] option in the menu (Fig. 13).
Fig. 13 Selecting IIS application adding command
4.Specify the name of the application "0" in the [Alias] field. Specify the “Terrasoft.WEBApp” directory (Fig. 14).
Fig. 14 The application parameters selection window
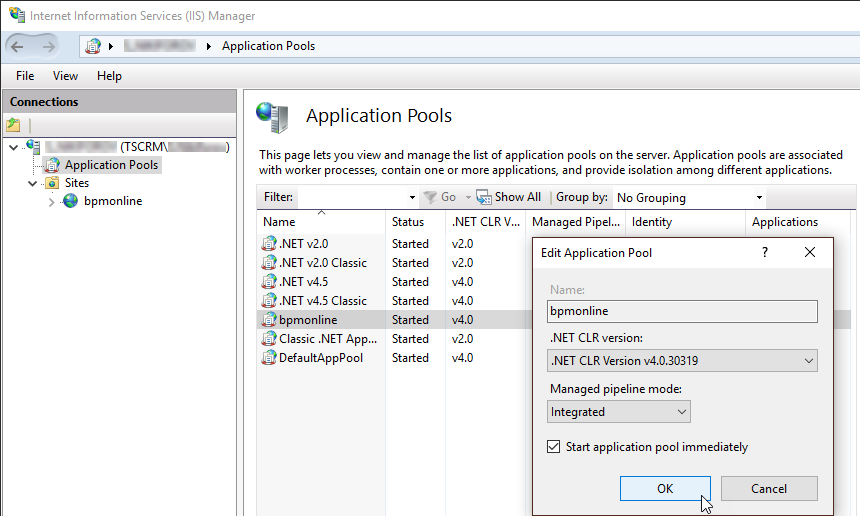
5.Go to the [Application Pools] section.
6.Select the [BPMonline] pool.
7.Select the [Integrated] mode in the [Managed pipeline mode] field.
8.Specify the Asp.Net - 4.0.30319 version in the [.Net Framework version] field (Fig. 15).
Fig. 15 Applications Pools parameters input window
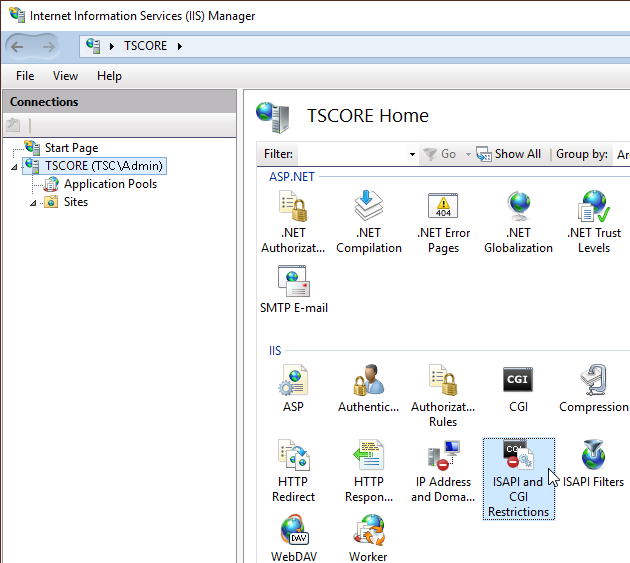
9.Check if the specified ASP.Net version is allowed. To do this:
a.Go to the ISAPI and CGI Restrictions on the web-server level (Fig. 16).
Fig. 16 Opening ISAPI and CGI Restrictions
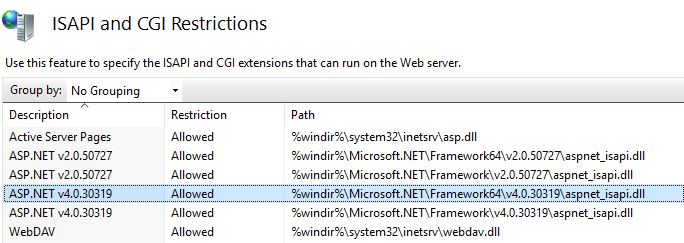
b.Make sure that the [Allowed] status is checked in the [Restriction] field for the used ASP.Net version (Fig. 17).
Fig. 17 Status check for the ASP.Net version used
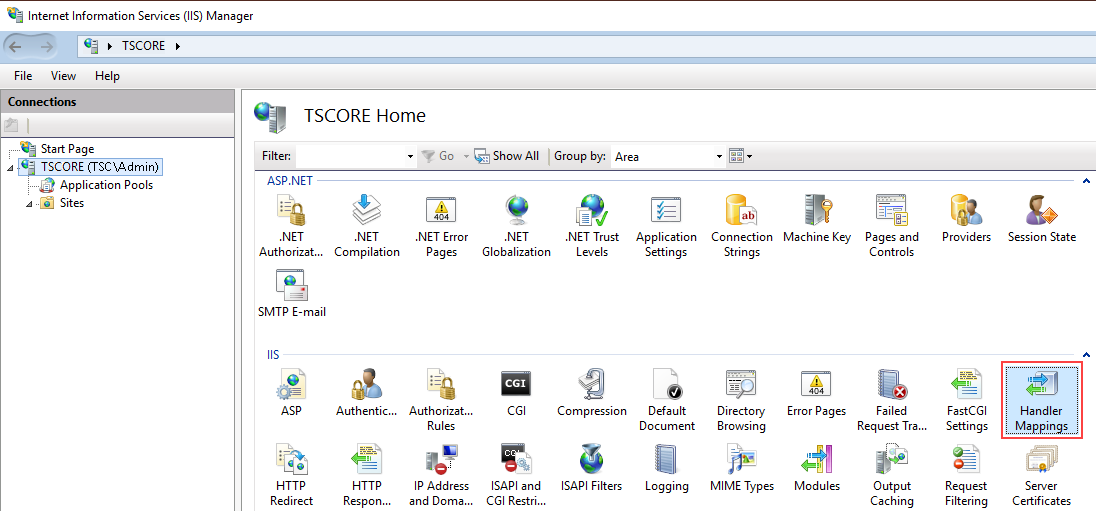
10.Make sure that all the required permissions are active. To do this:
a.Open the Handler Mappings on the server level (Fig. 18).
Fig. 18 Opening the Handler Mappings
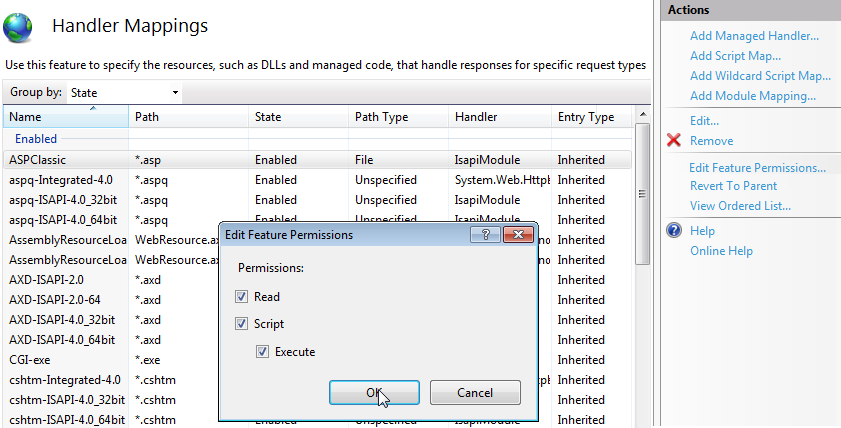
b.Select the [Edit Feature Permissions] action in the [Actions] area.
c.Make sure that all the required checkboxes are selected in the [Edit Feature Permissions] window (Fig. 19).
Fig. 19 Checking required parameters in the [Edit Feature Permissions] window
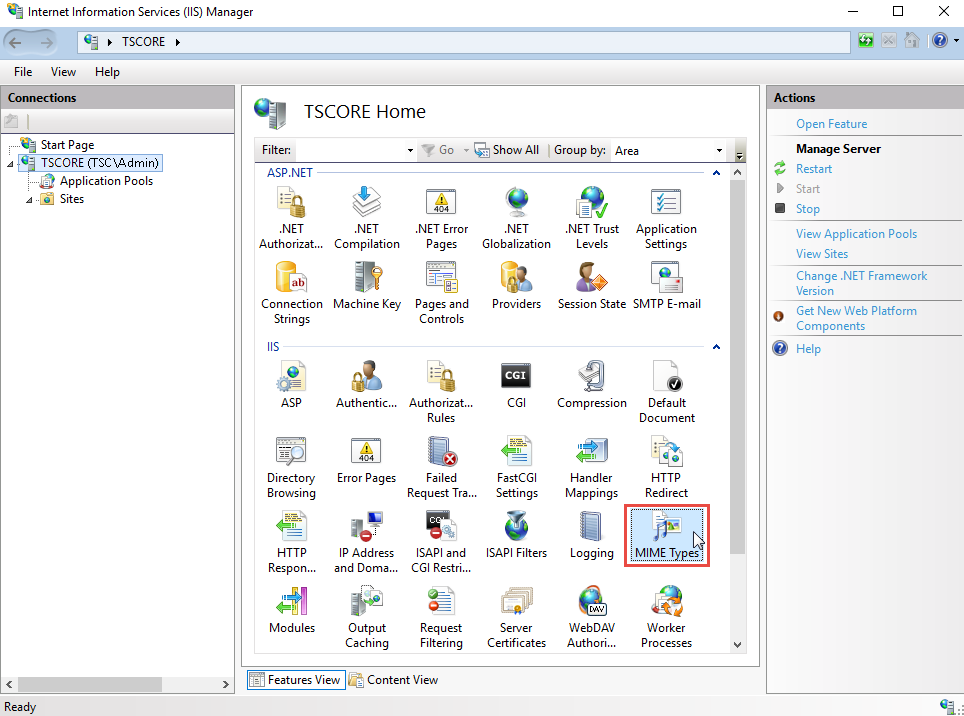
11.Make sure that MIME-type for the .svg files is configured in the new application. This configuration can be performed both on the level of the server (in this case it is inherited for all the applications located thereon) as well as on the level of the application. To verify:
a.Go to MIME Types on the server or application level (Fig. 20).
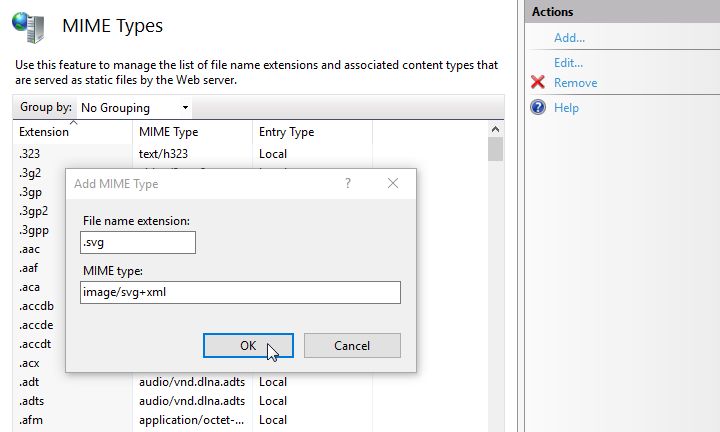
b.Make sure that configuration for .svg files is available. If the configuration is available, go to step 12.
c.If configuration is not available, click [Add] in the [Actions] area. In the opened window, specify .svg and MIME-type of the data that corresponds to this extension (Fig. 21).
Fig. 21 Configuring MIME-type of the data for .svg files
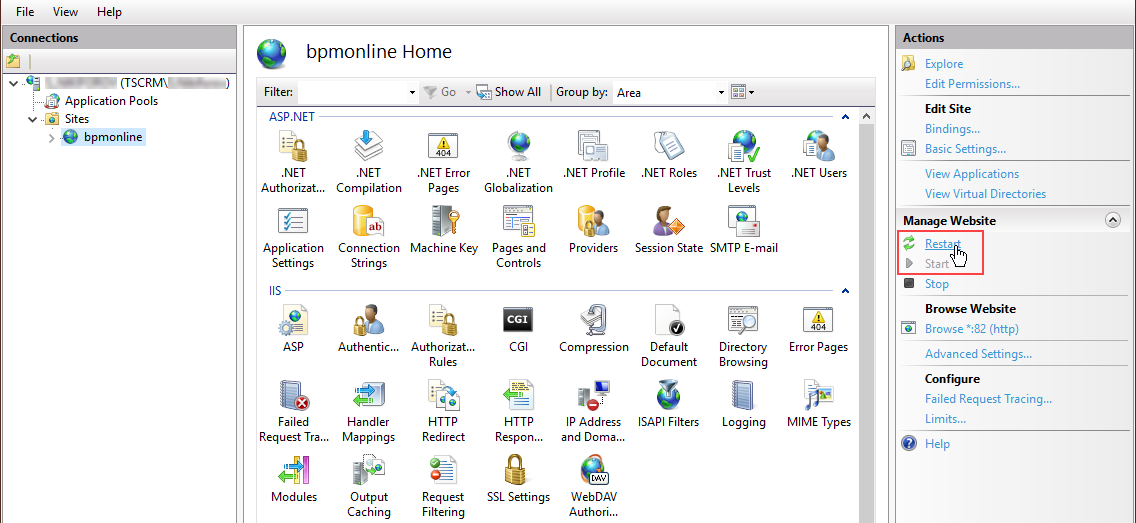
12.Restart the website with the [Restart] command on the [Manage Website] area (Fig. 22).
Fig. 22 [Restart] command at the [Manage Websites] area
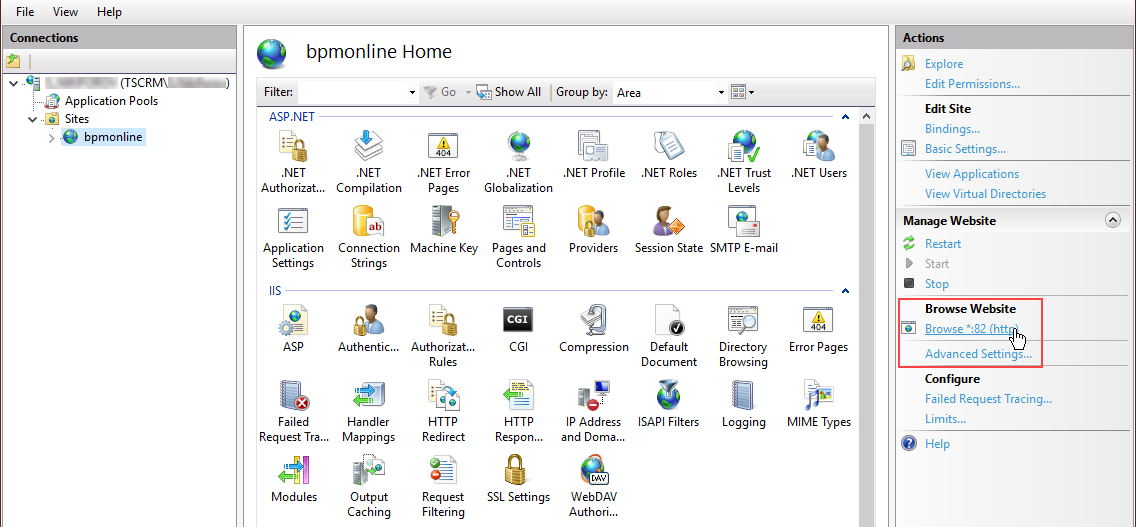
13.Open the site with the address or use the [Browse] command (Fig. 23). Make sure that the application authorization page is displayed.
Fig. 23 Selecting the [Browse] command in the website [Actions] area
Note
To log in to a newly deployed application, use the default Supervisor user account. It is highly recommended to change the Supervisor password immediately. Login: Supervisor; Password: Supervisor.
14. To enable additional interface language:
•Go to the [Languages] section in the system designer.
•Select the needed language and click [Open].
•Select the [Active] and [Use by default] checkboxes on the opened page. Save the changes.
15.In system designer, click [System settings] and change the [Order of first/last names] system setting value to “Last name, First name [Middle name]”. It is necessary to correctly display contact names per separate columns: [Last name], [First name], [Middle name].
Note
To enable a language, the user who has run the IIS application pool needs to have access permissions to read, edit and delete application files and content subordinate catalogs (catalog .\Terrasoft.WebApp\conf).
Next