Add a detail with columns to the mobile app
Use the Mobile application wizard to add a detail to the section of mobile application.
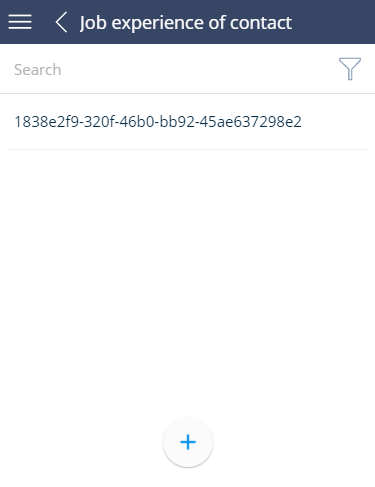
If the detail object is not a section object of the Mobile Creatio application, the detail will display the id of the connected section record instead of record values. Configure the schema of the detail page to display values.
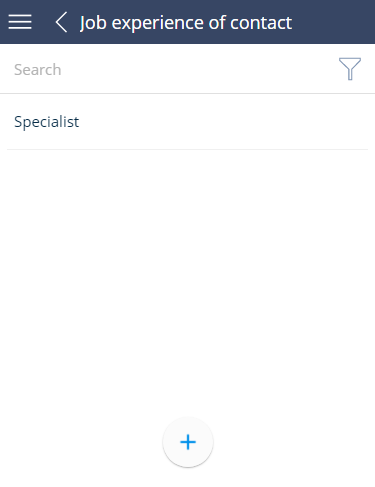
Add the Job experience detail on the edit page of the Contacts section of mobile application. Display the Job title column as primary column.
Example implementation algorithm
1. Add the Job experience detail via the mobile application wizard
Use the mobile application wizard to add a detail on the record edit page. To do this:
-
Open the necessary workplace (for example Main workplace) and click the Set up sections.
-
Select the Contacts section and click the Details setup button.
-
Set up the Job experience detail.
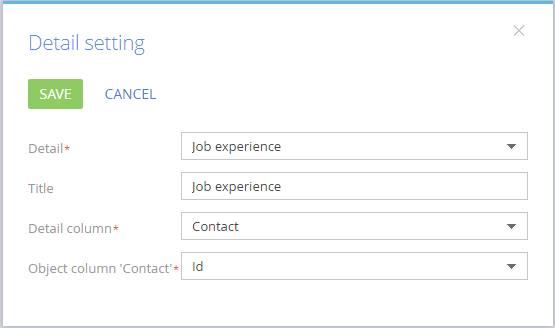
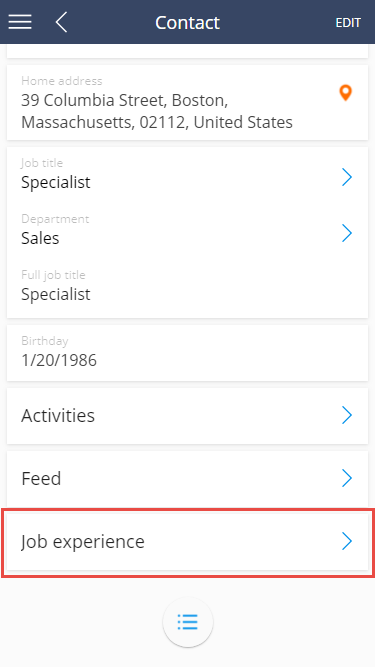
After saving the setup of detail, section and workplace, the Job experience detail will be displayed in the mobile application.
If the Job experience detail object is not a section object of the Mobile Creatio application, the detail will display the value of the Contact primary column (id of the connected record of the contact).
2. Create module schema in which to configure the detail list
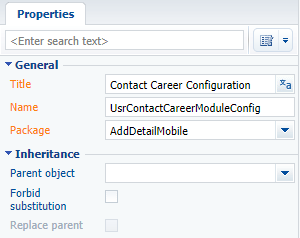
Use the Configuration section to create custom module in the user-made package with following properties:
- Title – "Contact Career Configuration."
- Name – "UsrContactCareerModuleConfig."
Add the source code to the module schema:
// Setting the [Job title] column as primary column.
Terrasoft.sdk.GridPage.setPrimaryColumn("ContactCareer", "JobTitle");
// Adding the [Job title] column to the primary column collection.
Terrasoft.sdk.RecordPage.addColumn("ContactCareer", {
        name: "JobTitle",
        position: 1
    }, "primaryColumnSet");
// Delete the [Contact] previous primary column  from the primary column collection.
Terrasoft.sdk.RecordPage.removeColumn("ContactCareer", "Contact", "primaryColumnSet");
In this code:
ContactCareer– name of the table that corresponds to the detail (as a rule it matches the name of the detail object).Job Title– name of the column that shoul be displayed on the page.
3. Connect the module schema in the mobile application manifest
To apply list settings performed in the UsrContactCareerModuleConfig module, perform following:
-
Open the schema of the mobile application manifest (
MobileApplicationManifestDefaultWorkplace) in the custom module designer. This schema is created in the user-made package by the mobile application wizard. -
Add the
UsrContactCareerModuleConfigmodule to thePagesExtensionssection of theContactCareermodel.ContactCareer{
"SyncOptions": {
...
},
"Modules": {},
"Models": {
"ContactCareer": {
"RequiredModels": [
...
],
"ModelExtensions": [],
"PagesExtensions": [
...
"UsrContactCareerModuleConfig"
]
},
...
}
} -
Save the schema of the mobile application manifest.
As a result, the Job experience detail will display records by the Job title column.
To display the columns after set up clean the mobile application cache. You may need to compile the application using the corresponding action in the Configuration section.