Add relationships between accounts and contacts
You can depict any type of relationship between contacts and accounts in Creatio.
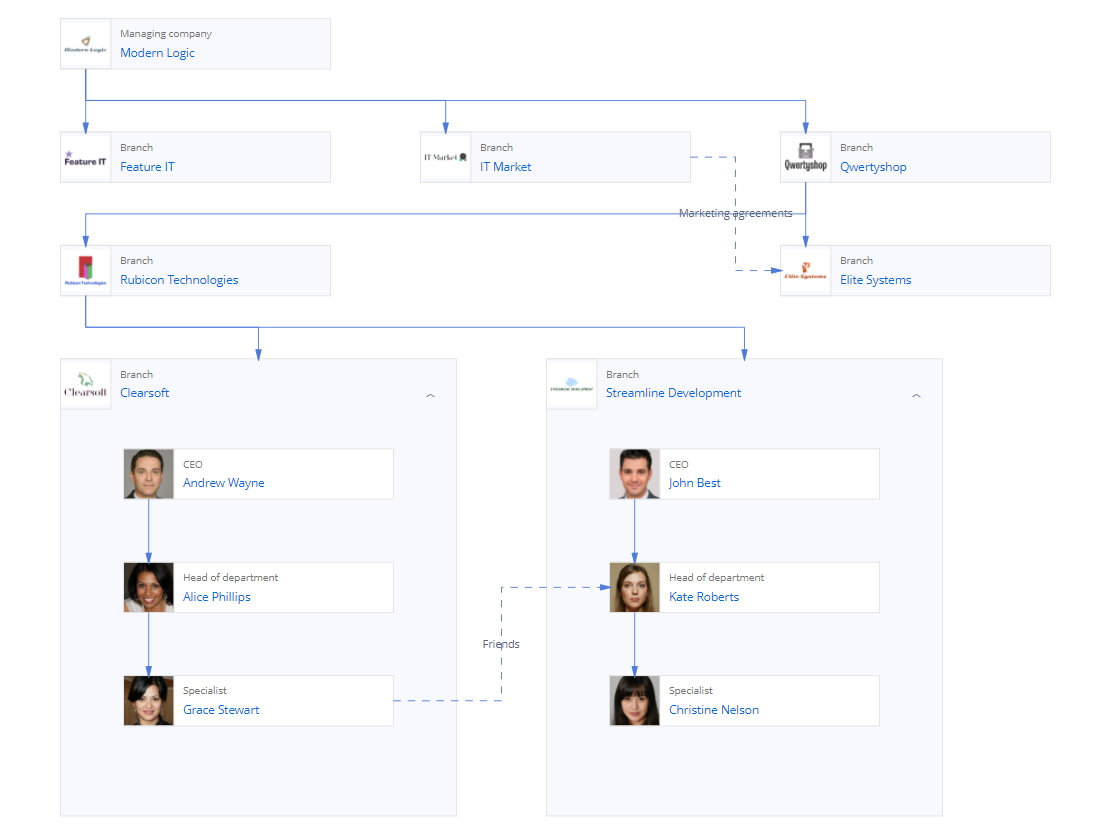
Creatio will display all internal and external contact and account relationships as a chart (Fig. 1).
You can track changes to external relationships between objects, for example, contacts and accounts, in the change log. Change logging is disabled by default. To enable logging, perform additional setup. Learn more in a separate article: Set up the change log.
The relationships can be depicted with either a vertical hierarchy or horizontal connection.
For instance, depict a relationship between accounts to facilitate centralized communication and streamlined transaction flow with a company group. Intuitively visualize a holding company structure to better understand your company's relationship with the holding company and the affiliates. You can also visualize any account's employee hierarchy or specify both formal and informal relationships between the contacts that work for different accounts.
You can view the account relationships by clicking the  button on the form page in the Accounts section of the Customer 360 app. The relationship chart is also available on the account or contact page's Connected to tab in Classic UI sections. Read more: View the relationship chart.
Before setting up the charts, configure all the necessary relationship types in the Relationship types lookup. Read more: Set up relationship types.
Once you configure the types, you can start setting up contact and account charts. Read more: Add relationships to the chart.
The chart also lets you group contacts by any relevant criteria. Read more: Group contacts.
The chart displays all contacts and accounts regardless of your permissions to access them. If you lack permissions to access a particular contact or account, the chart will gray it out and make its details unavailable.
View the relationship chart
Click the button on the form page to view the chart in the Accounts section of the Customer 360 app. If you want to view contact relationships in the Contacts section of the Customer 360 app, you can add the button that has "Show record's relationships" action to the contact page in Freedom UI Designer. Learn more about setting up buttons in a separate article: Set up [Button] components.
The chart is also located on the account or contact page's Connected to tab in Classic UI sections.
Chart actions
- Move the chart: drag it.
- Expand the chart to the entire page: click
 .
. - Expand and collapse the chart blocks: click
 and
and  .
. - Delete an element or a relationship from the chart: select the element, click
 and confirm deletion.
 - Edit the relationship between the contact and account blocks: double-click the relationship and make changes in the settings panel that opens to the right.
- Go to the chart element: click the element.
- View the details: double-click the contact or account block.
Relationship profile
To open the relationship profile (Fig. 2), double-click a contact or an account block on the chart. The relationship profile displays:
-
The general contact or account information, including the address and contact details.
noteThe relationship profile only displays the contact or account information if it is present on the corresponding contact or account page. If there is no data, the profile will not display empty fields. To edit the information, go to the record page by clicking the button on the top right of the relationship profile.
-
The contact groups. You can group contacts by any criteria here. Only contacts are supported.
noteThe contact groups on the relationship chart are independent from the folders in the Contacts section.
-
The related contacts and accounts. This section displays all contacts and accounts that have a depicted relationship with the selected record.
You can edit or delete the relationship directly from the relationship profile. To do this, click
 near the relationship and select
  or , respectively.

Set up relationship types
Before depicting relationships on the chart, add all the necessary relationship types to the Relationship types lookup.** This lookup already contains a list of the most common relationship types. Review the lookup's content and add more records if necessary. We do not recommend deleting the available relationship types as they may already be in use.
Add a new relationship type
-
Click
 to open the System Designer.
 -
Click "Lookups" in the "System setup" group and open the Relationship types lookup.
noteAny Creatio user with permissions to "Access to "Lookups" section" ("CanManageLookups" code) system operation can perform the setup.
-
Click New relation type.
-
Fill out the new lookup record's fields (Fig. 3).
-
Enter the relationship name the chart will use in the Name field.
-
Add the record that specifies the opposite vector of this relationship to the Inverse relationship field. If you are setting up a relationship with a "Horizontal connection" position, add the record itself to this field.
ImportantTo ensure the chart depicts the relationships correctly, fill out the Inverse relationship field for all records.
noteIf the record's pair does not exist yet, leave this field empty, create the inverse relationship record, and come back to setting up the field.
See the inverse relationship examples below.
-
Specify the connection type in the Relationship connection type column. The type can be "Formal" or "Not formal." Learn more: Relationship parameters.
-
Specify the record pairs that are valid for the relationship in the Account-Account, Account-Contact, Contact-Contact, and Contact-Account columns.
-
The Include into container column is non-editable. If Creatio sets it to "Yes," the contact will appear inside the relevant account block on the chart. Read more: Relationship parameters.
-
Specify the element's position on the chart in the Position column. Learn more: Relationship parameters.
-

Relationship parameters
Use the following relationship parameters to customize the relationship type:
- Specify whether the relationship is formal or informal in the Relationship connection type parameter:
-
Use the " Formal " type for clear, structural relationships. For example, select this type to visualize relationships between managers and subordinates or holding companies and affiliate companies.
You can establish a formal relationship between contacts if one of them has a formal relationship with an account.
-
Use the " Not formal " type for unclear relationships. For example, select this type to visualize a non-hierarchical relationship.
-
- Specify the element's position relative to the connected element in the Position parameter.
- Select " Horizontal connection " if the connected element is on the same hierarchical level. For example, use a horizontal connection to connect two department heads of a single company.
- Select " Direct connection " if the connected element is on the lower hierarchical level. For example, use a direct connection for "Employer-Employee," "Chief-Employee," "Holding company-Affiliate company" relationship types.
- Select " Reverse connection " if the connected element is on the higher hierarchical level. For example, use a reverse connection for "Employee-Chief," "Employee-Employer," "Affiliate company-Holding company" relationship types.
- Specify the contact block position relative to the account block in the Include into container parameter. Creatio sets this option automatically depending on the relationship type and the connected objects (account or contact).
-
The Include into container checkbox is always selected for "Account-Contact," "Contact-Contact," and "Contact-Account" formal relationships.
For example, Creatio automatically selects the Include into container checkbox for the "Chief-Employee" formal relationship. The chart places both contact blocks inside the Apex Solutions account block (Fig. 4).
Fig. 4 The selected Include into container checkbox 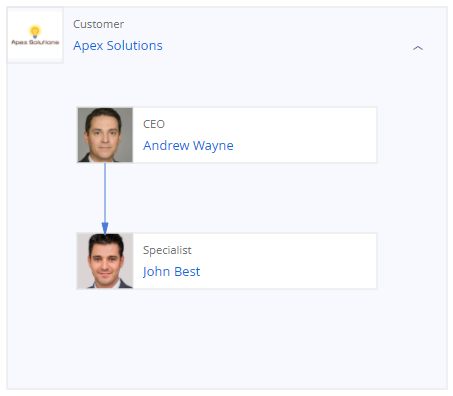
-
The Include into container checkbox is always cleared for "Account-Contact," "Contact-Contact," "Contact-Account" informal relationships, as well as for all "Account-Account" relationships. For example, Creatio does not select the Include into container checkbox for the "Relative-Relative" informal relationship. The chart places the contact block outside the account block (Fig. 5).
Fig. 5 The cleared Include into container checkbox 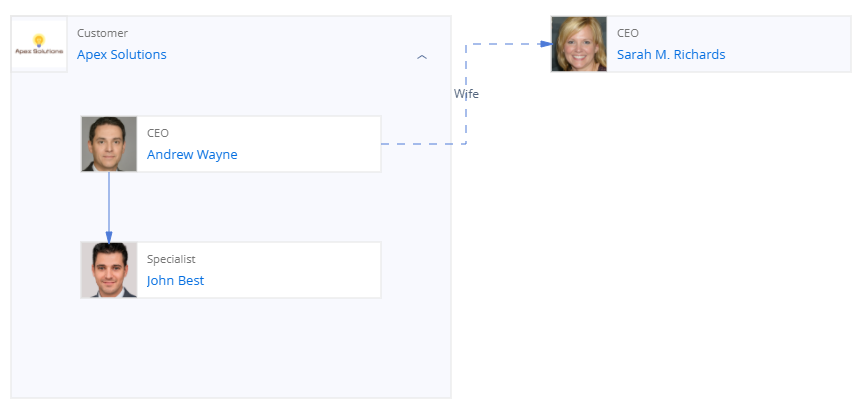
-
Keep the following in mind when setting up the parameters:
- The elements with formal relationship are usually structured vertically on the chart, appearing higher or lower relative to each other depending on the Position parameter.
- Always select " Direct connection " or " Reverse connection " for formal relationships between contacts or a contact and an account. These relationships can only exist in pairs. For example, if you create a "Managing company-Branch" relationship with a direct connection, make sure to add another record for a "Branch-Managing company" relationship with a reverse connection.
- Only a relationship between accounts can both be formal and have a horizontal position.
- The elements with informal relationship are usually placed on the same vertical level, thus requiring a horizontal position. If you do need to display an informal hierarchical relationship, set a " Direct connection " or " Reverse connection " position for this relationship, similar to formal relationships.
Relationship type setup examples
Set up a relationship between a lawyer and a client.
To do this, add a "Lawyer" and "Client" relationship pair.
"Lawyer" relationship settings:
- Set the name to "Lawyer."
- Set the inverse relationship to "Client."
If the "Client" relationship does not exist yet, leave the Inverse relationship column empty and come back to it later.
- Set the relationship connection type to "Formal."
- Select the Contact-Contact checkbox.
- Set the position to "Direct connection."
"Client" relationship settings:
- Set the name to "Client."
- Set the inverse relationship to "Lawyer."
- Set the relationship connection type to "Formal."
- Select the Contact-Contact checkbox.
- Set the position to "Reverse connection."
Set up a non-hierarchical relationship between partner companies.
Add a "Partner" relationship and connect it to itself.
- Set the name to "Partner."
- Set the relationship connection type to "Formal."
- Select the Account-Account checkbox.
- Set the position to "Horizontal connection."
Save the relationship, then add the "Partner" relationship itself to the Reverse connection column.
Add relationships to the chart
Once you add all the necessary relationships to the Relationship types lookup, you can start setting up contact and account charts. For example, here is how you can depict relationships with a contact.
Depict relationships with the contact's manager and the contact's father. The father is an employee of a different account.
Depict the "Chief-Employee" formal relationship and the "Relative-Relative" informal relationship:
-
Go to the Contacts section and open the necessary record.
-
Go to the Connected to tab.
This opens a block that contains the employee photo, name, and the job title.
-
Select the block and click + on the right.
-
Specify the details of the new relationship details (Fig. 6):
-
Leave the dropdown list at the top of the relationship profile as "Formal."
-
Select "Employee-Chief" in the Relationship type dropdown list. The list lets you select all types of formal relationships between contacts.
-
Select the relevant contact from the Contact dropdown list.
-
Add a comment in the Comment field if needed. The comment will appear on the chart. If you need to edit the comment after adding it to the chart, double-click the arrow and make changes in the Comment field of the setup box that opens.
Fig. 6 Setting up the relationship information  note
noteIf you depicted a relationship by mistake, click
on the panel to the right and confirm deletion.
-
-
Depict the "Relative-Relative" relationship type in a similar way. Specify the relation degree in the Comment field.
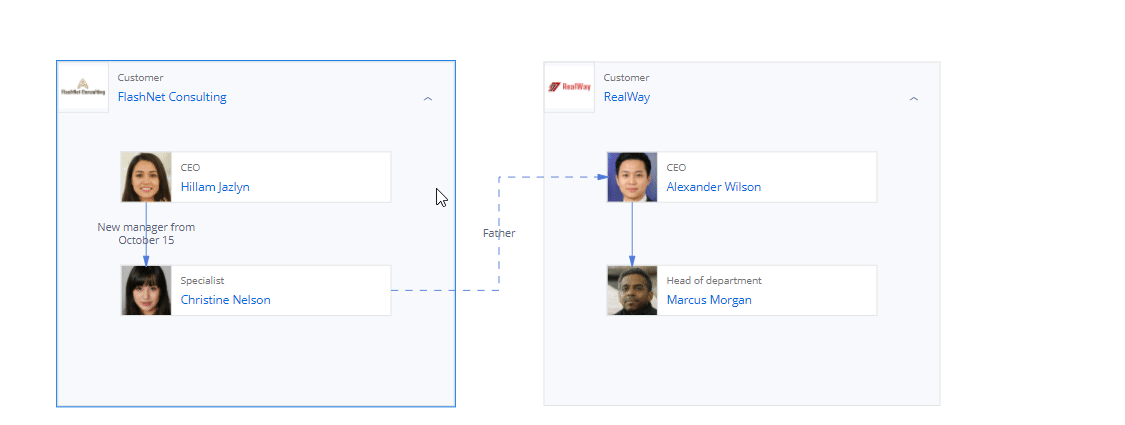
This will add the new relationships to the chart. If you have previously depicted other relationships with these records, these relationships will also appear on the chart (Fig. 7).
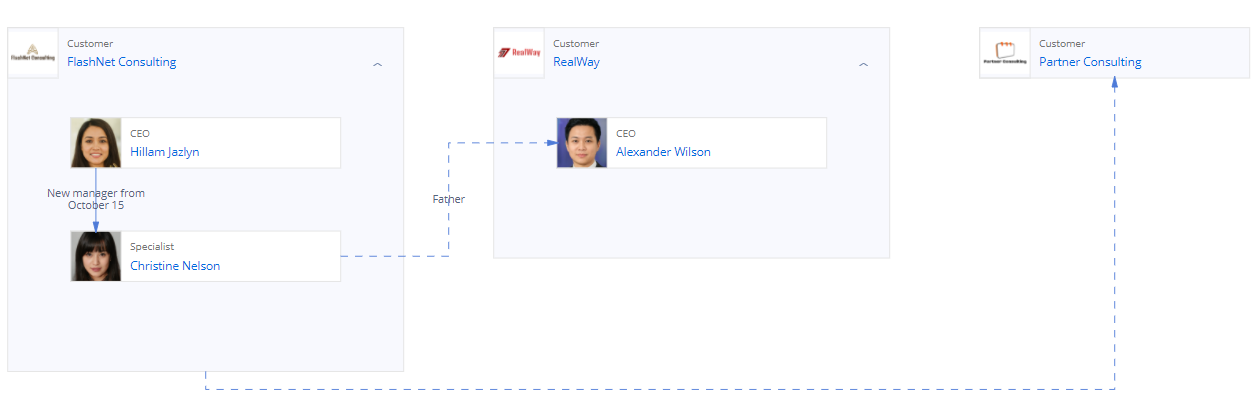
In this example, the FlashNet Consulting account has relationships with the company employees and a different account. If you depict a relationship between employees who work for different companies, the chart will display all existing relationships, including the connection between one of the employer accounts and a different account.
A contact can only be an employee of a single account. If you have already depicted an "Employee-Employer" formal relationship type between a contact and an account, you will receive an error message when attempting to depict a similar relationship between an employee and a different account. You can depict informal relationships instead.
If necessary, you can depict a relationship between the elements directly from the chart. Select one of the elements, click ![]() , drag the arrow to the second element and fill out the relationship details (Fig. 8).
, drag the arrow to the second element and fill out the relationship details (Fig. 8).
New relationship examples
Add an affiliate account to the holding company's chart.
- Start the setup on the main account page.
- Add an account.
- Set the dropdown list at the top of the relationship profile to "Formal."
- Set the relationship type to "Holding company-Affiliate company."
- Select the affiliate account record.
Add a branch to the company's chart.
- Start the setup on the managing company's page.
- Add an account.
- Set the dropdown list at the top of the relationship profile to "Formal."
- Set the relationship type to "Managing company-Branch."
- Select the branch account record.
Add a former employer to the employee's chart.
- Start the setup on the contact page.
- Add an account.
- Set the dropdown list at the top of the relationship profile to "Not formal."
- Set the relationship type to "Employee-Former employer."
- Select the account record of the former employer.
Group contacts
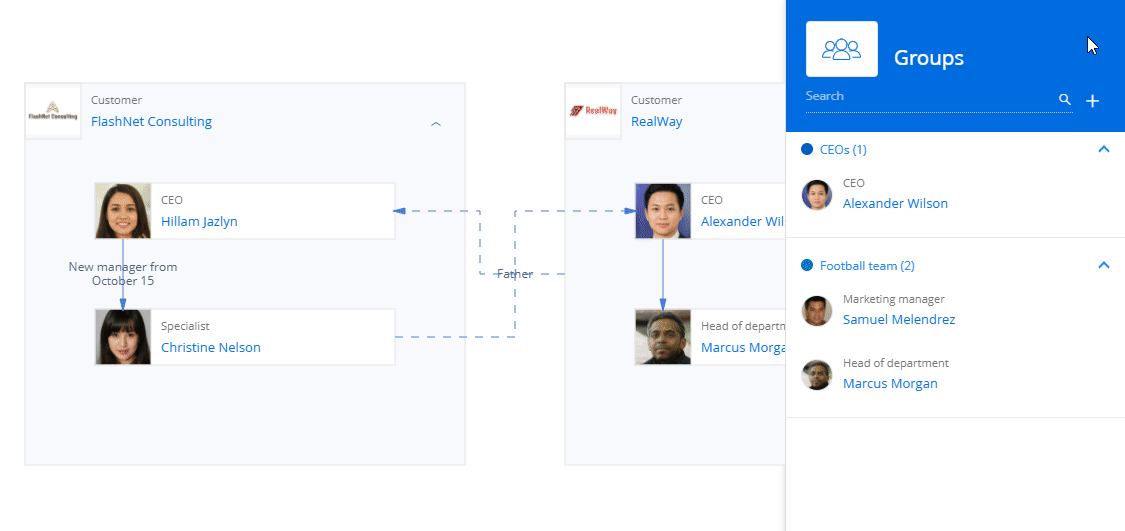
Use relationship groups to combine contacts by any criteria, even if the contacts do not have any other relationships. You can group contacts both within and outside an organization. For instance, you can group the sports team members who are employed by different accounts and do not have any other formal or informal relationships between each other (Fig. 9).
To view the group membership, bring up the contact relationship profile or hover over the contact block on the chart.
The contact groups on the relationship chart are independent from the folders in the Contacts section.

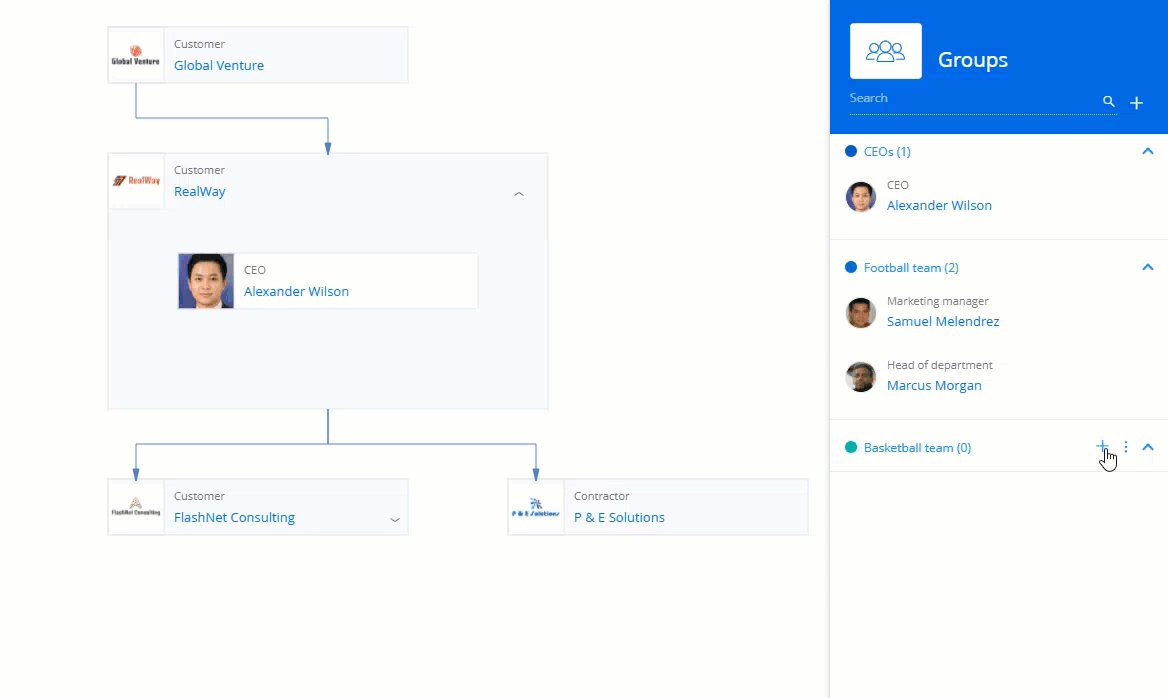
Add a new group
- Go to the contact or account page's Connected to tab and click
 .
. - Click +.
- Specify the group name in the Name field. The group color is set automatically, but you can change it.
- Add a comment in the Comment field if needed.
- Click Save (Fig. 10).
This will add a new group to the contact group list.
The  button next to the group name has the following options:
- Edit the group name and/or add a comment: click .
- Delete the group: click and confirm deletion.
- Highlight all the group's contacts on the chart: click
 . Contacts that do not belong to the group will become inactive on the chart.
Add a contact to the group
- Go to the contact or account page's Connected to tab and click .
- Select the relevant group and click + next to its name. This opens a box.
- Select the relevant contact in the box that opens.
- Add a comment in the Comment field if needed.
- Click Save (Fig. 11).
This will add a new contact to the group.
The button next to the group member name has the following options:
- Add a comment to the group member: click .
- Delete the member from the group: click and confirm deletion.