Manage communication options and addresses in Classic UI
In Creatio, you can manage the communication options and addresses of contacts and accounts using the General information tab on their pages. Add addresses and communication options, look them up on a map, and restrict the usage of specific communication options.
Add communication options
Use the Communication options detail to specify the communication options of a contact or account. To do this:
-
Go to the Contacts or Accounts section and open the needed record.
-
Open the Contact info or Account info tab → the Communication options detail →
 .
. -
Select communication option to add:
- Business phone, Mobile phone, Home phone. Phone numbers that can be used to contact the person. Communication option types are defined when a record is added. You can change the type later. The fields are available for contact profiles.
- Primary phone, Additional phone, Fax. Phone numbers that can be used to contact the company. Communication option types are defined when a record is added. You can change the type later. The fields are available for account profiles.
- Web, Email. Website and email addresses of the contact. The record list displays the last of the entered email addresses of the contact or account.
- Facebook, Twitter. Social network profiles of the contact or account. A separate page is used to link social network profiles to accounts or contacts.
- Skype. The contact's Skype account. The field is available for contact profiles.
-
Enter the data using the standard format for this communication option.
-
Click Save.
You can use default types of communication options or add custom ones. Use the Communication option types lookup to add custom types of communication options. Custom communication option types fall into one of the pre-set communication types: Email, Skype, Web, Phone, and Social. Be sure to select one when adding a custom communication option type.
Attention. If Microsoft Exchange integration is configured, we do not recommend changing the default communication option types, since this might lead to synchronization errors.
Restrict the use of contact communication options
If a contact prefers some communication options and finds the use of the other options unacceptable, you can display this information on the Communication options detail. To do this, click → Do not use → select the needed option:
- Do not use email
- Do not use phone
- Do not use SMS
- Do not use mail
- Do not use fax
Checkboxes signify which communication options not to use to contact the person. For example, if a contact does not wish to receive mail, select the Do not use mail checkbox. If a contact did not consent to receive emails, select the Do not use email checkbox.
If the "Unsubscribe user from all bulk emails" system setting is enabled, Creatio checks the Do not use email checkbox automatically for all contacts who unsubscribed from bulk emails. This functionality is available in Sales Creatio and Marketing Creatio.
When sending bulk emails via the Send email element in the business process or case, Creatio ignores the Do not use email checkbox selected in the Communication options detail.
Keep communication options valid
Creatio lets you mark contact communication options as valid. This functionality is available in Marketing Creatio. For example, if the email address of the customer changes, you can add a new address to the detail and mark the previous address as invalid manually. To do this:
-
Open the Contacts section.
-
Open the page of the relevant contact.
-
Select an invalid email on the Communication options detail and click
 next to the field title. This opens the record edit menu.
 -
Clear the Valid checkbox (Fig. 1).
Fig. 1 Mark a communication option as invalid 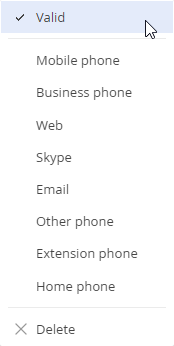
-
Save the changes.
As a result, Creatio will add "invalid" in brackets to the field name (Fig. 2) and populate the following communication option data:
- Invalid. Selected checkbox means the communication option is not in use currently. You can use the field when setting up filters for folders.
- Reason for irrelevance. Reason why the communication option is invalid: "Hard bounce" or "Manual setting." The field is populated automatically. Creatio does not display it on the Communication options detail but you can use the field when setting up filters for folders.
- Invalid from Date from which the selected communication option has become invalid. The field is populated automatically. Creatio does not display it on the Communication options detail but you can use the field when setting up filters for folders.

Depending on the received email responses, Creatio can mark an email address as invalid automatically. This occurs if the sent emails received "Hard Bounce" response 5 times in a row for any of the following reasons:
- Unknown Recipient
- Mailbox Problem
- Spam Reject
- Domain Not Found
If Creatio receives the "Hard Bounce" response for the "Recipient Blocked" reason, the email address is marked as invalid immediately.
You can view the reasons for the response in several ways:
- Open the email page → the Audience tab → the Response reason column.
- Open the contact page → the History tab → the Email - Bulk emails detail → the Response reason column.
Add an address
Use the Addresses detail to specify the addresses of a contact or account. To do this:
- Go to the Contacts or Accounts section and open the needed record.
- Go to the Contact info or Account info tab → Addresses → .
- Select the type of address to add. This opens a page
- Fill out the following fields on the page that opens:
- Specify the type of the contact or account address in the Address type field. For example, "Home" or "Work" for a contact, "Legal" or "Actual" for an account. Address types are defined when a record is added (you can change them later).
- Select the Primary checkbox if the address is primary. Creatio displays the primary address in the list and record profile. By default, the Primary checkbox is selected for the first address added to the Addresses detail, but you can select this checkbox for a different address at any time. The checkbox in the original record will be cleared.
- Enter the street, building, and apartment or office number in the Address field. The list displays the account or contact’s primary address.
- Select the contact or account location in the City and Country fields. The State/province and City fields are connected to the Country field. For example, if a city is located in a certain country, then when you populate the City field, Creatio populates the Country field automatically. Similarly, if you enter a province in the State/province field, Creatio populates the Country field automatically. When you fill out the Country field, the State/province and City fields display only the regions and cities connected to the selected country. You can connect a region to a specific country in the States/provinces lookup, and connect a city to a country in the Cities lookup.
- Enter the ZIP or postal code of the account or contact in the ZIP/postal code field.
After you fill out one or multiple account addresses, the Show on map section action becomes available. Use it to display the location of the selected accounts on the map. If an account has several addresses populated, e. g., physical address and mailing address, the map displays all of the specified addresses. To view the detailed description, click an address.
Creatio also displays the account address after you click on the needed row in the Addresses detail. If the location of the account on the map is not correct, move the marker to the correct position and save the changes.
Attention. Creatio displays addresses using the OpenStreetMap service integration. The service is developed and maintained by a third party. Creatio assumes no responsibility for the operation of the service and the content of OpenStreetMap maps.