Create a contact
In Creatio, a contact can be:
-
added manually
-
imported from an *.xlsx file
-
imported from the landing page (available in Creatio Marketing)
-
saved manually or automatically during lead qualification (available in Creatio Sales and Creatio Marketing)
-
received through Google synchronization
-
created using incoming mail processing
-
created using Single Sign-On authentication.
To synchronize with external resources, you need to perform initial setup. Learn more about social network integration, Google synchronization, and Single Sign-On technology: Base integrations, Authentication.
Create a contact manually
-
Open the Contacts section.
-
Click New. This opens a mini page.
-
Add a photo of the contact to display on the contact page, section list, and feed. To add a photo, click the placeholder image and upload a photo file using the standard file selection window. We recommend uploading a square image, i. e. image that has a 1:1 aspect ratio. Hold the pointer over the image and click
 to upload a new photo or
  to remove the photo.
 -
Click Add contact name and birth date and fill out the main contact information:
Field
Field value
First name
First name of the contact. The field is required.
Last name
Last name of the contact.
Middle name
Middle name of the contact.
Birth date
Birth date of the contact.
-
Enter more information about the contact on the mini page:
Field
Field value
Type
Type of contact depending on their relations with your company, for example, "Customer" or "Contact person."
Account
The company whose employee the contact is.
Full job title
The full name of the contact's current position.
Mobile phone
Contact's mobile phone number.
Email
The email address of the contact.
-
Click
 . This opens the main contact page.
 -
Fill out the contact data on the Contact info tab:
Field
Field value
Owner
Name of the employee in charge of the contact. Creatio populates the field with the record creator, but you can change the value if needed.
Recipient's name
The preferred way to address the contact.
Gender
The gender of the contact.
Title
Honorific for the contact, for example, "Mr" or "Mrs."
Preferred language
The language to use by default for automated communications with the contact. Affects the language of email notifications. If no preferred language is set for a contact, Creatio sends notifications in English (the default language). The drop-down list of this field contains only languages whose status is set to "Active" in the Customer languages lookup.
-
Specify the addresses and communication options of the contact. Learn more: Manage communication options and addresses.
-
Fill out the contact career data on the Job experience expanded list. Learn more: Manage job experience.
-
Save changes.
As a result, Creatio will add a contact record. You will be able to update the contact details at any moment.
When you save a contact, a duplicate search page might open. It means that this contact might already exist in Creatio. You can edit the new record or indicate that the records found are not duplicates of the newly saved record.
Add a new contact from an email
If you receive an email from a contact that has not been registered in Creatio, the sender's data is displayed as "unrecognized" in the emails. In this case, you can create a new contact record directly from the incoming email. To do this:
-
Open the email tab in the communication panel.
-
Select the author of the email for which to create a contact.
-
Click
 .
. -
Select Create "contact name" from the data enrichment menu (Fig. 1). This opens a window.
Fig. 1 Create a new contact from an email conversation 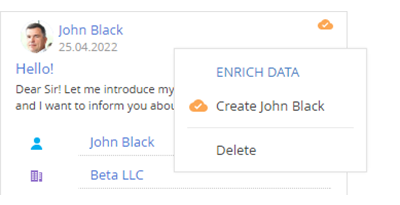
-
Select the contact data to add.
-
Save the changes.
As a result, Creatio will add a new contact. The email will be linked to the contact automatically.