Set up Button components
Use Button components to enable users to take a wide variety of actions, from opening record pages to setting up access permissions.
Set up a button that executes a single action
Set up the Workflow button on the request page. The button must open the page that displays the request workflow and have an easily noticeable icon.

- Drag a Button component to the canvas and open the component setup area.
- Enter "Workflow" in the Title parameter. You can click the
 button to the right to localize the title to other languages you are going to use in the app. Learn more about localizing Freedom UI elements in a separate article.
 - Specify the visual design of the button in the Style parameter. For this example, select "Primary."
- Set the button size in the Size parameter. For this example, select "L."
- Specify the button action to execute in the Action parameter. For this example, select "Open specific page." This brings up the Which page to open? parameter. Other parameter values bring up similar parameters that let you customize the action.
- Select the page to open in the Which page to open? parameter or click
 next to the parameter to create and set up a new page. For this example, create and set up a "Workflow" page based on the "Blank" template.
 - Click
 in the Menu items group to add another action to the button as a menu item. For this example, do not add any items. Learn more about setting up button menus in different sections: Set up a button that executes multiple common actions, Set up a button that contains submenus.
 - Click the
 or
or  button in the Visibility group to make the component visible or invisible by default on the page, respectively. For this example, leave the component visible.
 - Click Setup conditions in the Visibility group to set up element business rules. For this example, do not add business rules. Learn more about setting up business rules in a separate article: Set up business rules.
- Click the Use icon toggle to add an icon to the button. This brings up button setup parameters.
- Select the
 information icon in the Icon parameter.
 - Specify the button position or toggle the button caption in the Position parameter. For this example, place the icon to the left of the caption.
- View the unique component code in the page schema in the Element code parameter. Creatio uses this code in page schemas. You can change it if needed. This helps software developers to customize the app easier, especially if you have multiple similar components on the page. For this example, leave the code as is.
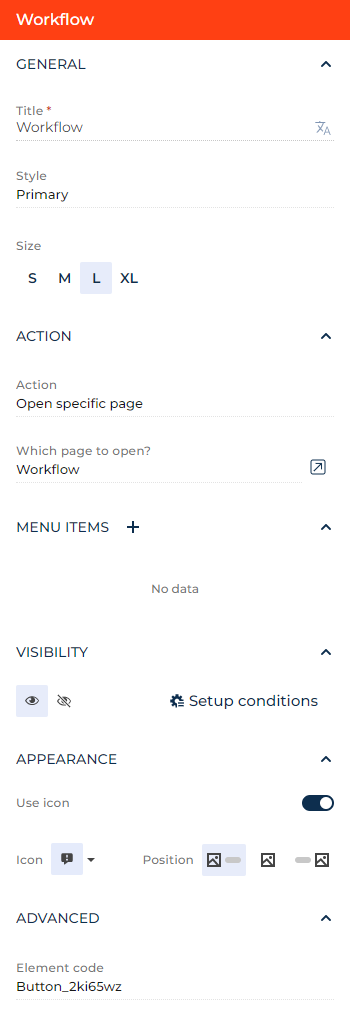
As a result, Creatio will add the Workflow button to the request page. The button will open the page the displays the request workflow and have an icon to the left of its caption.
Set up a button that executes multiple common actions
To keep the page UI lean, you can combine similar button actions, for example, saving the record, canceling changes, or closing the page, into the drop-down menu of a single button.
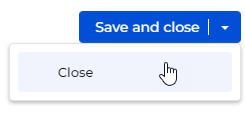
Set up the Save and close button on the request page toolbar. The button must save the changes and close the page simultaneously. The Close item of the drop-down button menu must close the page without saving the changes.
-
Open the setup area of the Save button included in the page template by default.
-
Enter "Save and close" in the Title parameter. You can click the
button to the right to localize the title to other languages you are going to use in the app. Learn more about localizing Freedom UI elements in a separate article. -
Add a drop-down menu with the action that closes the page.
-
Click
in the Menu items block. This opens the setup area of the menu item. -
Set the base menu item parameters in the setup area:
- Enter "Close" in the Title parameter. You can localize the parameter similarly to the Title parameter.
- Select "Close page" in the Action parameter.
-

As a result, Creatio will add the Save and close button to the record page. Click the button to save the changes and open the section list. Select the Close menu item in the button drop-down menu to close the page without saving the changes.
Set up a button that contains submenus
To make the app workflow as flexible as possible, you can add buttons that contain submenus with various actions users might require on different process stages.
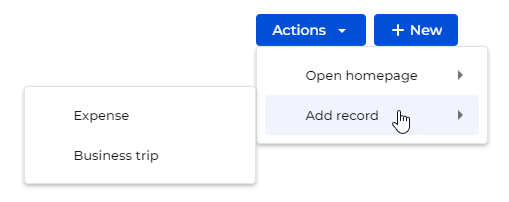
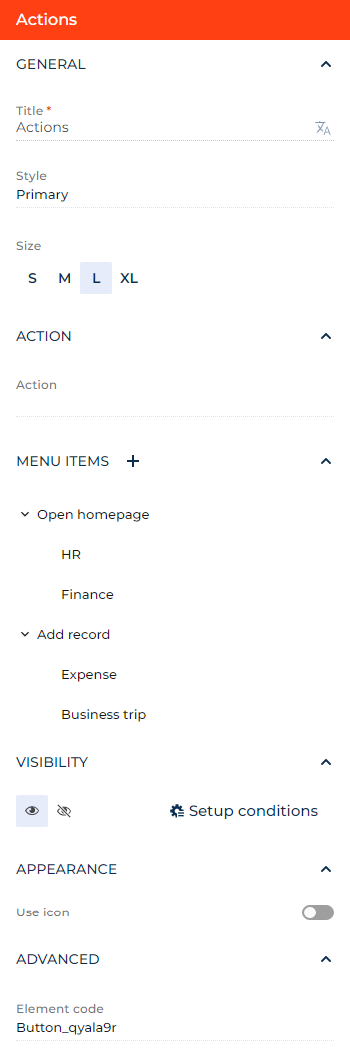
Set up the Actions button on the list page toolbar. The button must contain an embedded menu with the following items: Open homepage and Add record. Items of the Open homepage submenu must open "HR" and "Finance" homepages. Items of the Add record submenu must add new expense and business trip records.
-
Drag a Button component to the canvas and open the component setup area.
-
Enter "Actions" in the Title parameter. You can click the
button to the right to localize the title to other languages you are going to use in the app. Learn more about localizing Freedom UI elements in a separate article. -
Select "Primary" in the Style parameter.
-
Set up the submenu with actions that open pages.
-
Add an item that will contain the submenu.
- Click in the Menu items block.
- Enter "Open homepage" in the Title parameter. You can localize the parameter similarly to the first Title parameter.
- Click
-
Add an item that opens the "HR" homepage to the Open homepage submenu.
-
Click the Open homepage menu item to open its settings.
-
Click
in the Menu items block. -
Set the base menu item parameters in the setup area:
- Set Action to "Open specific page."
- Enter "HR" in the Title parameter. You can localize the parameter similarly to the first Title parameter.
- Select the page to open in the Which page to open? parameter or click next to the parameter to create and set up a new page. For this example, create and set up an "HR" homepage based on the "Dashboards" template.
-
-
Repeat steps a-c for the submenu item that opens the "Finance" homepage.
-
-
Set up the submenu whose items add expense and business trip records in a similar way.
As a result, Creatio will add the Actions button to the toolbar of the list page. You will be able to run the following actions using the button menu:
- Open HR homepage.
- Open Finance homepage.
- Add an expense record.
- Add a business trip record.
Set up a button that runs business processes in a section
In Creatio, you can set up a business process that runs for a specific section record. You can run business processes in any Freedom UI object using a button.
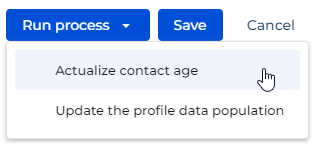
Set up the Run process button on the record page toolbar. The button must run the Actualize contact age process and Update the profile data population business processes.
-
Drag a Button component to the canvas and open the component setup area.
-
Enter "Run process" in the Title parameter. You can click the
button to the right to localize the title to other languages you are going to use in the app. Learn more about localizing Freedom UI elements in a separate article. -
Set Style to "Primary."
-
Add an item that runs the Actualize contact age process process.
-
Click
in the Menu items block. -
Set the base menu item parameters in the setup area:
- Enter "Actualize contact age process" in the Title parameter. You can localize the parameter similarly to the first Title parameter.
- Select "Run process" in the Action parameter.
- Select "Actualize contact age process" in the Which process to run? parameter.
-
-
Add an item that runs the Update the profile data population process in a similar way.

As a result, you will be able to run the Actualize contact age process and Update the profile data population business processes using the Run process button on the section page.
Set up a button that opens the change log
You can add a button to open the change log to a Freedom UI form page to let users view the change history of a record or all records of an object without leaving the section.
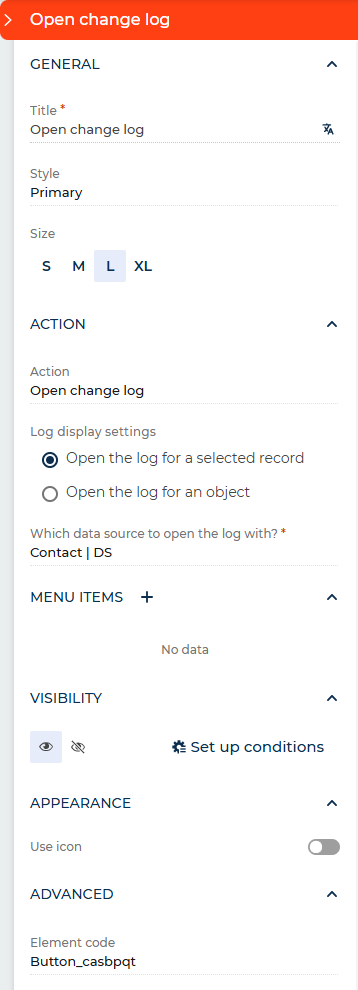
Set up the Open change log button on the contact page. The button must open the change log for the currently viewed contact record.
-
Drag a Button component to the canvas and open the component setup area.
-
Enter "Open change log" in the Title parameter. You can click the
button to the right to localize the title to other languages you are going to use in the app. -
Set Style to "Primary."
-
Set Action to "Open change log." This brings up the log display settings.
-
Select the log scope:
- Select "Open the log for a selected record" to display change log entries for the currently open record. For this example, select this option.
- Select "Open the log for an object" to display change log entries for all records of the object.
-
Check the Which data source to open the log with? field. The field is populated automatically. Change the value if you need to use a different data source.
-
Save changes.
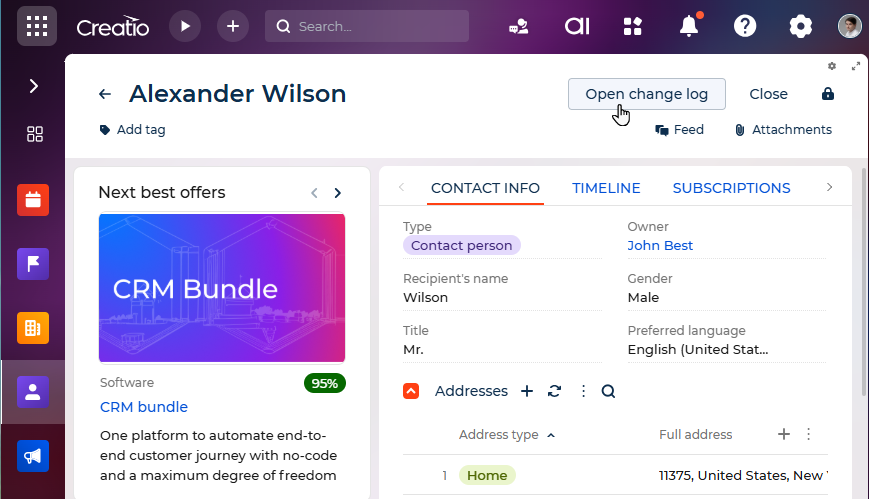
As a result, Creatio will add the Open change log button to the contact page. Users can click it to view the change log for the currently open contact record directly from the page. If logging is not configured for the section, clicking the button will redirect the user to the setup described in step 5 of Method 1 in the Set up the change log article.
See also
Overview of Freedom UI Designer and its elements