
Mobile portal (mobile application for portal users) is a mobile workplace. The purpose of the mobile portal is to enable the mobile portal users to create cases and communicate with customer support.
A mobile portal has configurable:
- mobile portal user workplace
- case list
- case page
- page that adds cases
Set up the workplace of a mobile portal user
You can set up the workplace of a mobile portal user in the following ways:
- Add a new workplace.
- Hide a workplace.
- Delete a workplace.
Add a workplace of a mobile portal user
To check if the Portal workplace is available:
- Click
 to open the System Designer.
 - Go to the System setup block → Mobile application wizard.
The Portal workplace is in the Mobile application wizard section. By default, all mobile portal users can access it.
If the Portal workplace is not available in the Mobile application wizard section, add the workplace.
To add a workplace of a mobile portal user:
- Make sure that you are using Creatio version 7.18.4 or later.
- Click to open the System Designer.
- Go to the System setup block → Mobile application wizard.
- Click New workplace in the Mobile application wizard section toolbar.
-
Fill out the workplace properties.
- Set Name to the workplace name.
- Set Code to "Portal."
- Configure the access permissions to the workplace for users or user groups on the Roles detail.
- Click Set up sections on the toolbar. By default, the workplace of a mobile portal user includes the Cases section.
- Save the settings of the Mobile application wizard section.
As a result, Creatio will add a workplace of a mobile portal user.
Learn more about adding a workplace to a mobile application in the user documentation: Set up mobile app workplaces.
Hide the workplace of a mobile portal user
- Click to open the System Designer.
- Go to the System setup block → Mobile application wizard.
- Open the Portal workplace in the section list.
- Delete users or user groups of the Portal workplace. To do this, click
 and select Delete on the Roles detail.
As a result, Creatio will hide the workplace of a mobile portal user.
Delete the workplace of a mobile portal user
- Click to open the System Designer.
- Click Mobile application wizard in the System setup block.
- Select the Portal workplace in the section list and click Delete.
As a result, Creatio will delete the workplace of a mobile portal user.
Set up the case list
You can set up the case list of a mobile portal in the following ways:
- Add a column to the case list.
- Hide the column title from the case list.
- Configure the case sorting order in the list.
Add a column to the case list
- Click to open the System Designer.
- Go to the System setup block → Mobile application wizard.
- Open the Portal workplace in the section list.
- Click Set up sections on the toolbar.
- Select the Cases section in the section list and click List setup.
- Click New column in the Subtitle or Additional columns block and select the required column.
- Save the list settings in the Cases section.
- Save the settings of the Mobile application wizard section.
Learn more about adding a column to the section list in the user documentation: Set up mobile application section list .
Hide the column title from the case list
- Go to the Configuration section.
-
Open the MobileCaseGridPageSettingsPortal schema in the custom package. If you are yet to set up the case list using the Mobile Application Wizard, the MobileCaseGridPageSettingsPortal schema will not be available in the custom package.
To add the MobileCaseGridPageSettingsPortal schema to the custom package:
- Click to open the System Designer.
- Go to the System setup block → Mobile application wizard.
- Open the Portal workplace in the section list.
- Click Set up sections on the toolbar.
- Select the Cases section in the section list and click Page setup.
- Save the settings of the Cases section page.
- Save the settings of the Mobile application wizard section.
- Click
-
Hide the column title from the case list. To do this, add a configuration object of the column whose title must be hidden to the beginning of the diff array of modifications.
- Specify the column in the value property. Column name template: $ColumnName.
- Set the visible property (whether to display the column title) to false.
View an example that hides the [Status] column title below.
- Click Save on the Designer’s toolbar.
Configure the case sorting order in the list
- Go to the Configuration section.
-
Open the MobileCaseGridPageSettingsPortal schema in the custom package. If you are yet to set up the case list using the Mobile Application Wizard, the MobileCaseGridPageSettingsPortal schema will not be available in the custom package.
To add the MobileCaseGridPageSettingsPortal schema to the custom package:
- Click to open the System Designer.
- Go to the System setup block → Mobile application wizard.
- Open the Portal workplace in the section list.
- Click Set up sections on the toolbar.
- Select the Cases section in the section list and click Page setup.
- Save the settings of the Cases section page.
- Save the settings of the Mobile application wizard section.
- Click
-
Set up the sorting order in the case list. To do this, add a configuration object that has the list display settings to the beginning of the diff array of modifications.
- Specify the name of the column to use for sorting in the columnPath property.
- Specify the alias of the column to use for sorting in the alias property.
- Specify the sorting order in the orderDirection property: 1 for ascending, 2 for descending.
- Specify the index of the column in the column collection to use for sorting in the orderPosition property.
View an example that configures the sorting in the case list below. The cases in the list are sorted by the [RegisteredOn] column in ascending order.
- Click Save on the Designer toolbar.
Set up the case page
Set up the case page to add a column to the Details tab.
To add a column to the Details tab of the case page:
- Click to open the System Designer.
- Go to the System setup block → Mobile application wizard.
- Open the Portal workplace in the section list.
- Click Set up sections on the toolbar.
- Select the Cases section in the section list and click Page setup.
- Click New column in the General information block and select the Number column.
- Save the settings of the Cases section page.
- Save the settings of the Mobile application wizard section.
Set up the page that adds cases
You can add a column to the page that adds cases.
To add a column to the page that adds cases:
- Go to the Configuration section.
- Open the MobileCaseMiniPagePortal schema of the CaseMobile package and copy its contents.
- Select a custom package to add the schema.
-
Click Add → Module on the section list toolbar.
/scr_add_module.png)
-
Fill out the schema properties.
- Set Code to the schema name. Required. Must contain the prefix (by default, Usr) specified in the Schema name prefix (SchemaNamePrefix code) system setting.
- Set Title to the localizable schema title. Required.
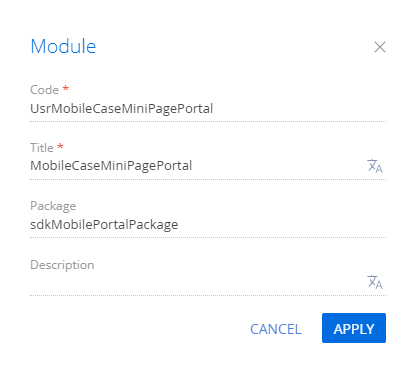
- Add the copied contents of the MobileCaseMiniPagePortal schema of the CaseMobile package to the custom module.
- Move the localized strings of the MobileCaseMiniPagePortal schema of the CaseMobile package to the custom module.
-
Add a column.
-
Add the element to use for editing the required column to the viewConfig property. Specify the column in the value property. Column name template: $ColumnName.
View an example that adds the [$ConfItem] column below.
$ConfItem is the column name.
-
Add the description of the required column to the controllers property. Specify the name of the schema column of the Case object in the columnPath property.
View an example that describes the [ConfItem] column below.
-
- Click Save on the Designer’s toolbar.
-
Register the earlier created UsrMobileCaseMiniPagePortal custom schema in the portal workplace manifest.
-
Open the MobileApplicationManifestPortal schema in the custom package. If you are yet to set up the app using the Mobile Application Wizard yet, the MobileApplicationManifestPortal schema will not be available in the custom package.
To add the MobileApplicationManifestPortal schema to the custom package:
- Click to open the System Designer.
- Go to the System setup block → Mobile application wizard.
- Open the Portal workplace in the section list.
- Click Set up sections on the toolbar.
- Select the Cases section in the section list and click Page setup.
- Save the settings of the Cases section page.
- Save the settings of the Mobile application wizard section.
- Click
-
Register the schema.
- Specify the schema used to add the schema record of the Case object in the Modules property.
- Specify the schema used to extend the schema of the Case object in the Models property.
View an example that registers the UsrMobileCaseMiniPagePortal schema below.
-