
A web service is software reachable via a unique URL, which enables interaction between applications. The purpose of a web service is to integrate Creatio with external applications and systems.
Based on the custom business logic, Creatio will generate and send a request to the web service, receive the response and extract the needed data. Use this data to create or update records in the Creatio database, as well as for custom business logic or automation.
Creatio supports the following web service types:
- External REST and SOAP services that you can integrate with low-code tools. Read more in the following user documentation article block: Web services.
-
System web services.
- System web services that use cookie-based authentication.
- System web services that use anonymous authentication.
-
Custom web services.
- Custom web services that use cookie-based authentication.
- Custom web services that use anonymous authentication.
.NET Framework system web services use the WCF technology and are managed at the IIS level. .NET Core system web services use the ASP.NET Core Web API technology.
Learn more about the authentication types Creatio provides for web services in a separate article: Authentication. We recommend using authentication based on the OAuth 2.0 open authorization protocol. Learn more about OAuth-based authentication in the user documentation: Set up OAuth 2.0 authorization for integrated applications.
Creatio system web services that use cookie-based authentication include:
- odata that executes OData 4 external application requests to the Creatio database server. Learn more about using the OData 4 protocol in Creatio in a separate article: OData.
- EntityDataService.svc that executes OData 3 external application requests to the Creatio database server. Learn more about using the OData 3 protocol in Creatio in a separate article: OData.
- ProcessEngineService.svc that enables external applications to run Creatio business processes. Learn more about the web service in a separate article: Business process service.
Creatio system web services that use anonymous authentication include:
- AuthService.svc that executes Creatio authentication requests. Learn more about the web service in a separate article: Authentication.
This article covers custom web services. Learn more about system web services in a separate guide: Integrations & API.
Develop a custom web service
A custom web service is a RESTful service that uses the WCF (for .NET Framework) or ASP .NET Core (for .NET Core) technology. Unlike system web services, custom web services let you solve unique integration problems.
The web service development procedure differs for each Creatio deployment framework. View the unique features of the custom web service development for the .NET Framework and .NET Core frameworks below.
Develop a custom web service that uses cookie-based authentication
- Create a Source code schema. Learn more about creating schemas in a separate article: Develop configuration elements.
-
Create a service class.
- Add the Terrasoft.Configuration namespace or any of its nested namespaces in the Schema Designer. You can name the namespace arbitrarily.
- Add the namespaces the data types of which to utilize in the class using the using directive.
- Use the Terrasoft.Web.Http.Abstractions namespace if you want the custom web service to support both .NET Framework and .NET Core. If you develop the web service using the System.Web namespace and have to run it on .NET Core, adapt the web service.
- Add the class name that matches the schema name (the Code property).
- Specify the Terrasoft.Nui.ServiceModel.WebService.BaseService class as a parent class.
- Add the [ServiceContract] and [AspNetCompatibilityRequirement] class attributes that contain the needed parameters. Learn more about the [ServiceContract] attribute in the official Microsoft documentation. Learn more about the [AspNetCompatibilityRequirements] attribute in the official Microsoft documentation.
-
Implement the class methods that correspond to the web service endpoints.
Add the [OperationContract] and [WebInvoke] method attributes that contain the needed parameters. Learn more about the [OperationContract] attribute in the official Microsoft documentation. Learn more about the [WebInvoke] attribute in the official Microsoft documentation.
-
Implement additional classes whose instances will receive or return the web service methods (optional). Required to pass data of complex types. For example, object instances, collections, arrays, etc.
Add the [DataContract] attribute to the class and the [DataMember] attribute to the class fields. Learn more about the [DataContract] attribute in the official Microsoft documentation. Learn more about the [DataMember] attribute in the official Microsoft documentation.
- Publish the source code schema.
As a result, you will be able to call the custom web service that uses cookie-based authentication from the source code of configuration schemas, as well as from external applications.
Develop a custom web service that uses anonymous authentication
Custom web services that use anonymous authentication do not require the user to pre-authenticate, i. e., you can use them anonymously.
Develop a custom web service that uses anonymous authentication for .NET Framework
- Take steps 1-5 in the Develop a custom web service that uses cookie-based authentication instruction.
- Add the SystemUserConnection system connection when creating a service class.
-
Specify the user on whose behalf to process the HTTP request when creating a class method. To do this, call the SessionHelper.SpecifyWebOperationIdentity method of the Terrasoft.Web.Common namespace after retrieving SystemUserConnection. This method enables business processes to manage the database entity (Entity) from the custom web service that uses anonymous authentication.
-
Register the custom web service that uses anonymous authentication:
- Go to the ..\Terrasoft.WebApp\ServiceModel directory.
-
Create an *.svc file whose name matches the web service name. Add the following record to the file.
The Service attribute must contain the full name of the web service class and specify the namespace.
Learn more about the @ServiceHost WCF directive in the official Microsoft documentation.
-
Enable both HTTP and HTTPS support for the custom web service that uses anonymous authentication:
-
Open the ..\Terrasoft.WebApp\ServiceModel\http\services.config file and add the following record to it.
The <services> element contains the list of Creatio web service configurations (the <service> nested elements).
The name attribute contains the name of the type (class or interface) that implements the web service contract.
The <endpoint> nested element contains the address, binding, and interface that defines the contract of the web service specified in the name attribute of the <service> element.
Learn more about the web service configuration elements in the official Microsoft documentation.
- Add an identical record to the ..\Terrasoft.WebApp\ServiceModel\https\services.config file.
-
-
Enable all users to access the custom web service that uses anonymous authentication:
- Open the ..\Terrasoft.WebApp\Web.config file.
-
Add the <location> element that defines the relative path and access permissions to the web service.
-
Add the relative web service path to the value attribute of the AllowedLocations key in the <appSettings> element.
- Restart Creatio in IIS.
As a result, you will be able to call the custom web service that uses anonymous authentication from the source code of configuration schemas, as well as from external applications. You can access the web service both with and without pre-authentication.
Develop a custom web service that uses anonymous authentication for .NET Core
- Take steps 1-5 in the Develop a custom web service that uses cookie-based authentication instruction.
-
Enable all users to access the custom web service that uses anonymous authentication:
- Open the ..\Terrasoft.WebHost\appsettings.json configuration file.
- Add the web service details to the AnonymousRoutes file block.
- Restart Creatio.
As a result, you will be able to call the custom web service that uses anonymous authentication from the source code of configuration schemas, as well as from external applications. You can access the service both with or without pre-authentication.
Call a custom web service
You can call a custom web service from the browser or front-end.
Call a custom web service from the browser
Call a custom web service that uses cookie-based authentication from the browser
To call a .NET Framework custom web service that uses cookie-based authentication from the browser:
- Retrieve the authentication cookies using the AuthService.svc system web service.
-
Call a custom web service using the address bar:
The procedure to call a .NET Core custom web service that uses cookie-based authentication is identical. That said, the /0 prefix is not required.
Call a custom web service that uses anonymous authentication from the browser
Call a .NET Framework custom web service that uses anonymous authentication using the address bar:
The procedure to call a .NET Core custom web service that uses anonymous authentication is identical. That said, the /0 prefix is not required.
Call a custom web service from the front-end
- Add the ServiceHelper module as a dependency to the module of the page from which to call the service. This module provides a convenient interface to execute server requests via the Terrasoft.AjaxProvider request provider implemented in the client core.
-
Call a custom web service from the ServiceHelper module.
You can call a custom web service in several ways:
- Call the callService(serviceName,
serviceMethodName, method.callback, serviceData, scope) -
Call the callService(config)method, where config is a configuration object that has the following properties:
serviceName is the name of the custom web service.
methodName is the name of the custom web service method to call.
callback is the callback function that processes the web service response.
data is the object that contains the initialized incoming parameters for the service method.
scope is the context of the request execution.
- Call the callService(serviceName,
Migrate an existing custom web service to .NET Core
You can migrate a .NET Framework custom web service that retrieves the context without inheriting the Terrasoft.Web.Common.BaseService base class to .NET Core. To do this, adapt the custom web service.
The HttpContextAccessor property of the Terrasoft.Web.Common.BaseService provides unified access to context (HttpContext) both in .NET Framework and .NET Core. The UserConnection and AppConnection properties let you retrieve the user connection object and the connection object on the application level. This lets you omit the HttpContext.Current property of the System.Web library.
Creatio supports the following context retrieval options for web services developed without inheriting the Terrasoft.Web.Common.BaseService class:
-
via IHttpContextAccessor registered in DI (ClassFactory)
This option lets you view the explicit class dependencies for thorough automated testing and debugging. Learn more about using the class factory in a separate article: Replace configuration elements.
-
via the HttpContext.Current static property
Add the Terrasoft.Web.Http.Abstractions namespace to the source code using the using directive. The HttpContext.Current static property implements unified access to HttpContext. To adapt the web service code to .NET Core, replace the System.Web namespace using Terrasoft.Web.Http.Abstractions.
1. Create a Source code schema
- Go to the Configuration section and select a custom package to add the schema.
-
Click Add → Source code on the section list toolbar.
/scr_add_schema.png)
-
Go to the Schema Designer and fill out the schema properties:
- Set Code to "UsrCustomConfigurationService."
- Set Title to "CustomConfigurationService."

Click Apply to apply the properties.
2. Create a service class
- Go to the Schema Designer and add the namespace nested into Terrasoft.Configuration. You can use an arbitrary name. For example, UsrCustomConfigurationServiceNamespace.
- Add the namespaces the data types of which to utilize in the class using the using directive.
- Add a class name that matches the schema name (the Code property).
- Specify the Terrasoft.Nui.ServiceModel.WebService.BaseService class as a parent class.
- Add the [ServiceContract] and [AspNetCompatibilityRequirements(RequirementsMode = AspNetCompatibilityRequirementsMode.Required)] attributes to the class.
3. Implement the class method
Go to the Schema Designer and add the public string GetContactIdByName(string Name) class method that implements the endpoint of the custom web service. The method executes database queries using EntitySchemaQuery. Depending on the value of the Name parameter in the query string, the response body will contain:
- The ID of the contact (string type) if the contact is found.
- The ID of the first found contact (string type) if several contacts are found.
- The empty string if no contacts are found.
View the source code of the UsrCustomConfigurationService custom web service below.
Click Save then Publish on the Designer's toolbar.
Outcome of the example
As a result, Creatio will add the custom UsrCustomConfigurationService REST web service that has the GetContactIdByName endpoint.
Access the GetContactIdByName endpoint of the web service from the browser and pass the contact name in the Name parameter.
If you access the web service without preauthorization, an error will occur.
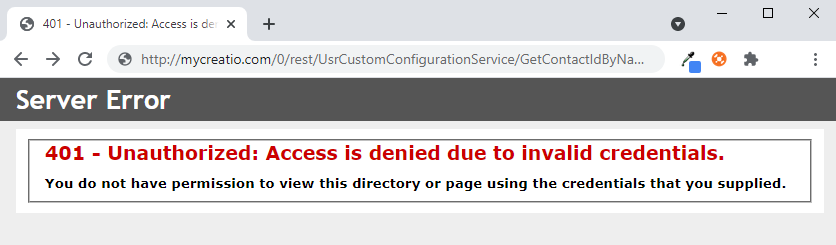
Log in to Creatio and execute the request once more. If Creatio finds the contact from the Name parameter in the database, the GetContactIdByNameResult property will return the contact ID value.

If Creatio finds no contacts from the Name parameter in the database, the GetContactIdByNameResult property will return an empty string.

1. Create a Source code schema
- Go to the Configuration section and select a custom package to add the schema.
-
Click Add → Source code on the section list toolbar.
-
Go to the Schema Designer and fill out the schema properties:
- Set Code to "UsrAnonymousConfigurationService."
- Set Title to "AnonymousConfigurationService."
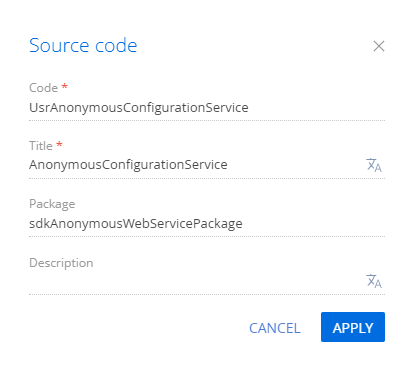
Click Apply to apply the properties.
2. Create a service class
- Go to the Schema Designer and add the namespace nested into Terrasoft.Configuration. You can use an arbitrary name. For example, UsrAnonymousConfigurationServiceNamespace.
- Add the namespaces the data types of which to utilize in the class using the using directive.
- Add the class name that matches the schema name (the Code property).
- Specify the Terrasoft.Nui.ServiceModel.WebService.BaseService class as a parent class.
- Add the [ServiceContract] and [AspNetCompatibilityRequirements(RequirementsMode = AspNetCompatibilityRequirementsMode.Required)] attributes to the class.
- Add the SystemUserConnection system connection to enable anonymous access to the custom web service.
3. Implement the class method
Go to the Schema Designer and add the public string GetContactIdByName(string Name) class method that implements the endpoint of the custom web service. The method executes database queries using EntitySchemaQuery. Depending on the value of the Name parameter in the query string, the response body will contain:
- The ID of the contact (string type) if the contact is found.
- The ID of the first found contact (string type) if Creatio several contacts are found.
- The empty string if Creatio no contacts are found.
Specify the user on whose behalf to process the HTTP request. To do this, call the SessionHelper.SpecifyWebOperationIdentity method of the Terrasoft.Web.Common namespace after retrieving SystemUserConnection. This method enables business processes to manage the database entity (Entity) from the custom web service that uses anonymous authentication.
View the source code of the UsrAnonymousConfigurationService custom web service below.
Click Save then Publish on the Designer's toolbar.
4 Register the custom web service that uses anonymous authentication
- Go to the ..\Terrasoft.WebApp\ServiceModel directory.
-
Create a UsrAnonymousConfigurationService.svc file and add the following record to it.
The Service attribute contains the full name of the web service class and specifies the namespace.
5. Enable both HTTP and HTTPS support for the custom web service that uses anonymous authentication
-
Open the ..\Terrasoft.WebApp\ServiceModel\http\services.config file and add the following record to it.
- Add an identical record to the ..\Terrasoft.WebApp\ServiceModel\https\services.config file.
6. Enable all users to access the custom web service that uses anonymous authentication
- Open the ..\Terrasoft.WebApp\Web.config file.
-
Add the <location> element that defines the relative path and access permissions to the web service.
-
Add the relative web service path to the value attribute of the AllowedLocations key in the <appSettings> element.
7. Restart Creatio in IIS
Restart Creatio in IIS to apply the changes.
Outcome of the example
As a result, Creatio will add the custom UsrAnonymousConfigurationService REST web service that has the GetContactIdByName endpoint. You can access the web service from the browser, with or without pre-authentication.
Access the GetContactIdByName endpoint of the web service from the browser and pass the contact name in the Name parameter.
If Creatio finds the contact from the Name parameter in the database, the GetContactIdByNameResult property will return the contact ID value.

If Creatio finds no contacts from the Name parameter in the database, the GetContactIdByNameResult property will return an empty string.

1. Create a custom web service
This example uses the UsrCustomConfigurationService custom web service. Learn more about developing the service in a separate article: Develop a custom web service that uses cookie-based authentication.
Change the Method parameter of the WebInvoke attribute in the UsrCustomConfigurationService custom web service to POST.
View the source code of the custom web service the example uses below.
2. Create a replacing contact record page
- Go to the Configuration section and select a custom package to add the schema.
-
Click Add → Replacing view model on the section list toolbar.
/scr_add_replacing_module.png)
-
Select the ContactPageV2 package's Display schema — Contact card view model schema to replace in the Parent object property. After you confirm the parent object, Creatio will populate the other properties.
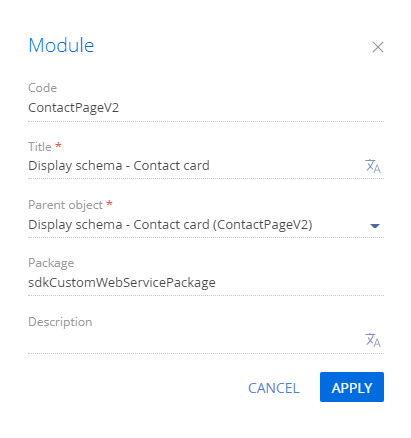
- Enable the ServiceHelper module as a dependency in the declaration of the record page module. Learn more about the module dependencies in a separate article: AMD concept. Module definition.
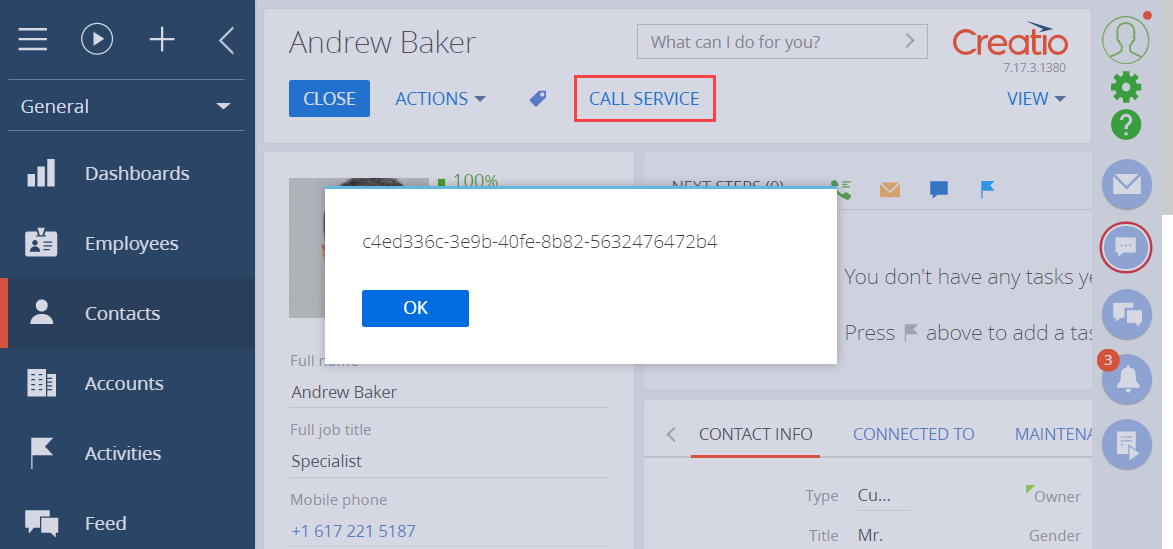
3. Add the button to the contact record page
-
Click the
/scr_add_button.png) button in the Localizable strings block of the properties panel and fill out the localizable string properties:
button in the Localizable strings block of the properties panel and fill out the localizable string properties:- Set Code to "GetServiceInfoButtonCaption."
- Set Value to "Call service."
-
Add the button handler.
Call the web service using the callService() method of the ServiceHelper module. Pass the following parameters of the callService() function:
- UsrCustomConfigurationService, the name of the custom web service class
- GetContactIdByName, the name of the custom web service method to call
- the callback function in which to process the service output
- serviceData, the object that contains the initialized incoming parameters for the custom web service method
- the execution context
View the source code of the ContactPageV2 replacing view model below.
- Click Save on the Designer's toolbar.
Outcome of the example
As a result, Creatio will display the Call service button on the contact page after you refresh the Creatio web page. Click the button to call the GetContactIdByName method of the UsrCustomConfigurationService custom web service. The method returns the ID of the current contact.
Integrate external applications with custom Creatio web services via HTTP requests to the services. Editing and debugging tools, such as Postman or Fiddler, help to understand the request creation principles.
Postman is a request testing toolset. The purpose of Postman is to send test requests from the client to the server and receive the server's responses. The example in this article calls a custom web service that uses cookie-based authentication from Postman.
This example uses the UsrCustomConfigurationService custom web service. Learn more about developing the service in a separate article: Develop a custom web service that uses cookie-based authentication.
Since this custom web service uses cookie-based authentication, authorize in Creatio first. Do this by calling the AuthService.svc system web service. Learn more about authentication in a separate article: Authentication.
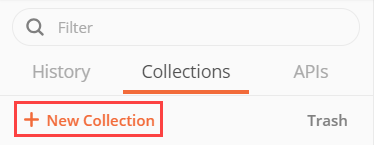
1. Create a request collection
-
Go to the Collections tab on the Postman request toolbar and click + New Collection.
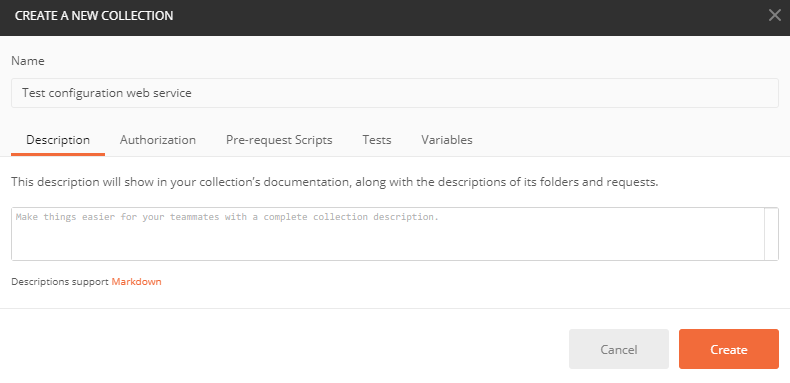
-
Fill out the request collection fields:
-
Set Name to "Test configuration web service."
-
- Click Create to create a request collection.
2. Set up an authentication request
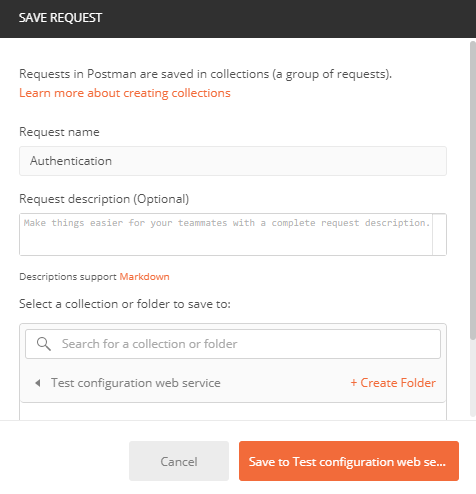
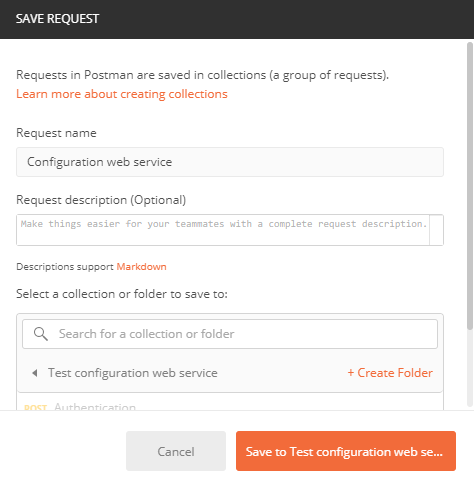
- Go to the request working area in Postman and right-click the name of the Test configuration web service collection → Add request.
-
Fill out the request fields:
-
Set Request name to "Authentication."
-
- Click Save to Test configuration web service to add the request to the collection.
-
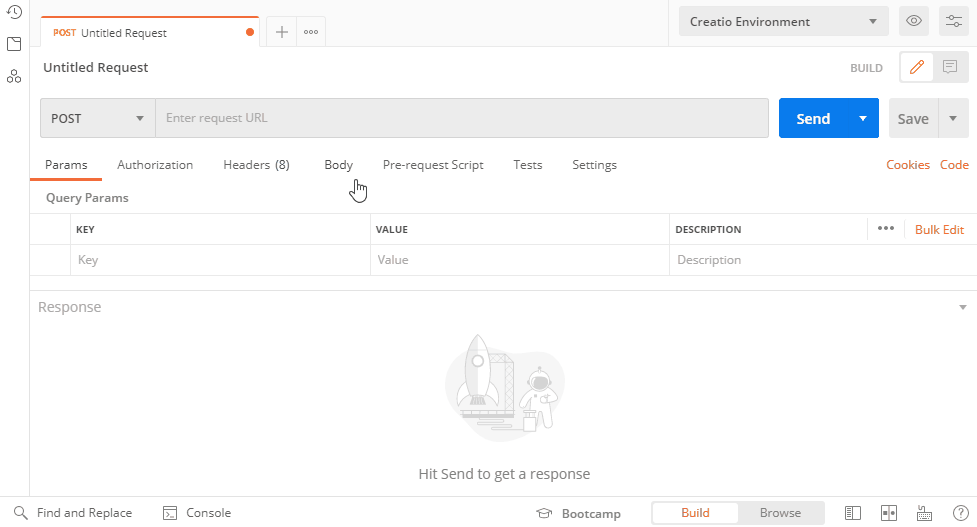
Select the POST request method in the drop-down list of the Postman workspace toolbar.

-
Enter the string of the authentication service request in the Postman workspace toolbar.
-
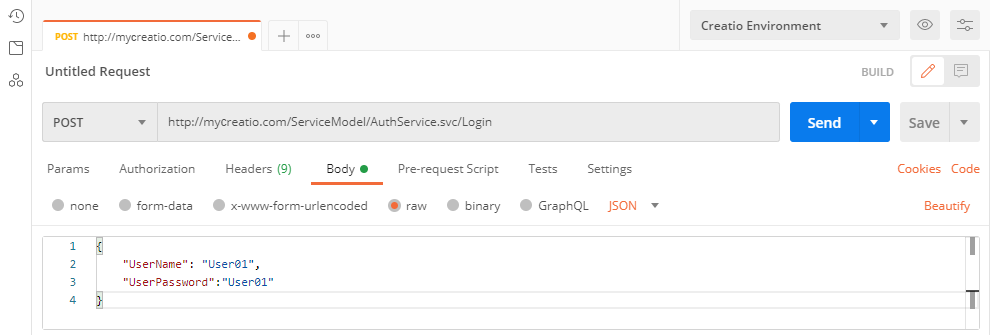
Set the request data format:
- Go to the Body tab.
- Set the "raw" option.
-
Select the "JSON" type.
-
Go to the Body tab in the Postman workspace and fill out the body of the POST request. The body is a JSON object that contains the login credentials.
3. Execute the authentication request
Click Send in the Postman workspace toolbar to execute the request from Postman.
As a result, Postman will receive a response that contains a JSON object. View the response body on the Postman Body tab.
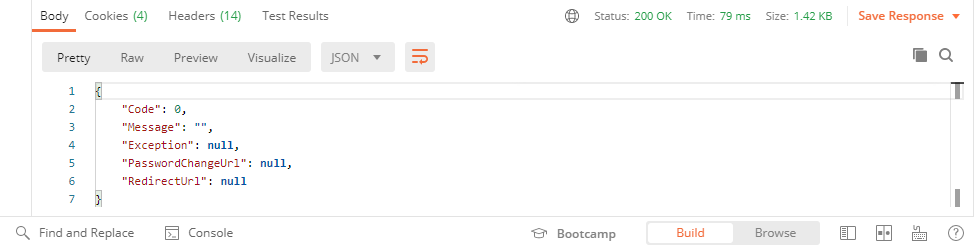
The indicators of a successfully executed request are as follows:
- The server returns the 200 OK status code.
- The Code parameter of the response body contains "0."
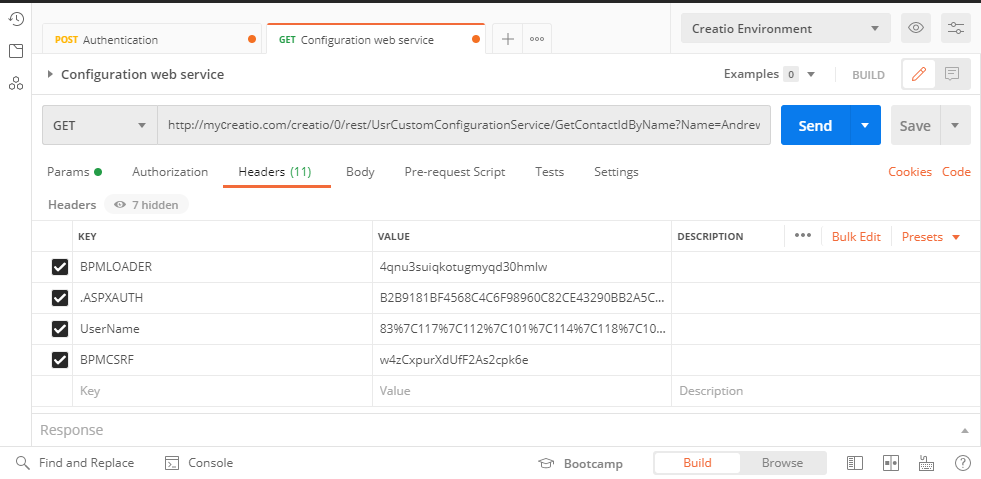
The response also contains BPMLOADER, .ASPXAUTH, BPMCSRF, and UserName cookies. Postman displays them on the Cookies and Headers tab.
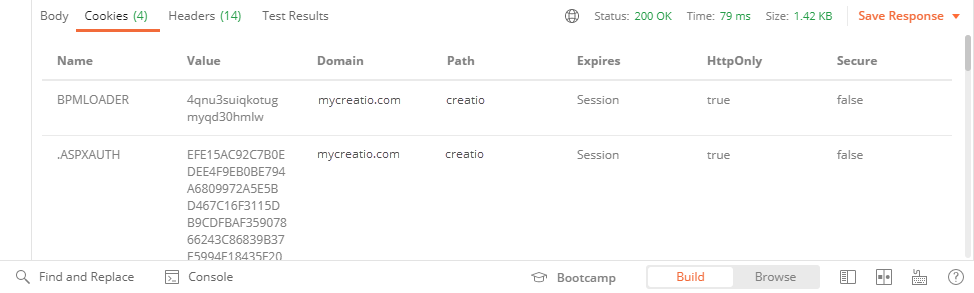
Use these cookies in further requests to Creatio services that use cookie-based authentication.
If you enabled the CSRF attack protection, always use the BPMCSRF cookie for request methods (POST, PUT, DELETE) that modify (add, change, or delete) the entity. If you do not use the BPMCSRF cookie, the server returns the 403 Forbidden status code. Creatio does not check for the BPMCSRF cookie for GET requests. You do not have to use the BPMCSRF cookie with Creatio demo sites since they have CSRF attack protection disabled by default.
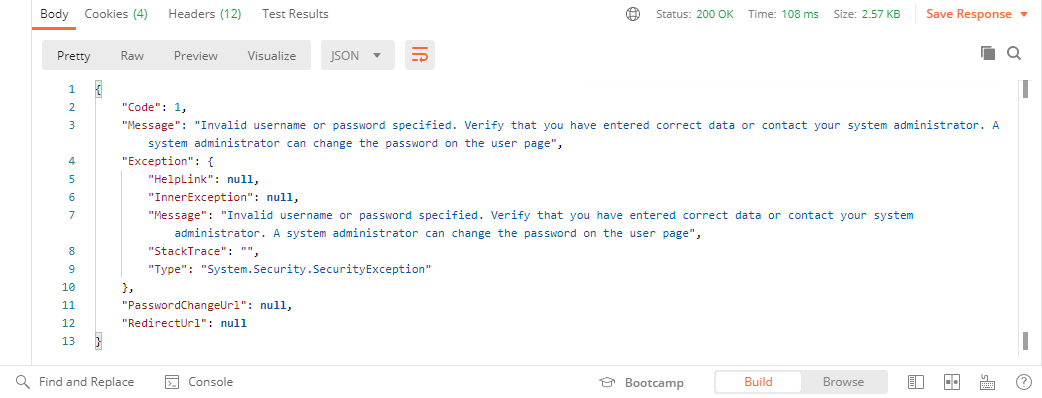
The request fails if it contains errors in the string or the body.
The indicators of an unsuccessfully executed request are as follows:
- The Code parameter of the response body contains "1."
- The Message parameter of the response body contains the reason for the authentication failure.
4 Set up the request to the custom web service that uses cookie-based authentication
The UsrCustomConfigurationService custom web service accepts GET requests only.
To set up the request to the custom web service that uses cookie-based authentication:
- Go to the request working area in Postman and right-click the name of the Test configuration web service collection → Add request.
-
Fill out the request fields:
-
Set Request name to "Configuration web service."
-
- Click Save to Test configuration web service to add the request to the collection.
-
Postman selects the GET method by default. Enter the string of the UsrCustomConfigurationService custom web service request in the request field of the Postman workspace toolbar.
-
Go to the Headers tab in the Postman workspace and add the cookies received as a result of the authorization request to the headers of the custom web service request. Add the cookie name to the Key field and copy the corresponding cookie value to the Value field.
5. Execute the request to the custom web service that uses cookie-based authentication
Click Send on the workspace toolbar to execute a request from Postman.
Outcome of the example
As a result, Postman will receive a response that contains a JSON object. View the response body on the Postman Body tab.
If Creatio finds the contact from the Name parameter in the database, the GetContactIdByNameResult property will return the contact ID value.
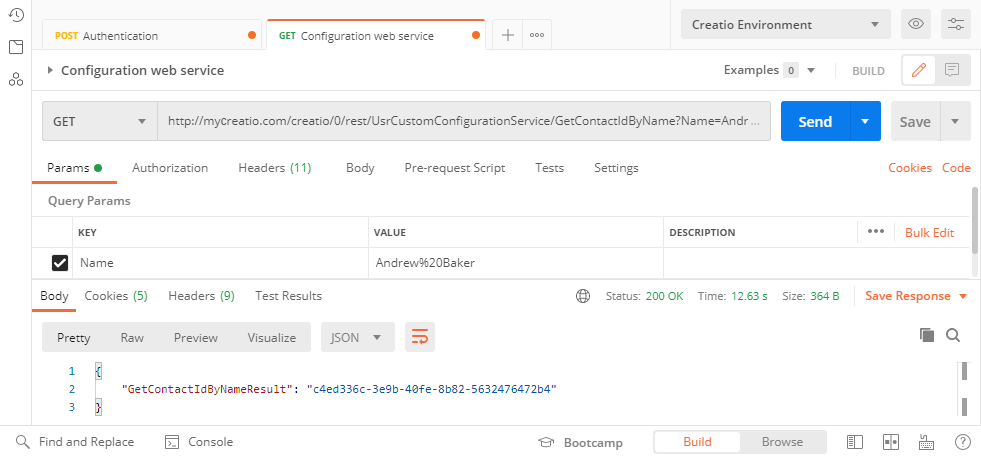
If Creatio finds no contacts from the Name parameter in the database, the GetContactIdByNameResult property will return an empty string.