LDAP directory synchronization lets you automate user account administration in Creatio. Users synchronized with LDAP can log in to Creatio with their domain credentials.
Creatio supports synchronization with Active Directory and OpenLDAP.
The synchronization procedure consists of three stages:
-
LDAP integration setup. Performed once, unless the LDAP directory structure changes. This step is required to enable the LDAP synchronization features. You will also need to set up Active Directory user filtering to define synchronization parameters. Read more: Set up Active Directory filters.
-
Connecting Creatio items (i. e. users and organizational structure elements) with the respective items in the LDAP directory. Performed when adding new users or organizational roles. You can connect existing Creatio user accounts or import users from Active Directory.
-
Synchronization of Creatio users and organizational structure elements with the connected LDAP directory elements. Required to update Creatio data so that it reflects changes to the LDAP directory since the previous synchronization. Creatio performs this step regularly. You can also synchronize data manually by clicking Synchronize with LDAP in the Organizational roles section.
Users will be able to log in with LDAP after the synchronization. Read more: Set up LDAP authentication.
Set up LDAP integration
To set up LDAP integration, connect LDAP directory elements with Creatio users and roles. Basic knowledge about the structure of the relevant LDAP directory is required to set up the integration.
This article contains LDAP setup examples for Active Directory and OpenLDAP.
- Click the
 button to open the System Designer.
 - Click the “LDAP integration setup” link in the “Import and integration” block. The setup page will open. Fill out the highlighted fields. You can keet the default values in the other fields.
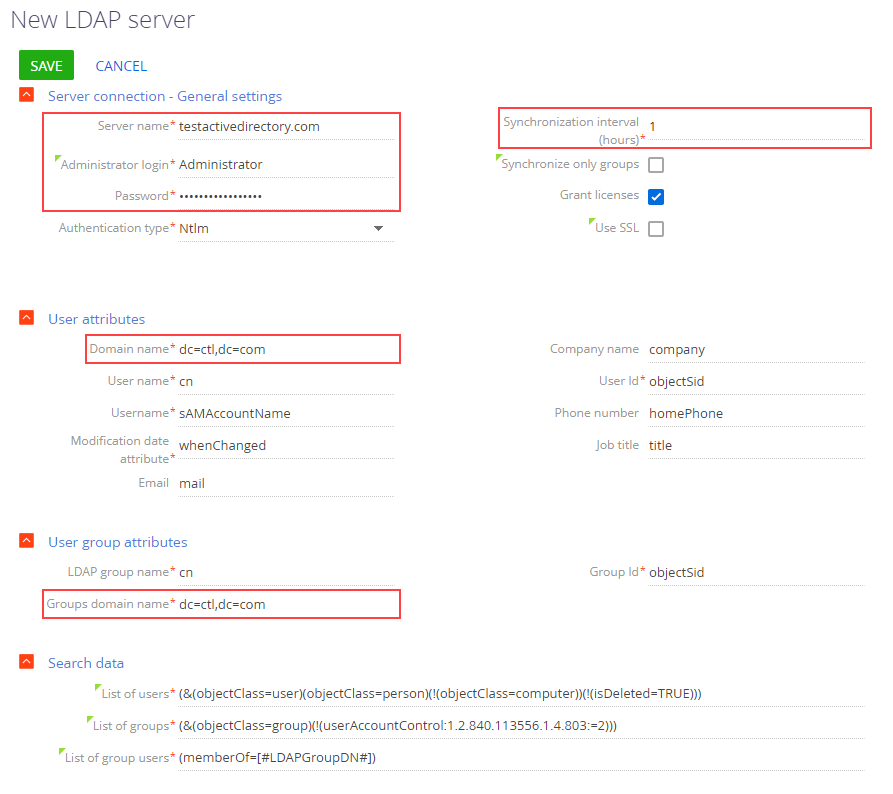
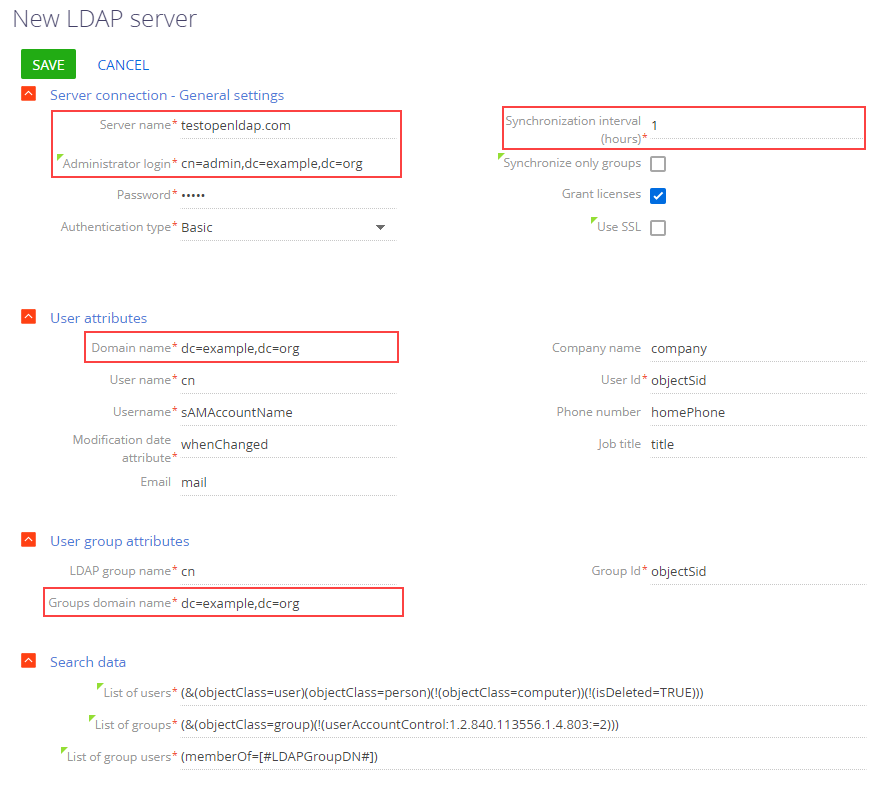
1. Set up the connection to the server
Specify the general server connection settings:
-
Enter the LDAP server name or the IP address in the Server name field.
-
Select the LDAP server connection protocol in the Authentication type field. The authentication type depends on your LDAP server and the authentication security requirements. For example, select the “Ntlm” type to authenticate “NT LanManager” supported by Windows.
-
Specify administrator credentials in the Administrator login and Password fields. If your Creatio server is installed on Linux, use the “domain\login” format.
-
Specify the automatic LDAP synchronization interval in the Synchronization interval (hours) field. Read more: Run the LDAP syncrhonization.
-
Select the Synchronize only groups checkbox to automatically deactivate and activate Creatio users that are manually excluded from and included in the synchronized groups in the LDAP catalog.
-
Select the Grant licenses checkbox to grant licenses to users on LDAP synchronization automatically.
-
Select the Use SSL checkbox to enable SSL for the synchronization. If you select the checkbox, specify the value of the Server name field in the “server:port” format.
The default port value is “636” for the LDAPS connection. Only Creatio on Windows supports LDAPS synchronization.
The default port value for the LDAP connection is “389.”
2. Set up the user synchronization
To set up the user synchronization, specify the attributes of the LDAP directory elements that contain the user data you need to import.
-
Map the required attributes:
-
Specify the the unique name of the LDAP organizational structure element that contains the synchronized users in the Domain name field. You will only be able to synchronize users subordinate to the specified LDAP element, either directly or to its child elements. For example, if you specify the root element of the directory structure, you will be able to synchronize all users in the directory.
-
Specify the the LDAP attribute that contains the full name of an LDAP user in the User name field. Creatio populates the Full name field on the contact page with the attribute's value during import. For example, the “name” or “cn” (Common Name) attributes can contain the full name of the user.
-
Specify the attribute that contains the LDAP username used for login in the Username field. The synchronized LDAP user will log in to Creatio with this name. For example, “sAMAccountName.”
-
Specify a unique user ID in the User Id field. The value of this attribute must be unique for each user.
-
Specify the attribute that stores the time and date of the last change to the LDAP element in the Modification date attribute field.
-
-
You can also map optional attributes Creatio will use to populate the user contact page:
-
Specify the attribute that contains the name of the user's employer in the Company name field. Populates the Account field on the contact page. If an account name matches the value of the specified attribute verbatim, Creatio will link the user's contact to that account during synchronization
-
Specify the attribute that contains the user's job title in the Job title field. Populates the Job title field on the contact page. If an existing job title matches the value of the specified attribute verbatim, Creatio will select this job title for the user during synchronization.
-
Specify the attribute that contains the user's phone number in the Phone number field. Populates the Business phone field on the contact page.
-
Specify the attribute that contains the user's email address in the Email field. Populates the Email field on the contact page.
-
3. Set up synchronization between LDAP user groups and Creatio roles
Group synchronization settings let you link LDAP groups to Creatio organizational structure elements. To set up the synchronization, map the attributes of the LDAP directory elements that contain the user data to be imported.
-
Specify the attribute that contains the name of the user group in LDAP in the LDAP group name field. For example, the “cn” (“Common Name”) attribute.
-
Specify the attribute to use as a unique group ID in the Group Id field. The value of this attribute must be unique for each group. For example, you can use the “objectSid” attribute.
-
Specify the unique name of the LDAP element that contains all synchronized user groups in the Groups domain name field. All user groups subordinate to the specified LDAP element, directly or to its child elements, will be available for synchronization. For example, if you specify the root element of the LDAP directory, all user groups in the directory will be available for synchronization.
4. Set up the filter conditions
Filter conditions determine which criteria to use to include LDAP elements in the list of synchronized groups and users. Set up the general server connection settings for Active Directory:
-
Specify the elements to synchronize with Creatio users from the general LDAP element catalog in the List of users field. The search filter must select active elements only.
-
Specify the LDAP elements to synchronize with Creatio organizational roles (user groups) in the List of groups field. The search filter must select active elements only.
-
Build a list of users included in the LDAP group in the List of group users field. One or more attributes determine whether a user is a member of a group. For example, most directories use the “memberOf” attribute. The (memberOf=[#LDAPGroupDN#]) filter contains a Creatio macro and will filter out all objects (users) included in the [#LDAPGroupDN#] group.
Link LDAP elements to Creatio users and roles
In Creatio, you can synchronize the organizational and functional user roles with the Active Directory groups.
You can transfer the company organizational structure and role settings from Active Directory to Creatio after the LDAP synchronization.
Set up the synchronization between Creatio organizational roles and Active Directory groups
-
Click the
button to open the System Designer. -
Click “Organizational roles” in the “Users and administration” block.
-
Select the needed role from the organizational tree on the newly-opened page (Fig. 3).
If there is no such role, click New and select “Organization” or “Division” depending on the type of role you need to add. Specify the group name on the newly-opened page.
Fig. 3 Selecting the organizational role for the synchronization setup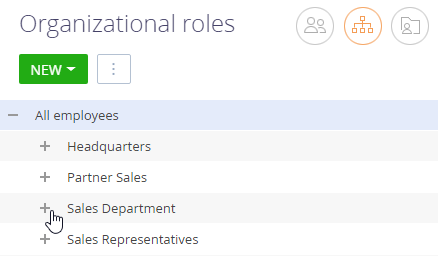
-
Select the Synchronize with LDAP checkbox in the Users tab. Select the Active Directory group that corresponds to this Creatio organizational role in the LDAP element field (Fig. 4).
Fig. 4 Selecting the Active Directory group for the synchronization setup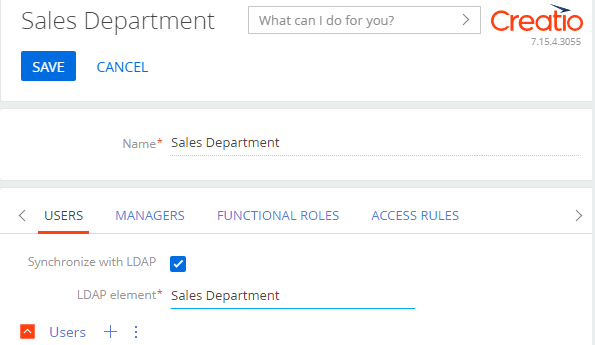
-
If necessary, add new users by clicking the
 button on the Users detail.
To synchronize large numbers of users not yet registered in Creatio, import these users from the LDAP directory. Read more: Import new users and roles from Active Directory.
- Click Save.
As a result, Creatio will synchronize the selected organizational role during the next synchronization session.
Set up the synchronization between Creatio functional roles and Active Directory groups
-
Click the
button to open the System Designer. -
Click “Functional roles” in the “Users and administration” block.
-
Repeat steps 3 through 5 of the Creatio organizational roles and Active Directory groups synchronization setup, described above.
Connect Creatio user accounts with LDAP users
-
Click the
button to open the System Designer. -
Click “Organizational roles” or “Functional roles” in the “Users and administration” block, depending on what user groups you would like to synchronize.
-
Select the relevant user's role on the newly-opened page.
-
Go to the Users tab, select the relevant user, and double-click the row to open the record page.
-
Select the LDAP authentication option in the General information tab.
-
Select the relevant LDAP user in the Login field.
-
Click Save (Fig. 5).
Fig. 5 Connecting a user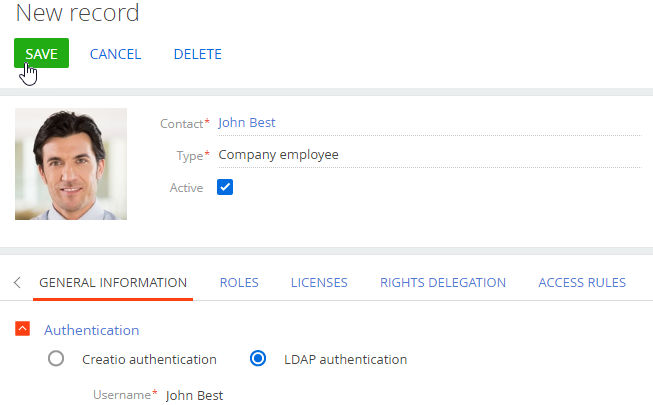
This will connect the Creatio user with the LDAP user. The user will be able to log in to Creatio with credentials stored in the LDAP directory, such as the domain login and password.
Creatio will apply all changes made to users and groups in the LDAP directory to the connected user accounts and Creatio organizational structure elements during the synchronization session.
Run the LDAP synchronization
Set up the automatic synchronization
-
Click the
button in the top right to open the System Designer. -
Click “LDAP integration setup” in the “Import and integration” block.
-
Fill out the Synchronization interval (hours) field on the newly-opened page. Creatio will automatically synchronize users with LDAP after every specified interval.
-
Click Save (Fig. 6).
Fig. 6 Save the filled out LDAP integration setup page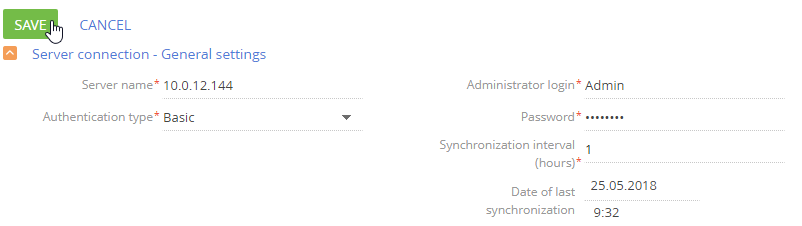
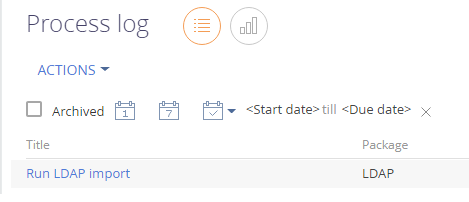
After you save the LDAP integration setup page, Creatio will automatically start the synchronization by running the “Run LDAP import” process (Fig. 7).
Run the synchronization manually
-
Click the
button in the top right to open the System Designer. -
Click the “Organizational roles” link in the “Users and administration” block.
-
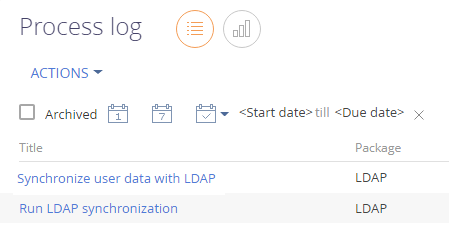
Select the Synchronize with LDAP action in the section menu (Fig. 8). This will run the “Run LDAP synchronization” process, which will, in turn, call the “Synchronize user data with LDAP” process (Fig. 9).
Fig. 8 The Synchronize with LDAP action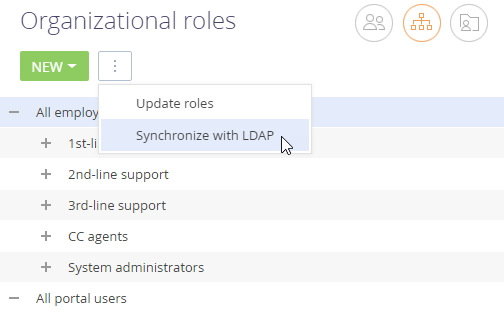
Creatio will notify you when the synchronization is complete.
Synchronization results
-
If an LDAP user is no longer among the active users, Creatio will clear the Active checkbox on the corresponding Creatio user page, and the user will not be able to log in.
-
If you activate a previously inactive LDAP user, Creatio will select the Active box on the corresponding Creatio user page.
-
If you rename an LDAP user or a group of users, Creatio will rename the synchronized Creatio users and roles as well.
-
If you select the Synchronize only groups checkbox and exclude an LDAP user from the LDAP group connected with a Creatio organizational structure element, Creatio will deactivate the corresponding user and exclude them from the organizational structure element.
-
If you select the Synchronize only groups check box and include a user to the LDAP group connected with a Creatio organizational structure element, Creatio will activate the corresponding user and include them in the organizational structure element.
-
If you add new unsynchronized users to the synchronized LDAP element, Creatio will import the users.
-
If there are Creatio users whom you did not import from LDAP yet their names match LDAP user names, Creatio will not synchronize them.
-
If you delete a synchronized LDAP user from a group connected with a Creatio organizational structure element, the user will remain active in Creatio but will not be able to log in.
-
Creatio will grant licenses to all synchronized users if you select the corresponding checkbox. Read more: Set up the connection to server.