The action dashboard is designed to display information about the current state of a record and consists of two parts:
- The Workflow bar (1) — shows the business process stage status.
- The Action panel (2) — enables you to move on to the activity, work with email or feed, without leaving the section. The action dashboard displays business process activities that are connected to the section object by the corresponding field. The action panel can also display an auto-generated page, pre-configured page, question or object page.
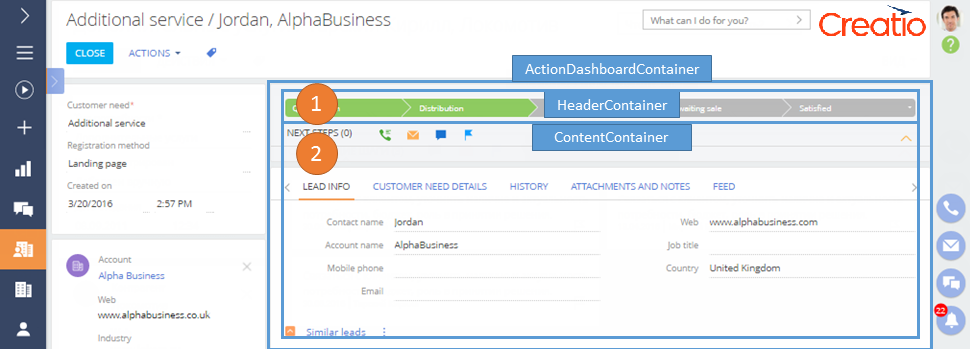
The action dashboard is located in the ActionDashboardContainer container of the section record edit page. The workflow bar is located in the attached HeaderContainer container, and the action panel — in the ContentContainer.
The arrangement of the elements of the action dashboard is configured by the BaseActionsDashboard view model schema and the SectionActionsDashboard inherited schema of the ActionsDashboard package.
Starting with version 7.8.0, Creatio has a new edit page module – the "Action panel" (ActionsDashboard). An action panel displays information about the current status and actions for working with the current record.
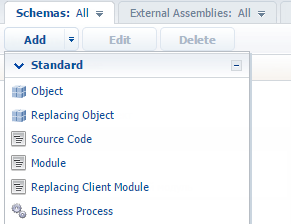
General procedure of adding an action panel on a page:
- Create a Schema of the Edit Page View Model inherited from the SectionActionsDashboard module.
- Create a replacing page schema.
- Set up the module in the modules property of the page view model.
- In the "diff" array of the page view model, add the module on the page.
ActionsDashboard channels are a way of communicating with a contact. A channel is created for every section in which it's connected to, for example, a case, contact, or lead.

Case description
Add an action panel to the order edit page.
Source code
You can download the package with case implementation using the following link.
Case implementation algorithm
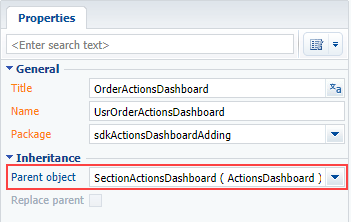
1. Create a client schema of the OrderActionsDashboard view model
Specify the SectionActionsDashboard schema as a parent object (Fig. 1).
The client schema source code is as follows:
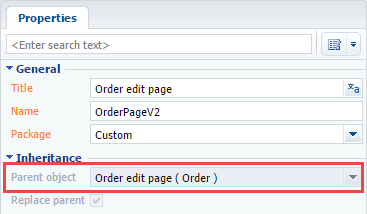
2. Create a replacing order edit page
A replacing client module must be created and Order edit page (OrderPageV2) must be specified as the parent object in it (Fig. 2). Creating a replacing page is covered in the “Create a client schema” article.
3. Add a configuration object with the module settings in the modules collection of the page schema
Add the code of the page replacing module to the Source code tab: Add a configuration object with the module settings in it to the modules collection of the view model.
4. Add a configuration object with the settings determining the module position in the diff array
The replacing schema source code is as follows:
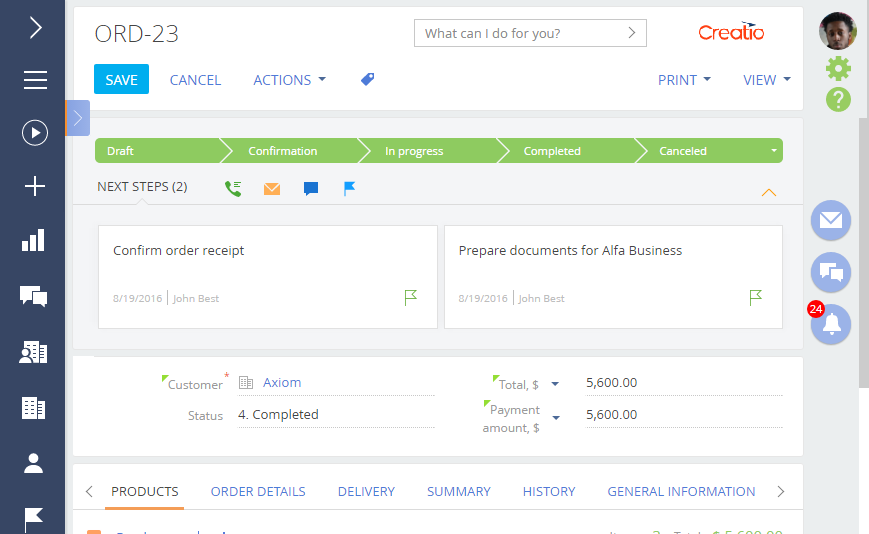
After saving the schema and updating the Creatio web page, the action panel will be added to the order page. The action panel will contain the order status and connected uncompleted activities (Fig. 3).

Case description
Add a new custom channel to the action dashboard of the contact edit page. The channel must have the same functionality as the call results channel (CallMessagePublisher channel).
Source code
You can download the package with case implementation using the following link.
Case implementation algorithm
1. Add the UsrCallsMessagePublisher source code schema
Perform the Add > Source code menu command on the Schema tab in the Configuration section (Fig. 1).
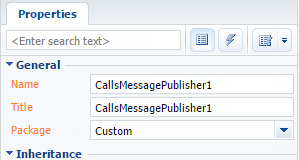
For the created schema specify (Fig. 2):
- [Title] – "Call message logging publisher"
- [Name] – “UsrCallsMessagePublisher”
In the created schema, add the new CallsMessagePublisher class inherited from the BaseMessagePublisher class to the Terrasoft.Configuration namespace. The BaseMessagePublisher class contains the basic logic to save an object in the database and the basic logic of event handlers. The inheritor class will contain the logic for a particular sender, for example, filling of columns of the Activity object and the subsequent sending of the message.
To implement the new CallsMessagePublisher class, you must add the following source code in the created schema.
Save and publish the schema.
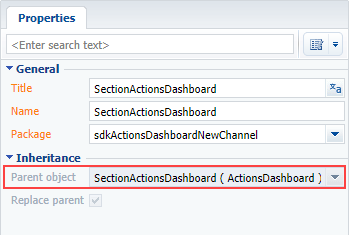
2. Create the SectionActionsDashboard replacing client schema
Create a replacing client module and specify the SectionActionsDashboard as parent object (Fig. 3). The procedure of creating a replacing page is covered in the "Create a client schema" article.
Specify the module which should be rendered in this channel on one of the tabs in the replacing schema diff property. Set the operations of inserting the CallsMessageTab tab and message container in this property. The new channel will be visible on the edit pages of those sections, which are connected to SectionActionsDashboard.
In the methods property override the getSectionPublishers() method that will add the new channel to the list of message publishers, and the getExtendedConfig() method, in which the tab settings are configured.
For the getExtendedConfig() method to run correctly, you must upload the channel icon and specify it in the ImageSrc parameter. The icons used in this example can be downloaded here.
You should also override the onGetRecordInfoForPublisher() method and add the getContactEntityParameterValue() method that defines the contact value from the edit page.
The replacing schema source code is as follows:
3. Create the UsrCallsMessagePublisherModule module
The UsrCallsMessagePublisherModule serves as container that renders the SectionActionsDashboard page with implemented logic of added channel in the UsrCallsMessagePublisherPage.
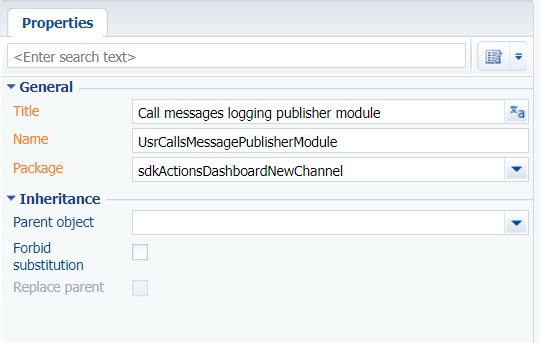
Set following properties for the module (Fig. 4):
- [Title] – "Call messages logging publisher module"
- [Name] – “UsrCallsMessagePublisherModule”
- [Parent object] – BaseMessagePublisherModule.
The module source code:
4. Create the UsrCallsMessagePublisherPage page
For the created page set the BaseMessagePublisherPage schema of the MessagePublisher package as parent object. Set the "UsrCallsMessagePublisherPage" value as the title and name.
In the source code page, specify the schema name of the object that will run along with the page (in this case, Activity), implement the logic of message publication and override the getServiceConfig method, in which you must set the class name from the configuration.
Implementation of message publication logic contains big number of methods, attributes and properties. The full source code of the UsrCallsMessagePublisherPage schema can be found in the sdkActionsDashboardNewChannel package. The source code shows the implementation of the CallMessagePublisher channel that is used for logging incoming and outgoing calls.
As a result you will get the new channel in the SectionActionsDashboard (Fig. 5).
You can set up custom logic for selecting languages of multi-language email templates. You can select email templates in the needed language using the action dashboard of a section record. The selection is based on special rules that can be specified for the section. If special rules are not defined, the selection is based on the contact, bound to the edited record (the Contact column). If a section object does not have a column for connecting with a contact, the DefaultMessageLanguage system setting value is used.
To add custom logic for selecting multi-language templates (localization):
1. Create a class or classes inherited from BaseLanguageRule and define the language selection rules (one class defines one rule).
2. Create a class inherited from BaseLanguageIterator. Define the LanguageRules property in the class constructor as a class instance array created on the previous step. The sequence corresponds to the rule priority.
3. Create a class inherited from AppEventListenerBase that will bind the class defining the language selection rules to the section.
4. Add the necessary multi-language templates to the Email templates lookup.
Case description
Add logic of selecting an email template language to a custom section based on the UsrContact column of the primary section object. Use English and Spanish languages.
Source code
You can download the package with case implementation using the following link.
Preliminary settings
For correct case implementation:
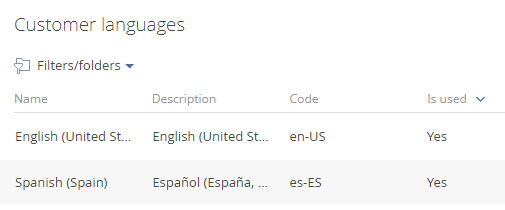
1. Make sure that the Customer languages lookup contains English and Spanish languages (Fig.1).
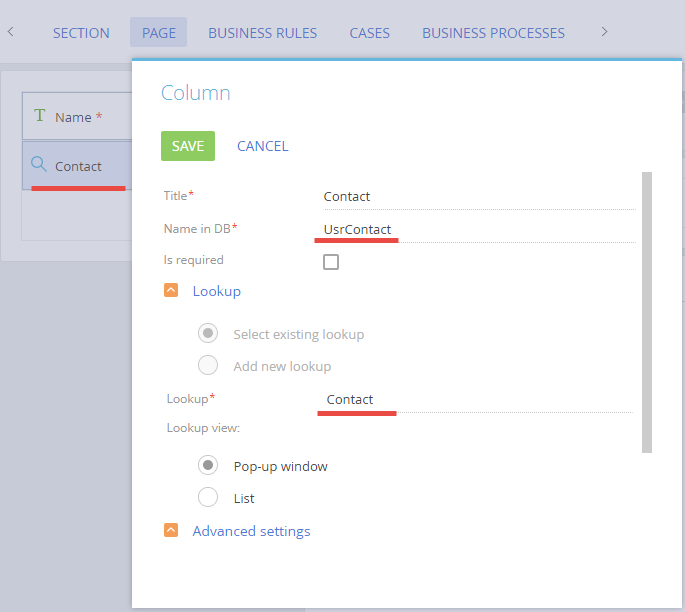
2. Use the section wizard to check that there is the UsrContact column bound to the Contact lookup on the edit page of the custom section record (Fig.2).
Case implementation algorithm
1. Adding a language selection rule
Create a Source code schema in the custom package (see “Create the Source code schema”).
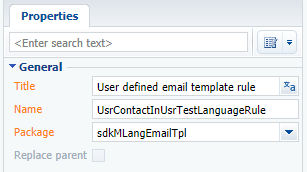
For the created schema specify (Fig. 3):
- [Name] – "UsrContactInUsrTestLanguageRule"
- [Title] – "User defined email template rule”
Add the following source code to the schema:
Publish the schema.
2. Defining the order sequence of language selection rules
Create a Source code schema in the custom package (see “Create the Source code schema”).
For the created schema specify (Fig. 3):
- [Name] – "UsrTestLanguageIterator”
- [Title] – "User defined language iterator”
Add the following source code to the schema:
DefaultLanguageRule. is the second array element The rules uses the DefaultLanguage system setting for obtaining the language and is used by default if the language was not detected by higher priority rules.
Publish the schema.
3. Binding language selection iterator to the section
Create a Source code schema in the custom package (see “Create the Source code schema”).
For the created schema specify (Fig. 3):
- [Name] – "UsrTestMLangBinder”
- [Title] – "UsrTestMLangBinder"
Add the following source code to the schema:
Publish the schema.
4. Adding the necessary multi-language templates
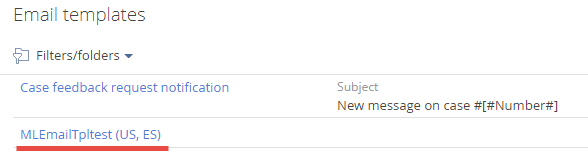
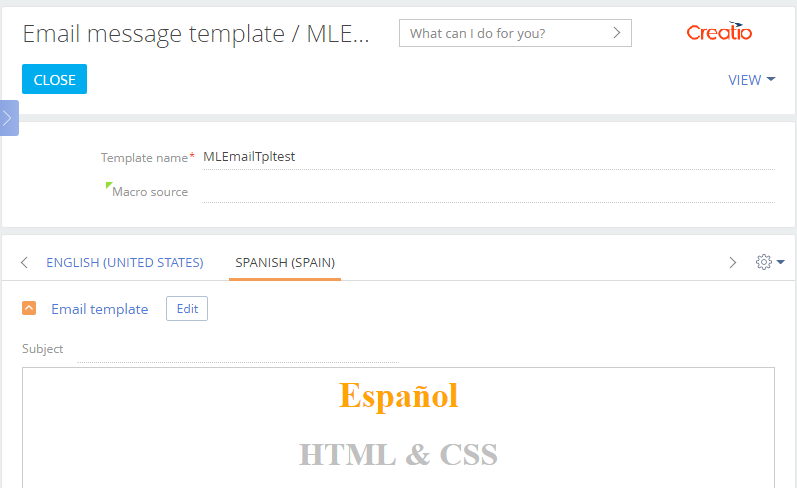
Add a new record (Fig.4) to the Email Templates lookup and define the email templates in the necessary languages (Fig.5).
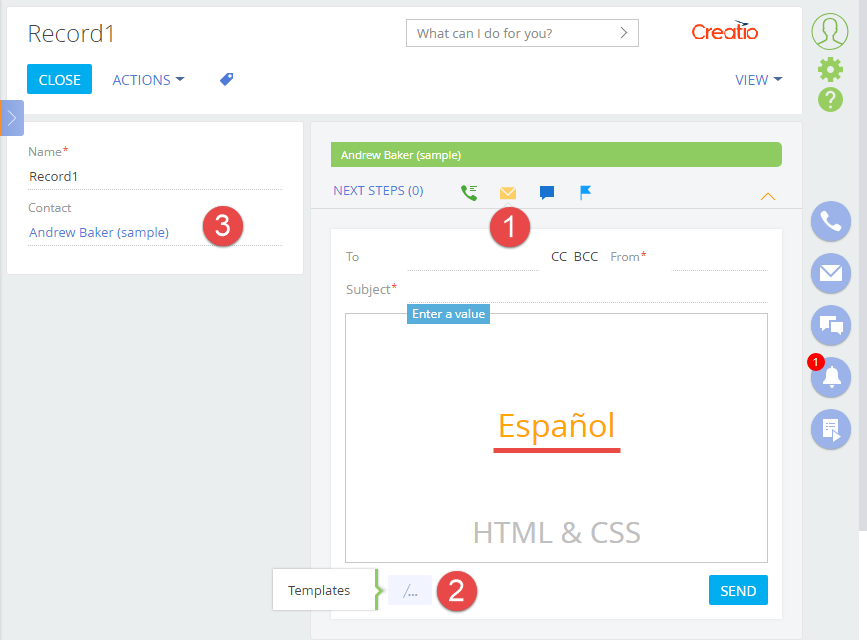
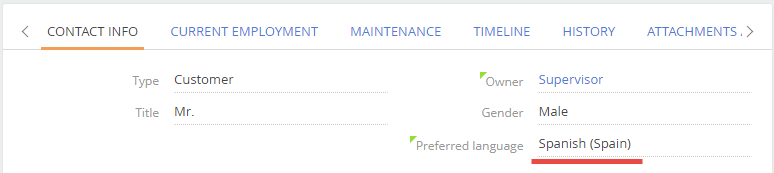
As a result of case implementation, in the action dashboard panel (Fig. 6. 1) of the custom section record edit page (Fig.6) the email templates (Fig. 6. 2) will be selected automatically in the language (Fig. 6. 3) specified as the contact’s preferred language (Fig.7).
Verification action is a confirmation that the data in the application form corresponds to the requirements of the application. The verification action is performed to check the data provided by the clients when they fill out their application forms.
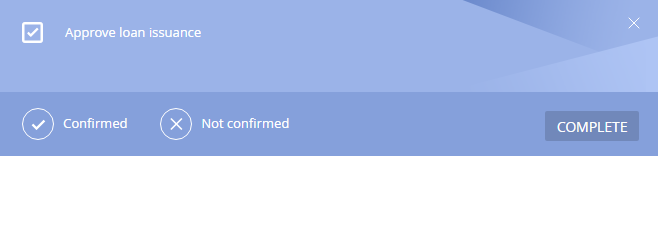
When creating a custom verification action page, for example, in the Approve application business process, you can select the Preconfigured verification page.
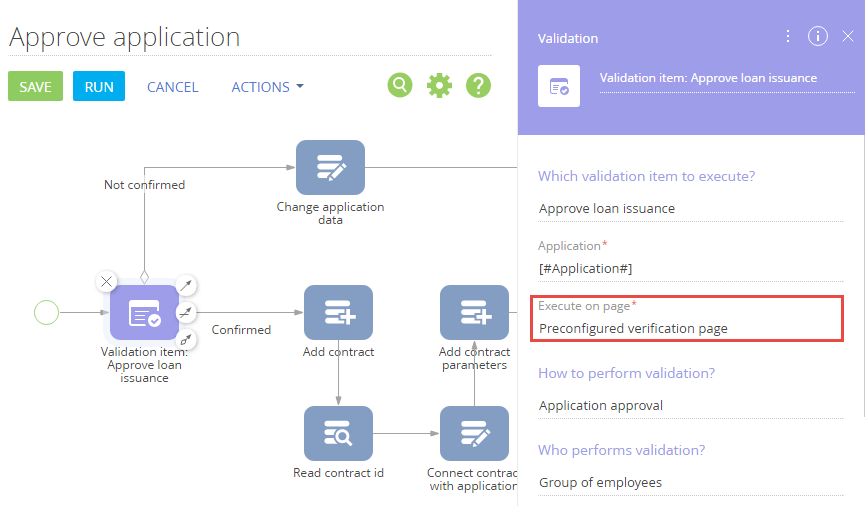
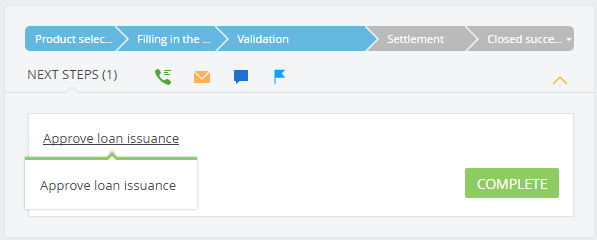
The page is displayed after clicking the Complete button of the Approve loan issuance activity that is created when the application is moved to the Validation stage (fig. 2).
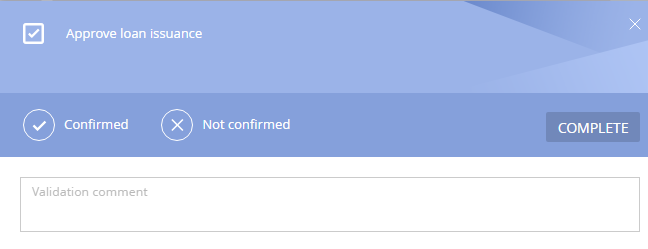
Preconfigured verification page contains (Fig. 3):
- Buttons for selecting the result of the verification action.
- The [Comment] field – comments to the verification action.
- The [Conversation script] detail – contains a hints for the verifiers who call customers in the process of verification. Read only.
- The [Attachments] detail – contains files and links attached to the validation stage. Read only.
- The [Checklist] detail – contains control questions and answers to them.
You can create custom verification pages, inheriting them from the preconfigured page. To create a custom page:
- Create a custom schema of the verification action page.
- Use the schema created in the business process.
Case description
Create a verification action page where the Comment field is hidden.
Case implementation algorithm
1. Create a schema of the verification action page
To do this, go to the Configuration section and select a custom package. Then execute the Add > Schema of the Edit Page View Model command. The process of creating custom schema of the view model is covered in the "Create a client schema” article.
You need to assign the following properties for the created schema (Fig. 4):
- [Title] – Verification page without comments.
- [Name] – UsrCommentlessAppValidationPage.
- [Package] – Custom (or another custom package).
- [Parent object] – Preconfigured verification page of the FinAppLending package.
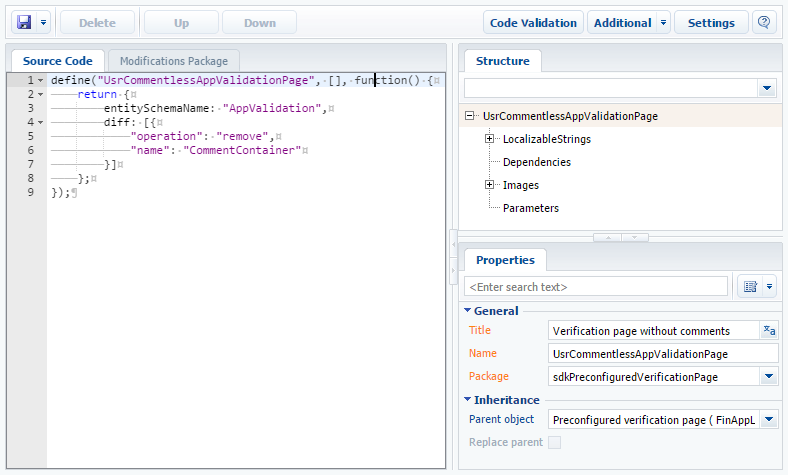
Add the following source code to the Source code tab:
The Comment field is removed from the parent element in the diff array.
Save the schema to apply the changes.
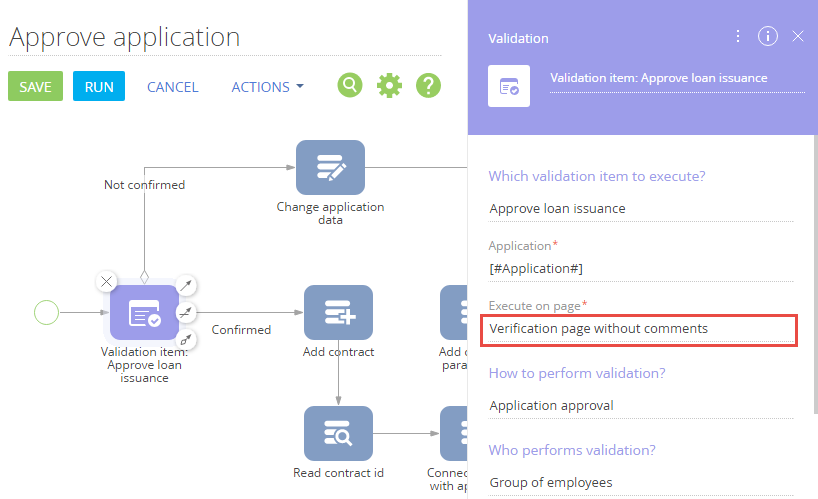
2. Use the schema created in the business process.
To use the created schema, specify it in the Execute on page field of the Validation item item of the business process. This schema can be used in both new and existing business processes, such as Approve application (Fig. 5).
Save the business process to apply the changes.
After the changes are applied, the previous verification page (Fig. 3) will be replaced with a custom page that does not contain the Comment field (Fig. 6).