How to create macros for a custom report in Word
Glossary Item Box

Introduction
You can set up a printable using standard Creatio MS Word Report Designer tools. MS Word printable setup is covered in the "The MS Word printables setup” article.
To implement specific printable setup tasks, you need to use macros. Basic macros are covered in the “Basic macros in the MS Word reports” article. A macro for setting up a printable is a class implementing the IExpressionConverter interface (see the ExpressionConverter schema of the NUI package).
To be able to call a custom macro from the printable template, it must be marked by the ExpressionConverterAttribute attribute with a specified name. Example:
[ExpressionConverterAttribute("CurrentUser")]
The Evaluate(object value, string arguments = "") interface method must be implemented in the class. The method accepts a printable template field value as an argument and returns the string type value that will be inserted instead of this field in the ready printable.
Algorithm of creating a custom macro for a printable
- Create a printable and add the [Id] column to the list of printable columns that will be the incoming parameter for the macro.
- Add the source code module to the custom package, where you need to describe the class-inheritor of the IExpressionConverter interface. The class must be marked by the ExpressionConverterAttribute attribute with the name of the macro. Implement the Evaluate(object value, string arguments = "") method in it.
- Add a tag with the name of the macro in the [#MacrosName#] format to the [Id] column in the printable template.
- Publish the source code module and download the updated printable template into the printable.
Case description
Create the [Account summary] printable for the [Accounts] section edit page that will contain the [Name], [Type] and [Primary contact] general fields and the [Additional information] field, which will display the annual turnover for the [Customer] type accounts, and the number of employees for the [Partner] type accounts. Besides, the printable must contain information about the date of creation and the name of employee who created it.
Source code
You can download the package with case implementation using the following link.
Case implementation algorithm
1. Creating the [Account summary] printable for the [Accounts] section edit page
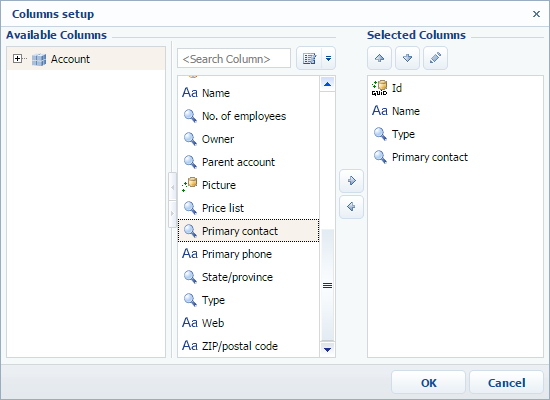
Add the [Id], [Name], [Type], [Primary contact] columns to the list of columns.
Fig. 1. Column list of the printable
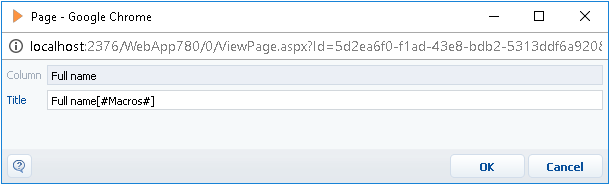
You can add the necessary macros to columns at the stage of their setup. To do this, go to the [Selected columns] field and select the necessary column. Click the  edit button and add a macro in the opened column edit window (fig.2).
Fig. 2. Adding a macro to the column
Creating the MS Word printable is covered in the “Setting up MS Word printables in Creatio” article.
2. Exporting the printable template and locating the fields
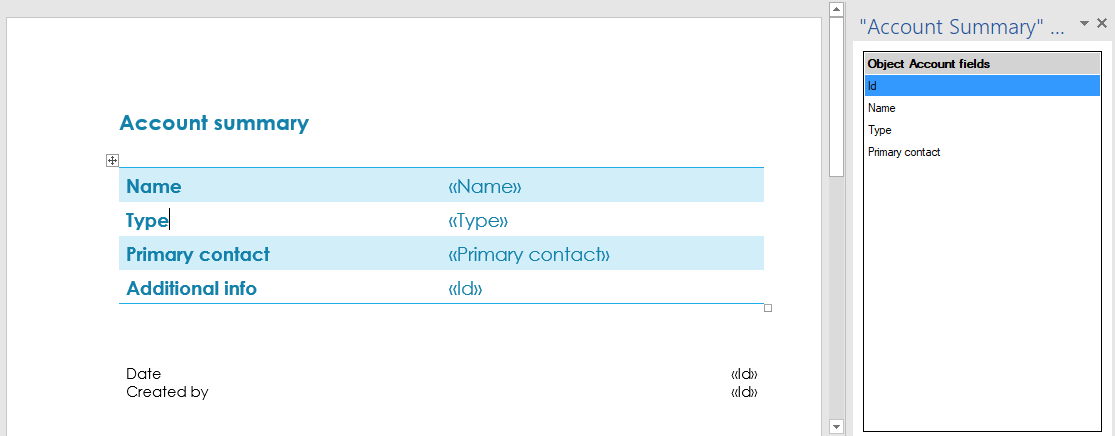
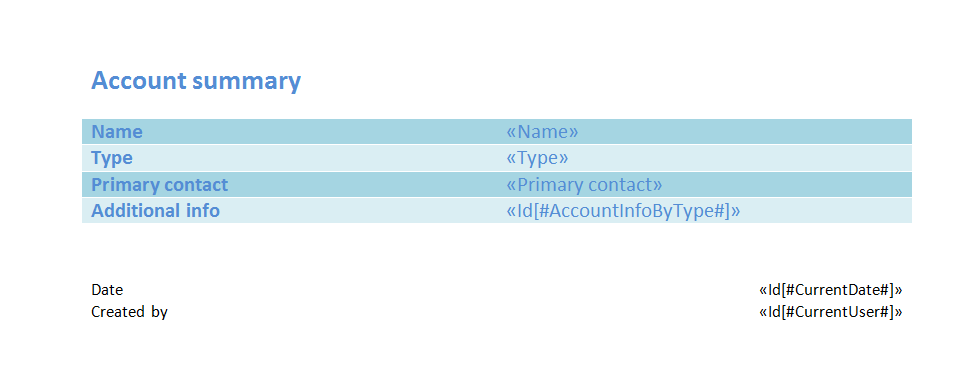
After you add the fields, your template may look as shown in fig.3. Editing the MS Word printable is covered in the “Setting up MS Word printables in Creatio” article.
Fig. 3. Locating fields in the template
3. Adding source code modules to the custom package that would implement macros
3.1 Macro of receiving additional information depending on the account type
Add the source code type schema (see Creating the [Source code] schema) with the following properties:
- [Name] – “UsrAccountInfoByTypeConverter”
- [Title] – “AccountInfoByTypeConverter”
Add localizable strings, whose properties are listed in table 1 to the schema.
Table 1. Localizable string properties
| Name | Value |
|---|---|
| PartnerAdditional | “Number of employees {0} persons” |
| CustomerAdditional | “Annual turnover {0}” |
Create a macro class in the schema source code for receiving additional information depending on the account type:
namespace Terrasoft.Configuration
{
    using System;
    using System.CodeDom.Compiler;
    using System.Collections.Generic;
    using System.Data;
    using System.Linq;
    using System.Runtime.Serialization;
    using System.ServiceModel;
    using System.ServiceModel.Web;
    using System.ServiceModel.Activation;
    using System.Text;
    using System.Text.RegularExpressions;
    using System.Web;
    using Terrasoft.Common;
    using Terrasoft.Core;
    using Terrasoft.Core.DB;
    using Terrasoft.Core.Entities;
    using Terrasoft.Core.Packages;
    using Terrasoft.Core.Factories;

    // The [AccountInfoByType] attribute with the macro name.
    [ExpressionConverterAttribute("AccountInfoByType")]
    // The class must implement the IExpressionConverter interface.
    class AccountInfoByTypeConverter : IExpressionConverter
    {
        private UserConnection _userConnection;
        private string _customerAdditional;
        private string _partnerAdditional;
        // Calling the values of localizable strings
        private void SetResources() {
            string sourceCodeName = "UsrAccountInfoByTypeConverter";
            _customerAdditional = new LocalizableString(_userConnection.ResourceStorage, sourceCodeName,
                "LocalizableStrings.CustomerAdditional.Value");
            _partnerAdditional =  new LocalizableString(_userConnection.ResourceStorage, sourceCodeName,
                "LocalizableStrings.PartnerAdditional.Value");
        }
        // Implementing the Evaluate method of the IExpressionConverter interface.
        public string Evaluate(object value, string arguments = "")
        {
            try
            {
                _userConnection = (UserConnection)HttpContext.Current.Session["UserConnection"];
                Guid accountId = new Guid(value.ToString());
                return getAccountInfo(accountId);
            }
            catch (Exception err)
            {
                return err.Message;
            }
        }
        // Method of receiving additional infomration depending on the account type.
        // The account Id is used as the incoming parameter.
        private string getAccountInfo(Guid accountId)
        {
            try
            {
                // Saving the EntitySchemaQuery class object with the  [Account] root schema.
                EntitySchemaQuery esq = new EntitySchemaQuery(_userConnection.EntitySchemaManager, "Account");
                // Adding the [Name] column to the schema from the [Type] lookup field.
                var columnType = esq.AddColumn("Type.Name").Name;
                // Adding the [Name] column to the schema from the [EmployeesNumber] lookup field.
                var columnNumber = esq.AddColumn("EmployeesNumber.Name").Name;
                // Adding the [Name] column to the schema from the[AnnualRevenue] lookup field.
                var columnRevenue = esq.AddColumn("AnnualRevenue.Name").Name;
                // Records are filtered by the account Id.
                var accountFilter = esq.CreateFilterWithParameters(
                    FilterComparisonType.Equal,
                    "Id",
                    accountId
                );
                esq.Filters.Add(accountFilter);
                // Receiving the entity collection.
                EntityCollection entities = esq.GetEntityCollection(_userConnection);
                // If the collection contains elements, the method returns correspondent information
                // depending on the account type.
                if (entities.Count > 0)
                {
                    Entity entity = entities[0];
                    var type = entity.GetTypedColumnValue<string>(columnType);
                    switch (type)
                    {
                        case "Customer":
                            return String.Format(_customerAdditional, entity.GetTypedColumnValue<string>(columnRevenue));
                        case "Partner":
                            return String.Format(_partnerAdditional, entity.GetTypedColumnValue<string>(columnNumber));
                        default:
                            return String.Empty;
                    }
                }
                return String.Empty;
            }
            catch (Exception err)
            {
                throw err;
            }
        }
    }
}
Publish the module.
3.2 Macro of receiving the current date
Add the source code type schema (see Creating the [Source code] schema) with the following properties:
- [Name] – “UsrCurrentDateConverter”
- [Title] – “CurrentDateConverter”
Create a macro class in the schema source code for receiving the current date:
namespace Terrasoft.Configuration
{
    using System;
    using System.CodeDom.Compiler;
    using System.Collections.Generic;
    using System.Data;
    using System.Linq;
    using System.Runtime.Serialization;
    using System.ServiceModel;
    using System.ServiceModel.Web;
    using System.ServiceModel.Activation;
    using System.Text;
    using System.Text.RegularExpressions;
    using System.Web;
    using Terrasoft.Common;
    using Terrasoft.Core;
    using Terrasoft.Core.DB;
    using Terrasoft.Core.Entities;
    using Terrasoft.Core.Packages;
    using Terrasoft.Core.Factories;

    // The  [CurrentDate] attribute with the macro name.
    [ExpressionConverterAttribute("CurrentDate")]
    // The class must implement the IExpressionConverter interface.
    class CurrentDateConverter : IExpressionConverter
    {
        private UserConnection _userConnection;

        // Implementing the Evaluate method of the IExpressionConverter interface.
        public string Evaluate(object value, string arguments = "")
        {
            try
            {
                _userConnection = (UserConnection)HttpContext.Current.Session["UserConnection"];
                // The method returns the current date.
                return _userConnection.CurrentUser.GetCurrentDateTime().Date.ToString("d MMM yyyy");
            }
            catch (Exception err)
            {
                return err.Message;
            }
        }
    }
}
Publish the module.
3.3 Macro of receiving the current user
Add the source code type schema (see Creating the [Source code] schema) with the following properties:
- [Name] – “UsrCurrentUserConverter”
- [Title] – “CurrentUserConverter”
Create a macro class in the schema source code for receiving the current user:
namespace Terrasoft.Configuration
{
    using System;
    using System.CodeDom.Compiler;
    using System.Collections.Generic;
    using System.Data;
    using System.Linq;
    using System.Runtime.Serialization;
    using System.ServiceModel;
    using System.ServiceModel.Web;
    using System.ServiceModel.Activation;
    using System.Text;
    using System.Text.RegularExpressions;
    using System.Web;
    using Terrasoft.Common;
    using Terrasoft.Core;
    using Terrasoft.Core.DB;
    using Terrasoft.Core.Entities;
    using Terrasoft.Core.Packages;
    using Terrasoft.Core.Factories;

    // The [CurrentUser] attribute with the macro name.
    [ExpressionConverterAttribute("CurrentUser")]
    // The class must implement the IExpressionConverter interface.
    class CurrentUserConverter : IExpressionConverter
    {
        private UserConnection _userConnection;
        // Implementing the Evaluate method of the IExpressionConverter interface.
        public string Evaluate(object value, string arguments = "")
        {
            try
            {
                _userConnection = (UserConnection)HttpContext.Current.Session["UserConnection"];
                // The method returns the contact of the current user.
                return _userConnection.CurrentUser.ContactName;
            }
            catch (Exception err)
            {
                return err.Message;
            }
        }
    }
}
4. Adding tags with the macro names to the report template fields
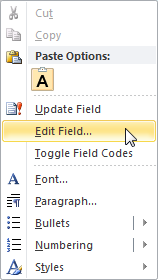
Select the [Edit Field] option in the template field context menu (Fig. 4).
Fig. 4. A template field context menu
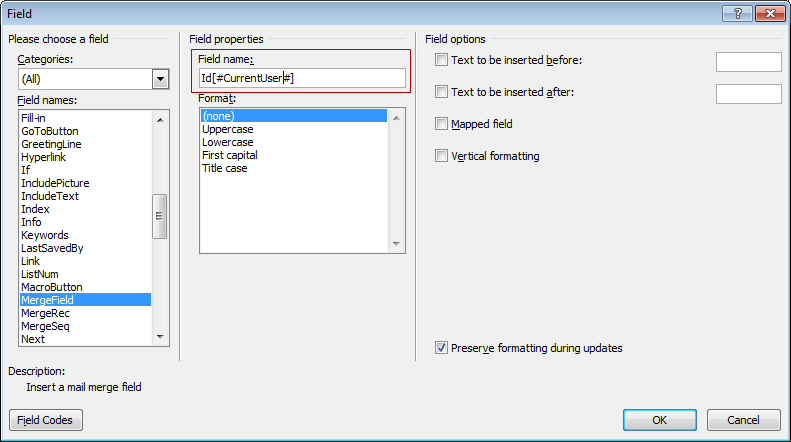
Add tags with macro names to the field names (fig. 5, 6, 7).
You can use any template field to receive data about the current date and user, since the handler-macros for this data do not use incoming parameters. You can use the [Id] field in both cases of the case.
Fig. 5. Adding the AccountInfoByType tag for receiving additional information about the account
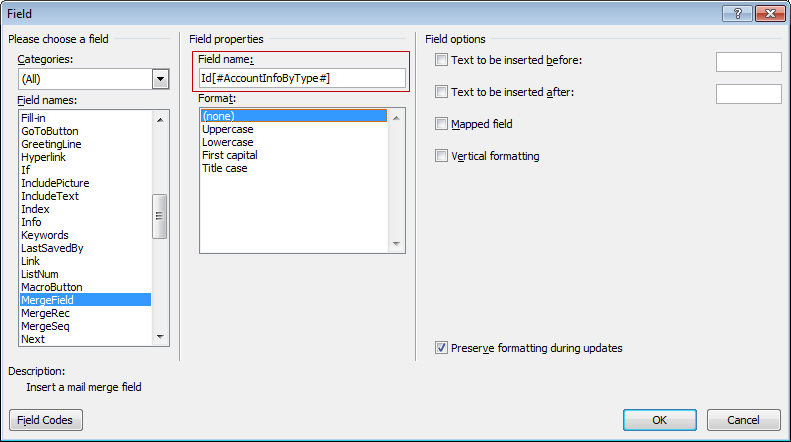
Fig. 6. Adding the CurrentDate tag for receiving the current date
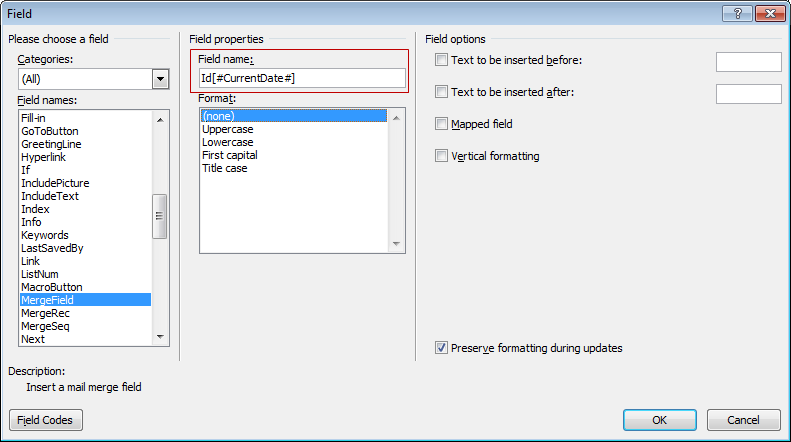
Fig. 7. Adding the CurrentUser tag for receiving the current user
As a result, the template will look as shown in Fig. 8.
Fig. 8. A printable template.
5. Saving the template and downloading it into the printable
Downloading the template into a printable is covered in the “Setting up MS Word printables in Creatio” article.
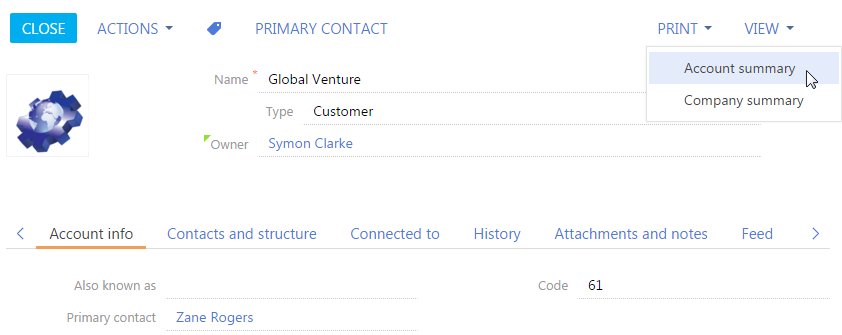
The new [Account summary] printable will be displayed in the [Print] button menu of the account edit page after you download the template (fig.9).
Fig. 9. The new printable in the [Accounts] section
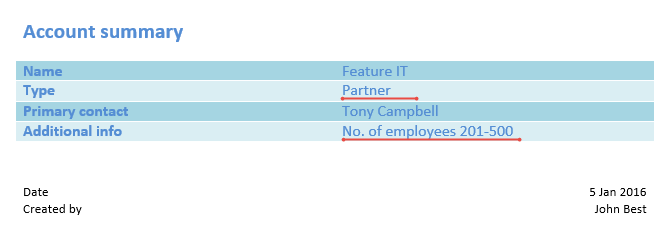
Information in the printable will depend on the account type (fig.10, 11).
Fig. 10. Printable for the [Customer] type account
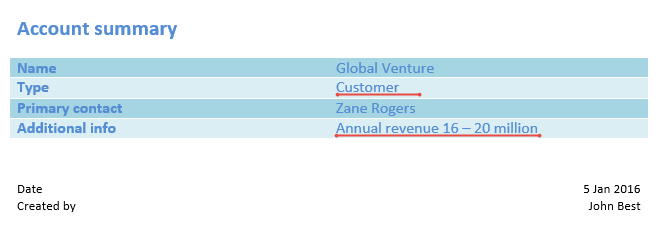
Fig. 11. Printable for the [Partner] type account