


Basic macros in the MS Word printables
Glossary Item Box

Introduction
Users can create MS Word reports in Creatio and configure them using the Creatio MS Word Report Designer plug-in. Learn more about creating and setting up MS Word reports in the "Set up MS Word reports" article.
Use macros to set up extra data output options for an MS Word report. You can use basic macros and create custom macros.
The general procedure of creating an MS Word report using basic macros is as follows:
- Install the MS Word Report Designer plug-in. This is a one-time procedure. Learn more in the "Installing Creatio plug-in for MS Word" article.
- Add a new report record in the [Report setup] section.
- Set up the report display parameters
- Set up the report data fields and tables. Add a tag with the name of the macro in the [#MacrosName#] format to the column when setting up column fields.
- Set up the report template layout in the Creatio MS Word Report Designer plug-in and upload the template to Creatio.
The structure of macros in MS Word reports:
ColumnName[#Macro name|Arguments#]
Basic macros
The [#Date#] macro
Converts a date to a specified date format. The default date format is "dd.MM.yyyy". If the date format is not specified, the entered date value will be converted to the default format. A detailed description of date formats is available in the Microsoft documentation. The argument is optional.
Cases:
ColumnName[#Date#]
If the entered value is "07/15/2020 11:48:24 AM", the macro will return "15.07.2020".
ColumnName[#Date|MM/dd/yyyy#]
If the entered value is "31/01/2019 08:25:48 AM", the macro will return "01/31/2019".
The [#Lower#] macro
Converts the value of a string to lowercase. The macro has no arguments.
An example:
ColumnName[#Lower#]
If the entered value is "ExaMpLe", the macro will return "example".
The [#Upper#] macro
Converts the value of a string to uppercase. The argument is optional. If the "FirstChar" argument is passed to the macro, only the first character in the string will be converted to uppercase.
Cases:
ColumnName[#Upper#]
If the entered value is "example", the macro will return "EXAMPLE".
ColumnName[#Upper|FirstChar#]
If the entered value is "example", the macro will return "Example".
The [#NumberDigit#] macro
Convert a raw number to a number with digit group separators. The default delimiter is the space character. The argument is optional.
Cases:
ColumnName[#NumberDigit#]
If the entered value is "345566777888.567", the macro will return "345 566 777 888.567".
ColumnName[#NumberDigit|,#]
If the entered value is "345566777888.567", the macro will return "345,566,777,888.567".
If the fractional part of the number equals zero, only the integer part will be returned. If the entered value is "345566777888.000", the macro will return "345,566,777,888".
The [#Boolean#] macro
Converts a boolean value to a custom representation. The argument is required. The following arguments are available:
- CheckBox – converts the entered value to "☑" or "☐".
- Yes,No – converts the entered value to "Yes" or "No".
Cases:
ColumnName[#Boolean|CheckBox#]
If the column contains the true value, the macro will return "☑".
ColumnName[#Boolean|Yes,No#]
If the column contains the true value, the macro will return "Yes".
Case description
Create an "Account Info” report for the [Accounts] section edit page to display the following information about the account:
- [Name].
- [Type].
- [Primary contact].
Case implementation algorithm
1. Create a new report
To do this:
- Open the System Designer by clicking
 . In the [System setup] block, click the [Report setup] link.
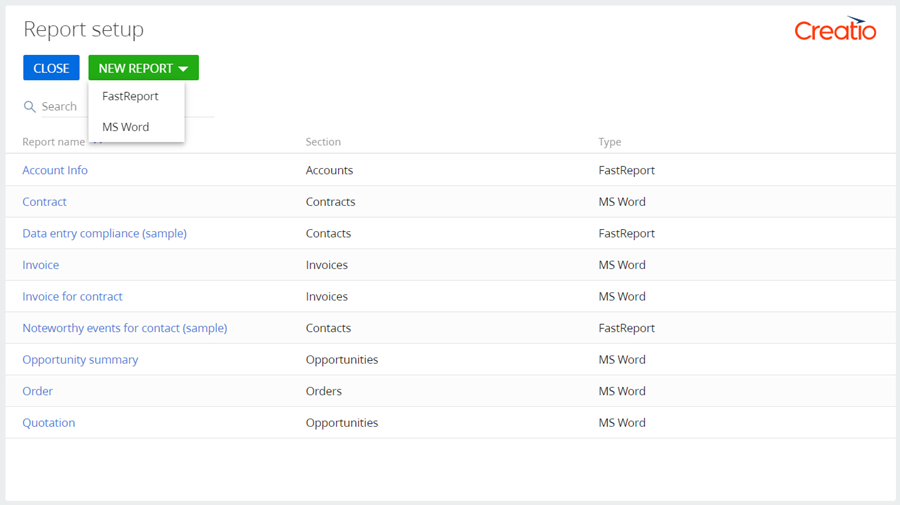
 - Click [New report] –> [MS Word] (Fig. 1).
Fig. 1. The [Report setup] section list
2. Set up the report display parameters
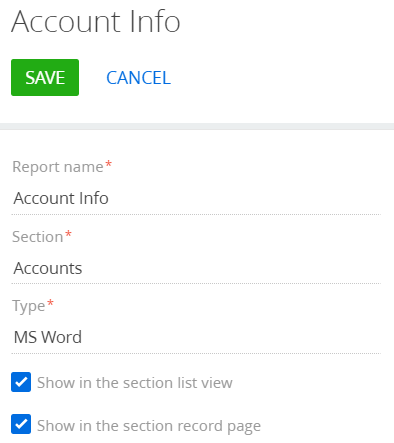
Set the following values (Fig. 3) in the parameter setup area (Fig. 2, 2):
- [Report title] – "Account Info".
- [Section] – "Accounts".
- [Show in the section list view].
- [Show in the section record page].
Fig. 2. MS Word report setup page
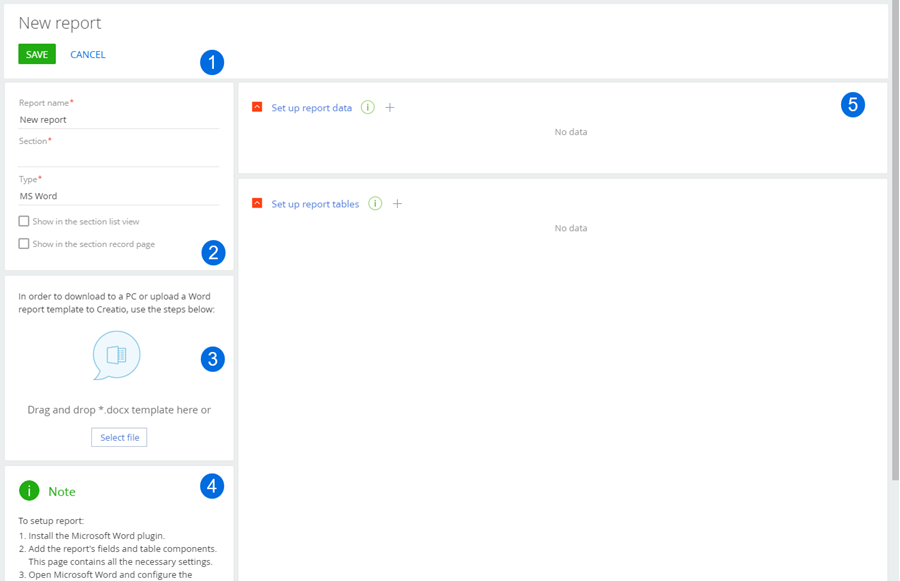
Fig. 3. – Setting up the report display parameters
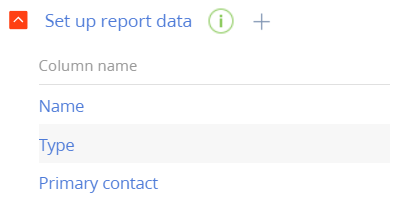
2. Set up the report fields
In the [Set up report data] block of the section working area (Fig. 2, 5), set up the fields to display in the report. To do this, click  and select the [Name] column in the drop-down [Column] list (Fig. 4). A macro will be added to the column later.
Fig. 4. Selecting a column
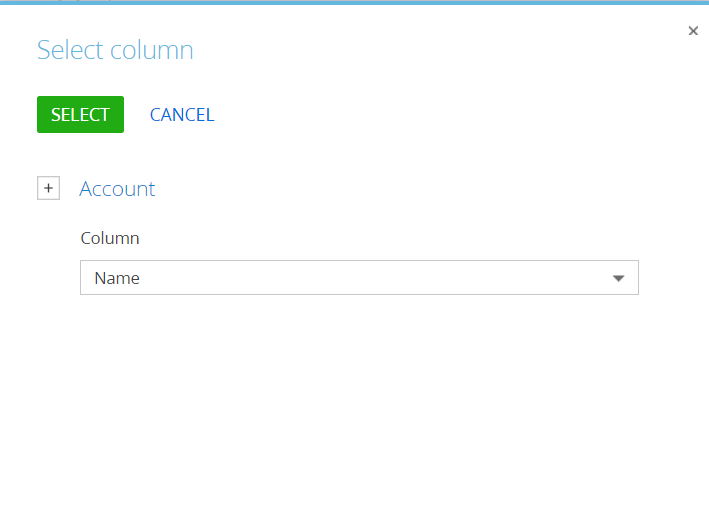
Click [Select].
Using the same method, add the [Type] and [Primary contact] columns to the template.
The list of columns after this step is presented below (Fig. 5).
Fig. 5. The list of added columns
3. Add the macro tag to the column name
Change the [Name] column property. To do this, take the following steps;
- In the [Set up report data] block of the section working area (Fig. 2, 5), double-click the title of the [Name] column or click
 in the column title bar.
 - Change the [Name] value of the [Title] field to [Name[#Upper#]] (Fig. 6).
Fig. 6. Setting up a column property
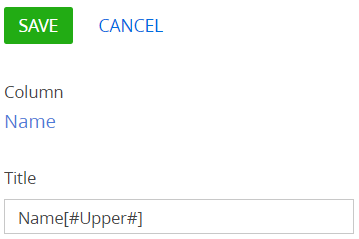
Click [Save].
The list of columns after adding macro tags is presented below (Fig. 7).
Fig. 7. The list of added columns with macros

Click [Save].
4. Set up the report template layout and upload the template to Creatio
To set up the template:
-
Open any MS Word file.
-
Click [Connect] on the Creatio plug-in toolbar (Fig. 8).
Fig. 8. The [Connect] button

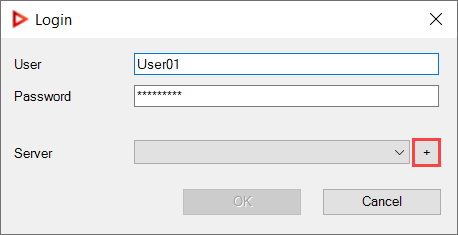
-
Enter the username and password of the Creatio user. Click
 next to the [Server] field (Fig. 9).
Fig. 9. Authentication
-
Click [New]. Enter the server parameters (Fig. 10).
Fig. 10. Server settings
Click [OK].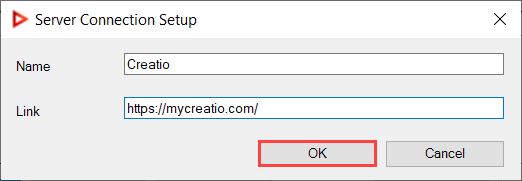
-
Click [Select report] on the Creatio plug-in toolbar (Fig. 11).
Fig. 11. The [Select report] button

-
Select the "Account info" report and click [OK] (Fig. 12).
Fig. 12. Selecting a report
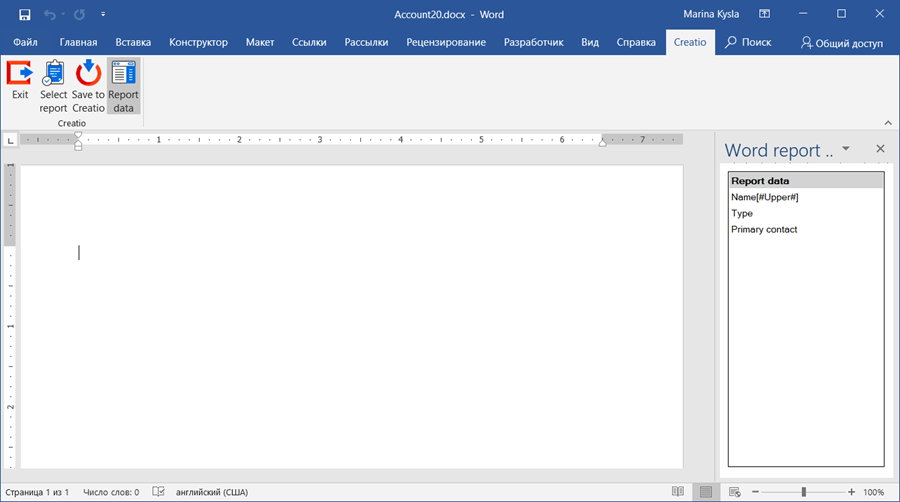
The report setup window looks as follows (Fig. 13):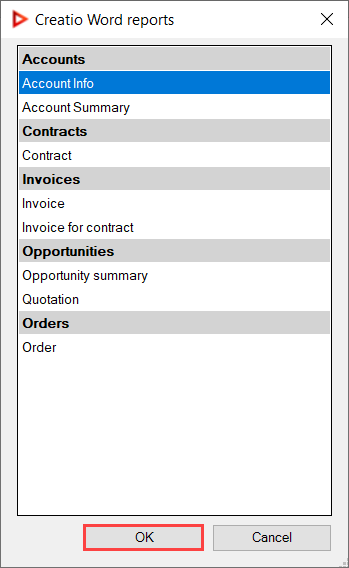
Fig. 13. Setting up the report
-
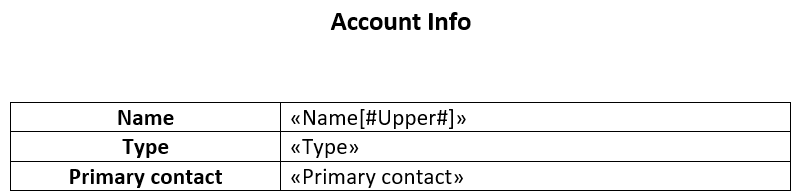
Set up the template layout. Learn more about setting up a report template in the "Design report layout via the Creatio MS Word plug-in" article.
After the setup, the report looks as follows (Fig. 14):Fig. 14. Setting up a report template
-
Click [Save to Creatio] to load the report template in Creatio (Fig. 15).
Fig. 15. The [Save to Creatio] button

As a result, the "Account Info" report will be available in the [Accounts] section list under [Print] (Fig. 16).
Fig. 16. Displaying the "Account Info" report in the dashboards of the [Accounts] section

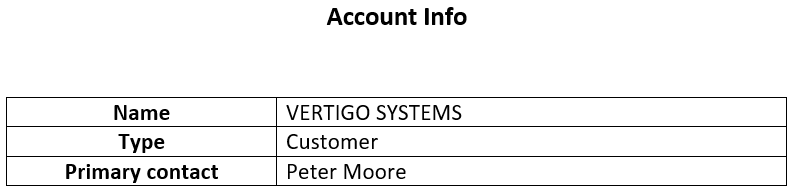
The report looks as follows (Fig. 17).
Fig. 17. – Example of the "Account Info" report
Transferring the package to another development environment
To transfer the package with the report to another development environment, go to the [Configuration] section -> the [Data] tab and bind the data of the following elements:
- SysModuleReport_ReportName – the report. To bind it, use the report Id from the [dbo.SysModuleReport] database table.
- SysModuleReportTable_ReportName – the tabular component of the report. To bind it, use the report Id from the [dbo.SysModuleReportTable] database table.
You can view the record Id in the database table even if you do not have access to the database. To do this, display the Id system column in the window of binding data to packages.