


How to use TypeScript when developing custom functions
Glossary Item Box

Introduction
Starting with version 7.11.3 you can add file content (.js, .css files, images, etc.) to the custom packages.
File content of packages is a number of any files used by the application. File content is static and is not processed by the web server (see “Client static content in the file system”). This increases application performance.
More information about file content can be found in the “Packages file content”.
File content enables to use languages which can be compiled to JavaScript (for example TypeScript) in custom functions development. More information about TypeScript can be found at https://www.typescriptlang.org.
TypeScript installation
One way to install the TypeScript tools is to use the NPM package manager for the Node.js. For this, run the following command in the Windows console:
npm install -g typescript
ATTENTION
Check the Node.js execution environment in your system, before installing TypeScript via the NMP. Download the installer by the https://nodejs.org link.
Case description
When saving an account record, display the message about the correctness of filling the [Also known as] field for the user. The field should contain only letters. Implement the validation logics in the TypeScript language.
Source code
You can download the package with case implementation using the following link.
Case implementation algorithm
1. Switch to the file system development mode
For more information about entering the file system development mode, see the “Development in the file system” article.
2. Create the structure of the file content storage
Recommended structure of the file content storage is described in the “Packages file content” article. For this:
1. Create the Files folder in the custom package loaded to the file system.
2. Add the src folder with the js subfolder to the Files folder.
3. Add the descriptor.json file with following content to the Files folder:
{
    "bootstraps": [
        "src/js/bootstrap.js"
    ]
}
4. Add the bootstrap.js file with the following content to the Files\src\js folder:
(function() {
    require.config({
        paths: {
            "LettersOnlyValidator": Terrasoft.getFileContentUrl("sdkTypeScript", "src/js/LettersOnlyValidator.js")
        }
    });
})();
NOTE
The LettersOnlyValidator.js file specified in the bootstrap.js will be compiled at the step 4.
3. Implement the validation class in the TypeScript language
Create the Validation.ts file in the Files\src\js folder and declare the StringValidator interface in this file:
interface StringValidator {
    isAcceptable(s: string): boolean;
}
export = StringValidator;
Create the LettersOnlyValidator.ts file in this folder. Declare the LettersOnlyValidator class in this file. The class will implement the StringValidator interface:
// Import the module in which the StringValidator interface is implemented.
import StringValidator = require("Validation");

// The created class must belong to the Terrasoft (module) namespace.
module Terrasoft {
    // Declaring the class of value validation.
    export class LettersOnlyValidator implements StringValidator {
        // A regular expression that allows the use of only letter characters.
        lettersRegexp: any = /^[A-Za-z]+$/;
        // Validating method.
        isAcceptable(s: string) {
            return !Ext.isEmpty(s) && this.lettersRegexp.test(s);
        }
    }
}
// Creating and exporting an instance of a class for require.
export = new Terrasoft.LettersOnlyValidator();
4. Compile the TypeScript source codes to the JavaScript source codes.
Add the tsconfig.json configuration file to the Files\src\js folder to set up the compilation:
{
    "compilerOptions":
    {
        "target": "es5",
        "module": "amd",
        "sourceMap": true
    }
}
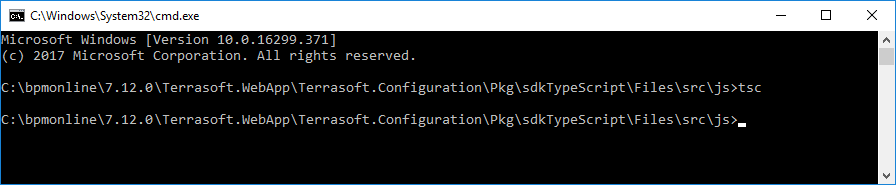
Go to the Files\src\js folder via the Windows console and execute the tsc command (Fig. 1).
Fig. 1. Execution of the tsc command
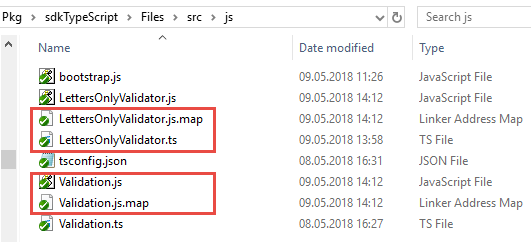
As a result of compilation the JavaScript version of the Validation.ts and LettersOnlyValidator.ts files and the .map files facilitating debugging in the browser will be created in the Files\src\js folder (Fig. 2).
Fig. 2. Result of the tsc command execution
The content of the LettersOnlyValidator.js file that will be used in the bpm’online (automatically generated):
define(["require", "exports"], function (require, exports) {
    "use strict";
    var Terrasoft;
    (function (Terrasoft) {
        var LettersOnlyValidator = /** @class */ (function () {
            function LettersOnlyValidator() {
                this.lettersRegexp = /^[A-Za-z]+$/;
            }
            LettersOnlyValidator.prototype.isAcceptable = function (s) {
                return !Ext.isEmpty(s) && this.lettersRegexp.test(s);
            };
            return LettersOnlyValidator;
        }());
        Terrasoft.LettersOnlyValidator = LettersOnlyValidator;
    })(Terrasoft || (Terrasoft = {}));
    return new Terrasoft.LettersOnlyValidator();
});
//# sourceMappingURL=LettersOnlyValidator.js.map
5. Perform the generation of auxiliary files
To generate the _FileContentBootstraps.js and FileContentDescriptors.js auxiliary files (see “Packages file content”):
1. Enter the [Configuration] section.
2. Load the package to the configuration with the [Update packages from file system] action.
3. Click the [Compile all items].
NOTE
Perform this step to apply changes in the bootsrtap.js file. You can also use the WorkspaceConsole utility (“Packages file content”).
6. Use validator in the bpm’online schema
In the [Configuration] section:
1. Load the package to the configuration with the [Update packages from file system] action.
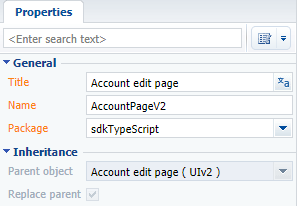
2. Create replacing schema of the edit page of the account record (Fig. 3).
Fig. 3. Properties of the replacing schema
3. Export the package to the file system using the [Download packages to file system] action.
4. Modify the ..\sdkTypeScript\Schemas\AccountPageV2\AccountPageV2.js file in the following way:
// Declaration of the module and its dependencies.
define("AccountPageV2", ["LettersOnlyValidator"], function(LettersOnlyValidator) {
    return {
        entitySchemaName: "Account",
        methods: {
            // Validation method.
            validateMethod: function() {
                // Determining the correctness of filling the AlternativeName column.
                var res = LettersOnlyValidator.isAcceptable(this.get("AlternativeName"));
                // Output of the result to the user.
                Terrasoft.showInformation("Is 'Also known as' field valid: " + res);
            },
            // Overriding the method of the parent schema that is called when the record is saved.
            save: function() {
                // Calling the validation method.
                this.validateMethod();
                // Calling the basic functions.
                this.callParent(arguments);
            }
        },
        diff: /**SCHEMA_DIFF*/ [] /**SCHEMA_DIFF*/
    };
});
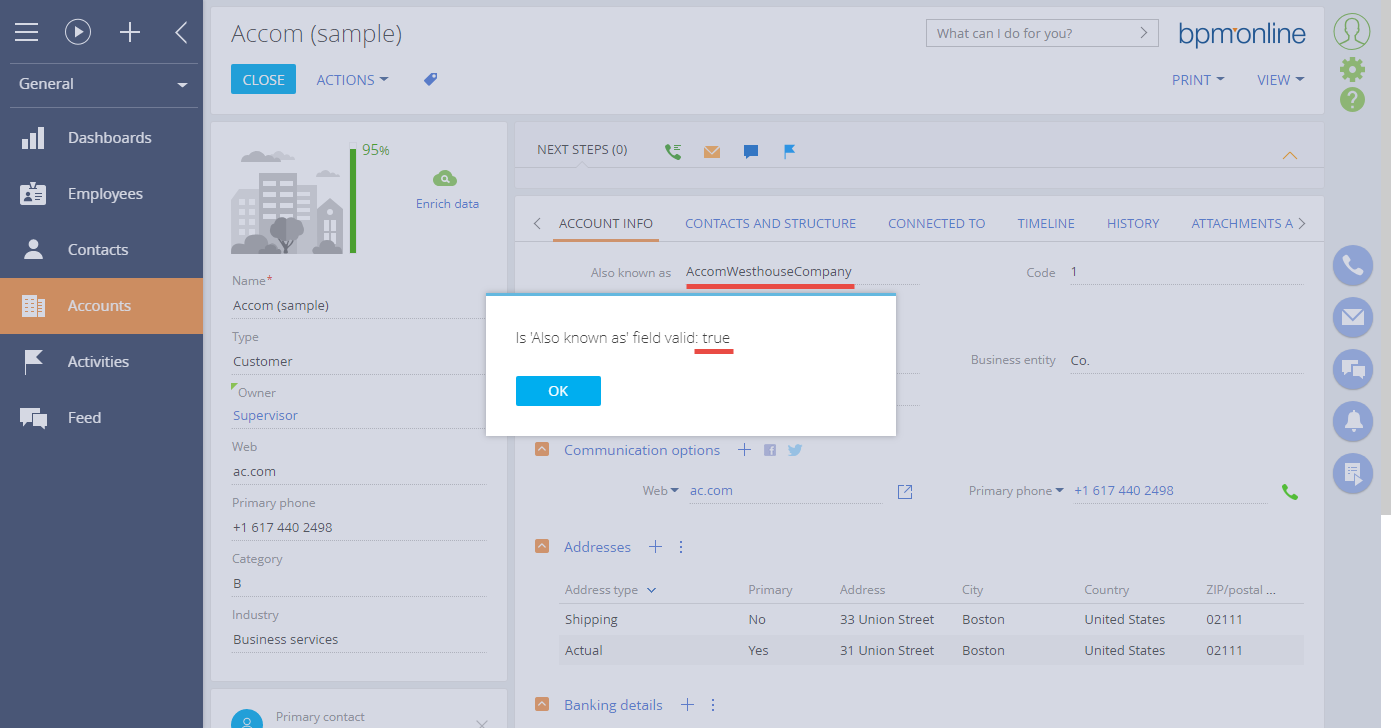
When the file with the schema source code is saved and the system web-page is updated, the warning message will be displayed on the account edit page when the page is saved (Fig.4, Fig. 5).
Fig. 4. Incorrectly populated field

Fig. 5. Correctly populated field
NOTE
Field validation is described in the “How to add the field validation” article.