Basic macros in the MS Word printables
Glossary Item Box

Introduction
A printables can be configured using bpm'online MS Word Report Designer standard tools. More information about MS Word printables can be found in the “The MS Word printables setup” article. Use the macros to implement the specific tasks of printables configuring. A process of the custom macro creation is described in the “How to create own macros for a MS Word printable” article.
Adding macro
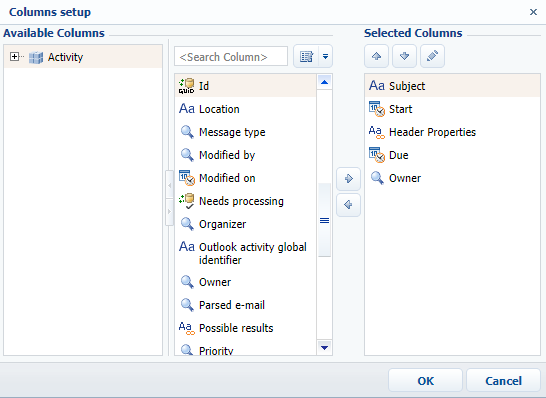
You can add the required macro on the stage of column configuration. For this, select the required column in the [Selected Columns] field (fig. 1).
Fig. 1. — Printable columns list

After that, click the column edit button  and add the macro in the opened window (Fig. 2).
Fig. 2. — Adding macro

Macro recording format
A following format is used for the MS Word printables macros:
Column name [#Macro name|Arguments#]
The [#Date#] macro
Converts date according to the specified format. If the data format is not specified, then the values will be converted to the default format ("MM-dd-yy"). More information about formats can be found in the MSDN documentation. Argument is optional.
Example:
ColumnName[#Date|MM-dd-yy#]
When the value "12/30/2016 11:48:24 AM” is entered, the macro will return the “12-30-16” as a result.
The [#Lower#] macro
Converts a string to the lowercase. This macro is used without an arguments.
Example:
The ColumnName[#Lower#]
When the value "ExamPle" is entered, the macro will return the "example” as a result.
The [#Upper#] macro
Converts a string to the uppercase. If the argument "FirstChar" is passed, only the first character will be converted to the uppercase. Argument is optional.
Examples:
ColumnName[#Upper#]
When the value "example" is entered, the macro will return the "EXAMPLE” as a result.
ColumnName[#Upper|FirstChar#]
When the value "example" is entered, the macro will return the "Eample” as a result.
The [#NumberDigit#] macro
Converts a fractional number to a thousand-digit number. A “space” character is the delimiter by default. Arguments are optional.
Examples:
ColumnName[#NumberDigit#]
When the value "345566777888.567" is entered, the macro will return the "345 566 777 888.567” as a result.
ColumnName[#NumberDigit|,#]
When the value "345566777888.567" is entered, the macro will return the "345,566,777,888.567” as a result.
 |
NOTE If the fractional part is zero, it will not be displayed. For example, if the input vaule is "345566777888.000", the macro will return "345,566,777,888" as a result. |
The [#NumberRU#] macro
Converts a number to a text string. The Cent argument returns the fractional part of the number without converting it to string. The Decimal argument converts the fractional part of the number to string. Arguments are optional.
ColumnName[#NumberRU#]
When the value "456" is entered, the macro will return the "четыреста пятьдесят шесть” as a result.
When the value "456.78" is entered, the macro will return the "четыреста пятьдесят шесть” as a result. If arguments are not specified, then only decimal part of the number is converted (see Decimal argument example).
ColumnName[#NumberRU|Cent#]
When the value "123.45" is entered, the macro will return the "45” as a result.
When the value "123" is entered, the macro will return the "00” as a result.
ColumnName[#NumberRU|Decimal#]
When the value "123.45" is entered, the macro will return the "семьсот семьдесят семь целых семьдесят семь сотых” as a result.
The [#Boolean#] macro
Converts boolean value to a user type value. Arguments are required. The CheckBox argument converts the entered value to the checkbox element ("☑"/"☐"). Text arguments must match the "Yes, No” format.
ColumnName[#Boolean|CheckBox#]
If the column has the “true” value, the macro will return "☑” as a result.
ColumnName[#Boolean|Yes,No#]
If the column has the “true” value, the macro will return "Yes” as a result.


