


Creating anonymous web service
Glossary Item Box

Case description
Create custom configuration service that returns the Id of a contact by the provided name. If there are several contacts found, it is only necessary to return the Id of the first contact. If the contact is not found, the service should return an empty string.
You can use the service created based on the example covered in the “Creating a user configuration service” article as the configuration web service.
Case implementation algorithm
1. Creating configuration service
How to create the configuration service is covered in the “Creating a user configuration service” article.
Because you are creating an anonymous configuration service, system user connection must be used instead of user connection.
The source code of configuration service, which uses system user connection:
namespace Terrasoft.Configuration.UsrCustomConfigurationService
{
    using System;
    using System.ServiceModel;
    using System.ServiceModel.Web;
    using System.ServiceModel.Activation;
    using Terrasoft.Core;
    using Terrasoft.Web.Common;
    using Terrasoft.Core.Entities;

    [ServiceContract]
    [AspNetCompatibilityRequirements(RequirementsMode = AspNetCompatibilityRequirementsMode.Required)]
    public class UsrCustomConfigurationService: BaseService
    {
        // Link to the UserConnection instance required to access the database.
        private SystemUserConnection _systemUserConnection;
        private SystemUserConnection SystemUserConnection {
            get {
                return _systemUserConnection ?? (_systemUserConnection = (SystemUserConnection)AppConnection.SystemUserConnection);
            }
        }

        // A method that returns the contact's ID by its name.
        [OperationContract]
        [WebInvoke(Method = "GET", RequestFormat = WebMessageFormat.Json, BodyStyle = WebMessageBodyStyle.Wrapped,
        ResponseFormat = WebMessageFormat.Json)]
        public string GetContactIdByName(string Name){
            // The default result.
            var result = "";
            // An EntitySchemaQuery instance that accesses the Contact table of the database.
            var esq = new EntitySchemaQuery(SystemUserConnection.EntitySchemaManager, "Contact");
            // Adding columns to the query.
            var colId = esq.AddColumn("Id");
            var colName = esq.AddColumn("Name");
            // Filter the query data.
            var esqFilter = esq.CreateFilterWithParameters(FilterComparisonType.Equal, "Name", Name);
            esq.Filters.Add(esqFilter);
            // Get the result of the query.
            var entities = esq.GetEntityCollection(SystemUserConnection);
            // If the data is received.
            if (entities.Count > 0)
            {
                // Return the value of the "Id" column of the first record of the query result.
                result = entities[0].GetColumnValue(colId.Name).ToString();
                // You can also use this option:
                // result = entities [0]. GetTypedColumnValue <string> (colId.Name);
            }
            // Return the result.
            return result;
        }
    }
}
2. Registering the WCF-service.
Create the UsrCustomConfigurationService.svc file in the ..\Terrasoft.WebApp\ServiceModel catalog and add the following record into it:
<%@ ServiceHost Language="C#" Debug="true" Service="Terrasoft.Configuration.UsrCustomConfigurationService.UsrCustomConfigurationService" %>
In the Service attribute specify the full name of the configuration service class. Read more about the @ServiceHost WCF-directive in Microsoft documentation.
3. Configuring WCF-service for the http and https protocols.
Add the following record to the services.config files located at ..\Terrasoft.WebApp\ServiceModel\http and ..\Terrasoft.WebApp\ServiceModel\https catalogs:
<services>
    ...
    <service name="Terrasoft.Configuration.[Service name]">
        <endpoint name="[Service name]EndPoint"
            address=""
            binding="webHttpBinding"
            behaviorConfiguration="RestServiceBehavior"
            bindingNamespace="http://Terrasoft.WebApp.ServiceModel"
            contract="Terrasoft.Configuration.[Service name]" />
    </service>
</services>
Configure the service here. The <services> element contains a list of configurations of all application services (the <service> nested elements). The name attribute contains the name of type (class or interface) implementing the service contract. The <endpoint> nested element requires address, binding and interface that define the service contract specified in the name attribute of the <service> element.
You can find detailed description of the service configuration elements in the documentation.
4. Setting up access to WCF-service for all users.
Perform the following changes in the ..\Terrasoft.WebApp\Web.config file:
- Add the <location> element defining the relative path and access rights to the service.
- In the <appSettings> element change the value value for the “AllowedLocations” key by adding the relative path to the service into it.
An example of changes in the ..\Terrasoft.WebApp\Web.config file:
<?xml version="1.0" encoding="utf-8"?>
<configuration>
  ...
  <location path="ServiceModel/UsrCustomConfigurationService.svc">
    <system.web>
      <authorization>
        <allow users="*" />
      </authorization>
    </system.web>
  </location>
  ...
  <appSettings>
    ...
    <add key="AllowedLocations" value="[Previous values];ServiceModel/UsrCustomConfigurationService.svc"  />
    ...
  </appSettings>
  ...
</configuration>
After reloading the application pool in IIS, the service will become available at:
[Application Address]/0/ServiceModel/[Custom Service Name].svc/[Custom Service Endpoint]?[Optional parameters]
For example:
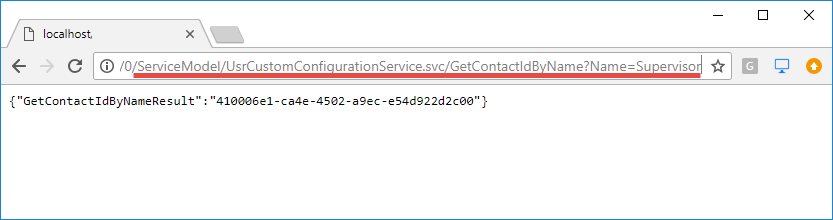
http://mysite.creatio.com/0/ServiceModel/UsrCustomConfigurationService.svc/GetContactIdByName?Name=Supervisor
You can address the service, e.g., from a browser (fig.1) either with preliminary login or without it.
Fig. 1. Example of access to the anonymous service from browser.
See also: