How to customize notifications for the [User task] process element
Glossary Item Box

Introduction
The [User task] process element can create notification on the [Business Process Tasks] panel, just like any other process action. To activate the notification mechanism, select the [Serialize in DB] checkbox in the process properties and define the ShowExecutionPage logical parameter.
Default process actions are able to create notifications for process steps. Custom process actions must be manually assigned this parameter.
Case of creating a user task with a notification
Case description
Create a simple custom process action ([User task]) that would automatically add a notification with “Attention” in its title and “Very important!” as its text. The notification must be displayed on the [Business process task] panel
Case implementation algorithm
1. Create a user task schema
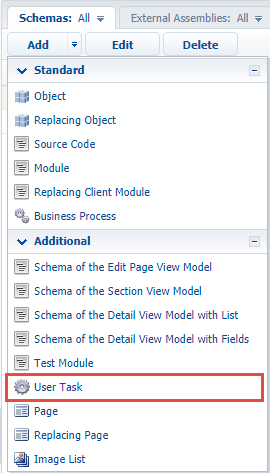
To do this, go to the [Configuration] section of the system designer, select a custom package and on the [Schemas] tab, execute the menu command [Add] - [User Task] (Fig.1).
Fig. 1. Creating a user task schema
Set the property values specified in table 1 for the created schema.
Table 1. Custom process task properties
| Property | Value |
|---|---|
| Title | Customized User Task |
| Name | UsrCustomizedUserTask |
| Small vector image | Scalable Vector Graphics The notification will be displayed on the [Business process task] panel. For this particular case we will use the SVG image available under the link. |
| Notification Icon (54x54 px) | Image for the notification pop-up window in PNG (Portable network graphics) format, 54x54 px. In the current case we will use the following image:  . . |
| Serialize in DB | Select the checkbox. |
| User task | Select the checkbox. |
After making the changes, save the schema’s meta data.
2. Add the ShowExecutionPage parameter
To enable automatic adding of the notification when the user task is run, add a new parameter (ShowExecutionPage) to the Parameters section of the custom user task (Fig. 2). Its primary properties are listed in table 2.
Fig. 2. Adding a schema parameter
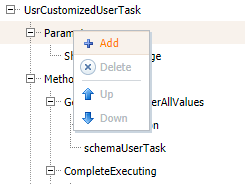
Table 2. Properties of the ShowExecutionPage parameter
| Property | Value |
|---|---|
| Title | ShowExecutionPage |
| Name | ShowExecutionPage |
| Data type | Boolean |
The value of the ShowExecutionPage parameter does not affect the notification mechanism. If the specified parameter exists in the process action, then before any process step implemented by this User task is executed, an automatic notification will be created for this step.
After making the changes, save the schema’s meta data.
3. Override the GetNotificationData() method
The contents of the business process step notification is generated via the GetNotificationData() method that can be overridden.
The method must return an instance of the Terrasoft.Core.Process.ProcessElementNotification class that contains data for the business process step notification. We recommend calling the base method first, which will return instance of the ProcessElementNotification, populated with default values, and then customize this instance. Full description of the ProcessElementNotification class properties is available in the .NET class libraries of platform core.
The properties that are most useful for customization are available in table 3.
Table 3. Primary properties of the Terrasoft.Core.Process.ProcessElementNotification class
| Property | Value |
|---|---|
| Title | Heading of the business process step notification. Default value – business process element name on the diagram. |
| Subject | Text of the business process step notification. Provide any process element specifics that are relevant to the notification recipient user here. Default value is the NotificationCaption process parameter value of the corresponding process. Thus, all steps of a business process will have the save value of the Subject parameter. |
| StartDate | Date and time of notification for system user. Default value – moment when the notification about the business process step has been created. This notification will be displayed for the user immediately after the process step is activated. |
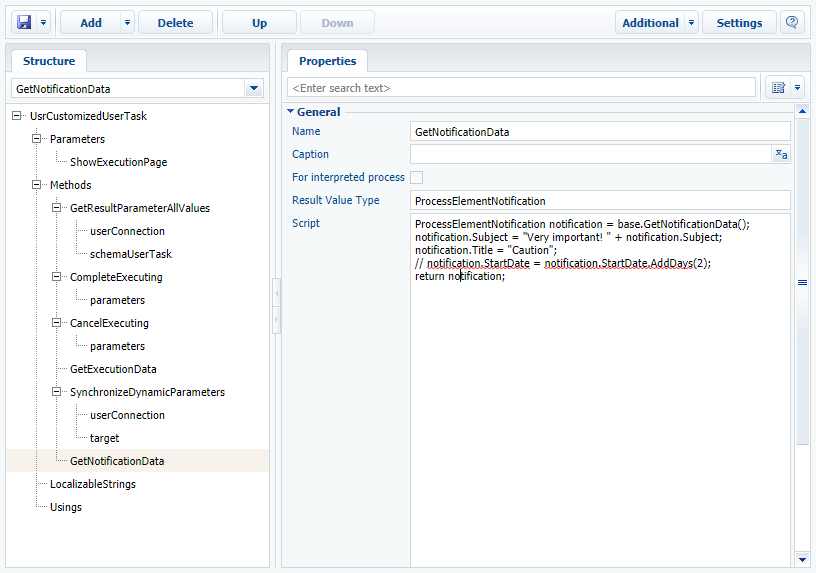
To execute the case conditions, override the GetNotificationData() method of the created schema. To do this, select the GetNotificationData node in the schema structure. Add the following code in the in the [Script] field (Fig. 3):
// Executing base method and getting an instance of the ProcessElementNotification class generated by default.
ProcessElementNotification notification = base.GetNotificationData();
// Customizing the notification element.
notification.Subject = "Very important! " + notification.Subject;
notification.Title = "Attention";
// You can postpone date and time of the notification.
// notification.StartDate = notification.StartDate.AddDays(2);
// The method returns customized instance of ProcessElementNotification
return notification;
Fig. 3. Overriding the GetNotificationData() method
After making the changes, publish the schema.
4. Use the created element in the business process.
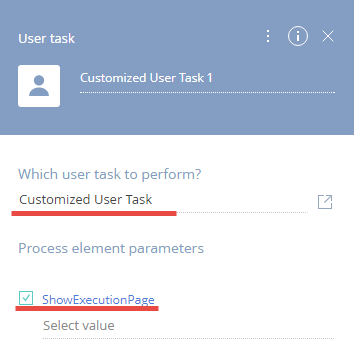
After publishing the user task schema, this action becomes available for use in bpm’online business processes. To use this custom action, add the [User Task] element on the process diagram and in the [Which user task to perform?] field, select "Customized User Task". After this, ShowExecutionPage Boolean parameter will be added to the user task parameters (Fig. 4). This parameter is optional.
Fig. 4. The ShowExecutionPage user task parameter
To correctly use the user task, select the [Serialize in DB] checkbox for it. Enable advanced mode in the process element properties (Fig. 5), and select the needed check box (Fig. 6, 1).
Fig. 5. Opening advanced properties of a process element
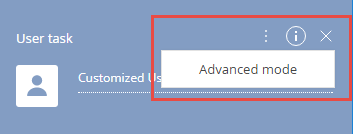
Fig. 6. The [Serialize in DB] check box
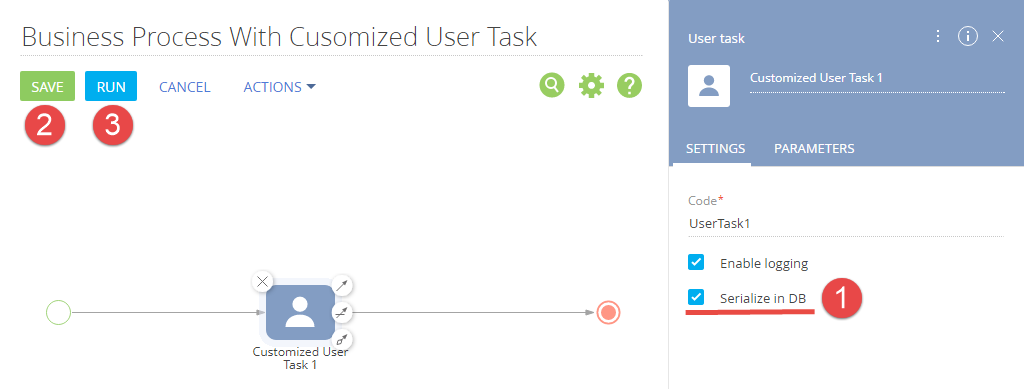
Save the process (Fig. 6, 2) and run it (Fig. 6, 1).
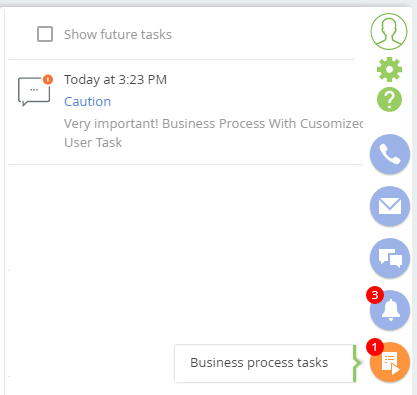
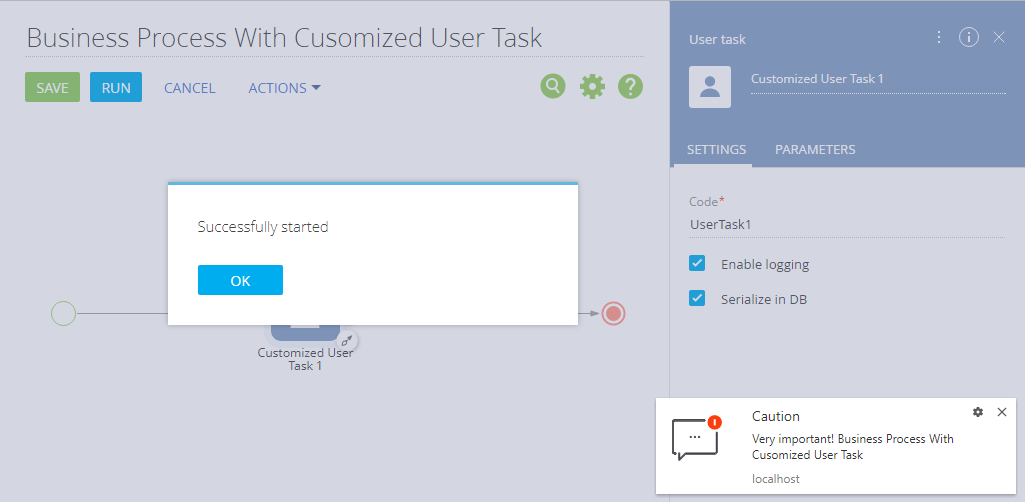
As a result, the corresponding notification (configured in the GetNotificationData() method) will be displayed (Fig. 7).
Fig. 7. Case result: Custom notification
The [Process tasks] panel will display a notification with the same properties (Fig. 8).
Fig. 8. Case result: Custom notification
