Creating new section
Glossary Item Box

General provisions
Creating new sections is one of the most common bpm'online development tasks. Use the Section Wizard to create new sections quickly. Using the wizard, not only can you add an existing section to a new workplace, but also set up list, record edit pages, and details.
As a result, new object, page and detail schemas will be added to the current custom package.
The list object schemas created by the wizard when adding new sections is available in table 1, and the list of created client schemas is available in table 2.
Table 1. Object schemas created by the section wizard
| Naming rules | Purpose | Parent |
|---|---|---|
| [Section object name] | Section primary object | Base object |
| [Section object name]Folder |
Object folder. Service object for correct grouping of section records. Forms general structure of section folders. |
Base folder (BaseFolder) |
| [Section object name]inFolder |
Object in folder. Service object for correct grouping of section records. Determines connection between section records and section folders, in which the records are included. |
Base element in folder (BaseItemInFolder) |
| [Section object name]File | Object for [Attachments] detail of the section. | File (File) |
| [Section object name]Tag | Section tag. | Base tag (BaseTag) |
| [Section object name]inTag | Tag in the section object. | Base tag in base object (BaseEntityInTag) |
Table 2. Client schemas created with section wizard
| Naming rules | Purpose | Parent |
|---|---|---|
| [Section object name]Section | Section schema |
Base section schema (BaseSectionV2) |
| [Section object name]Page | Section edit page schema | BaseModulePageV2 |
| [Section object name]Detail | Section detail schema |
Base detail with list schema (BaseGridDetail) |
Sequence for adding sections
- Create a section using the Section Wizard and add it to the required workplace.
- Add required columns to the section object schema and set up their display in the list, page and details.
Case description
In the application, add a [Car showroom] workplace. Add a [Trucks] section to the workplace. The truck object schema must contain the following required columns:
- Name – string.
- Owner – [Contact] lookup.
- Organization – [Account] lookup.
- Price – string.
Case implementation algorithm
1. Create a section using the Section Wizard and add it to a workplace
To create a new workplace, enter "Car showroom" in the [Name] field and add a user group that can access this workplace.
To create a new section, it is sufficient to complete the first page of the Wizard. The object of the new section will have the "Name" string column and the columns inherited from the base object. For the initial section setup, enter "Truck" in the [Code] field and "Trucks" in the [Title] field.
 |
ATTENTION Section object names (entered in the [Section code] field of the section wizard) must not contain any of the following prefixes: "Base", "Sys", "Vw". Also, section object names must not contain the following suffixes: "InFolder", "Lcz", "Lookup", "Settings". Excel import will be unavailable for all objects that contain any of the mentioned prefixes and/or suffixes. |
|
NOTE If you did not change any default settings, the system will inform you that the Usr prefix is required when entering the [Section code] value. The required prefix is set in the "Object name prefix" system setting. If needed, you can modify prefix value to user prefix. |
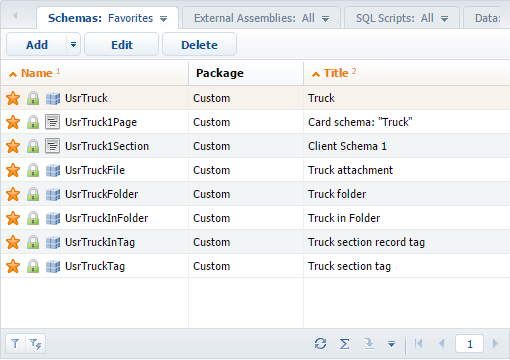
After saving the results in the custom package all schemas that are required for base section logic will be created automatically (Fig. 1).
Fig. 1. Schemas of the [Trucks] section in the custom package
2. Add required columns to section object schema and set up how they are displayed
There are two ways you can add new columns to an object schema.
The first method is to use the Section Wizard, namely the page field setup tab. With the Section Wizard, you can add a new column and add it to the edit page. The column will be automatically added to the section primary object schema. For more information on section page field setup, please refer to the "How to set up page fields" article.
The alternative method of adding columns is to use the Object Designer in the [Configuration] section to add columns to the page. For more information about the functions of the [Configuration] section, please see the "The [Configuration] section" article.
Since you need to use the Section Wizard in both cases, the first method is more advisable.
Since the [Name] column is added to the section pages automatically by the Section Wizard, you need to add the remaining columns manually.
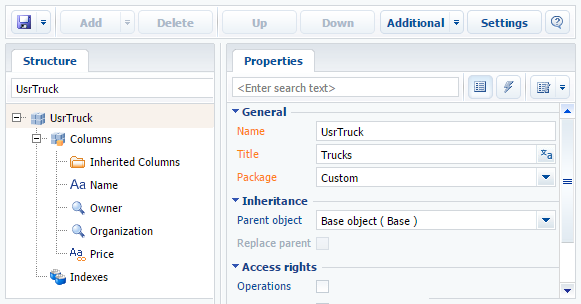
When adding the [Owner] column, select the "Contact" lookup as the column type, and then enter the column name and title. Similarly, for the [Organization] column, select the "Account" as the lookup object, and then enter the title and name of the column. The [Price] column must be a string with the corresponding title and name.
Select the [Required] checkbox for all added columns.
After saving the results, new columns will be added to the Truck object schema (Fig. 2), and the diff array of the TruckPage edit page schema will contain all corresponding configuration objects.
Fig. 2. [Trucks] section primary object schema
After adding new records, the section will look like the one in Fig. 3.
Fig. 3. The [Trucks] section in the [Car showroom] workplace