


Configuring a document approval process
Example
Create a business process for approving documents in the [Documents] section. Each document is sent for approval manually by launching the process in the section. All employees in the [Financial department] role can approve documents. Additionally, all employees eligible for approving documents receive an email notification once the approval is created. The employee awaiting the approval receives an email once the document is approved. If approved, the document status is changed to “Active”. If it was not approved, the document status is changed to “Draft”, and Creatio automatically creates an activity for the responsible employee to revise the document.
Setup steps
1.Set up the approval business process as shown on Fig. 1.
2.Set up running the approval business process for records that require approval in the corresponding section.
Attention
Before creating and configuring an approval business process, make sure that the [Enable approval in section] checkbox is selected for that section in the section wizard. Read more>>>
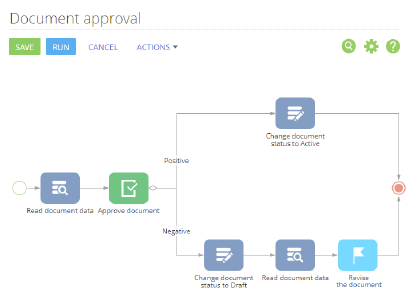
Fig. 1 A business process for approving documents
Configuring a business process for approving documents
1.Open the [Process library] section and add a new process.
2.Enter the name of the process in the [Process] field (e.g., “Document approval”).
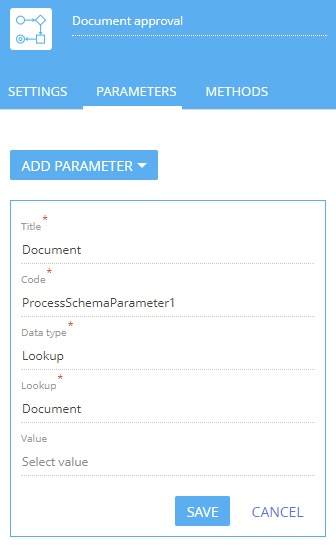
3.Open the [Parameters] tab and add a new parameter. This parameter will bind process instances to the documents that needs to be approved (Fig. 2). Once the process is launched from the [Documents] section, the parameter will be populated with the corresponding document. To add a process parameter:
a.Click the [Add parameter] button, and select “Lookup” in the drop down menu.
b.In the [Title] field, enter "Document".
c.In the [Lookup] field, select "Document".
d.Save the changes.
Fig. 2 Business process parameters
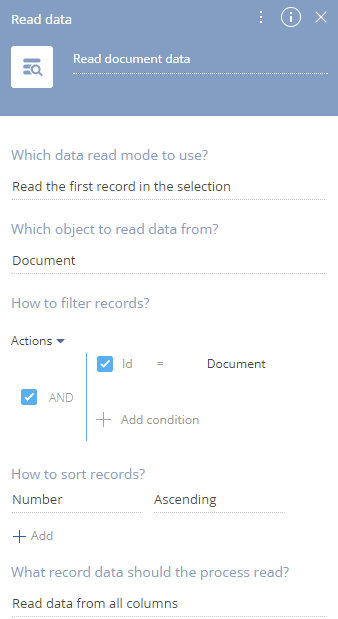
Add the [Read data] element from the [User actions] group to the process diagram. Enter the name of the element in the [Read data] field (e.g., “Read document data”). This element obtains the process parameters necessary to perform the next steps. Set up the element parameters (Fig. 3).
1.In the [Which data read mode to use?] field, select “Read the first record in the selection”.
2.In the [Which object to read data from?] field, select ”Document”. The business process will read the value in the [Owner] field of this object to send notifications about the approval status to the document owner.
3.In the [How to filter records?] area, set the filter “Id = Document”. To do this, click <Add condition>, select the “Id” column, select the [Compare with parameter] value in the displayed menu, and choose the [Document] process parameter in the in the appeared window.
4.The default settings in the [How to sort records?] area are configured for sorting in ascending order.
Fig. 3 The "Read document data" element properties
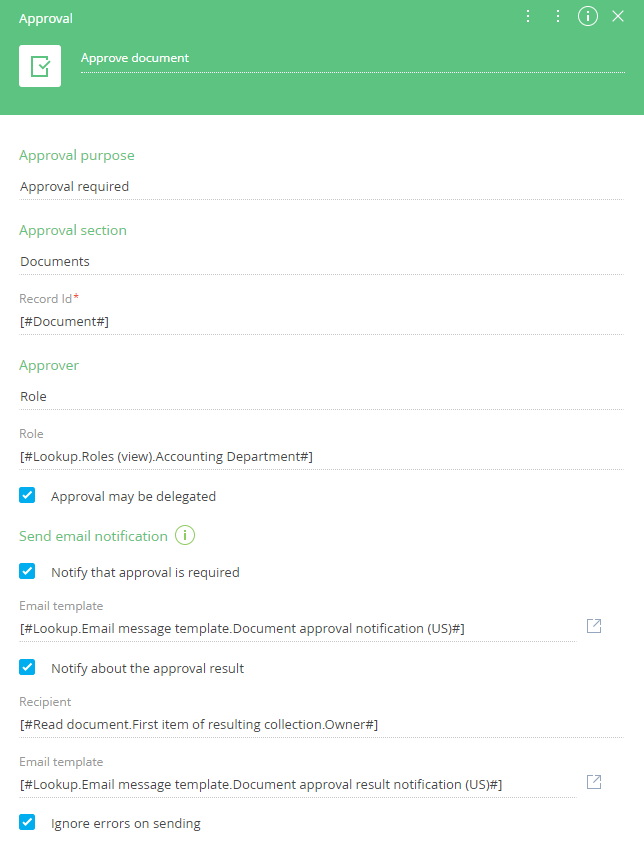
Add the [Approval] element from the [User actions] group to the process diagram (e.g., “Approve document”). The element will be activated once the process is launched for a record in the [Documents] section. Set up the element parameters (Fig. 4).
1.In the [Approval purpose] field, select “Approval required”.
2.In the [Approval object] field, select “Document”.
Note
If you cannot find the [Document] object in the list, the approval procedure might be disabled for the [Documents] section in the section wizard. More information about approvals is available in a separate article.
3.In the [Record Id] field, click  and select the “Process parameter” option, then choose the “Document” process parameter in the appeared window.
4.In the [Approver] field, select “Role”.
5.In the [Role] field, select “Lookup value option” and choose the “Financial department” value from the the “Roles (view)” lookup. All employees in the [Financial department] role will be able to approve documents.
6.Select the [Approval may be delegated] checkbox to be able to delegate an approval to a different employee.
7.In the [Send email notification] field, configure automatic email notifications for the approvers and the document owner employee.
a.Select the [Notify that approval is required] checkbox.
b.In the [Email template] field, click  and add an email template for a notification from the [Email message template] lookup.
c.Select the [Notify about the approval result] checkbox.
d.In the [Recipient] field, click the  button and select “Contact” in the menu, and choose the “Process parameter” option. Then, select the “Owner” parameter from the “Read document data” element in the appeared window. The owner of the document will receive an email notification about the approval.
e.In the [Email template] field, click  and add an email template for a notification from the [Email message template] lookup.
Attention
Set up the mailbox for email notifications in the [Mailbox for sending email with information on approval] system setting. Access the system setting in the Process Designer by clicking the  button in the [Send email notification area].
Note
Create email templates in the content designer, using the [Approvals in the Documents section] object. The approval objects are created automatically, when you select the [Enable approval in section] checkbox in the section wizard. For example, if you select the [Enable approval in section] checkbox in the [Documents] section wizard, a new object “Approvals in section Document” will be created. If the lookup of the [Enable approval in section] does not contain the template you need, click  in the right part of the field to add a new email template. The process of creating an email template is described in a separate article.
Fig. 4 The [Approval] element parameters
Add two [Modify data] elements of the [System actions] group to the process diagram.
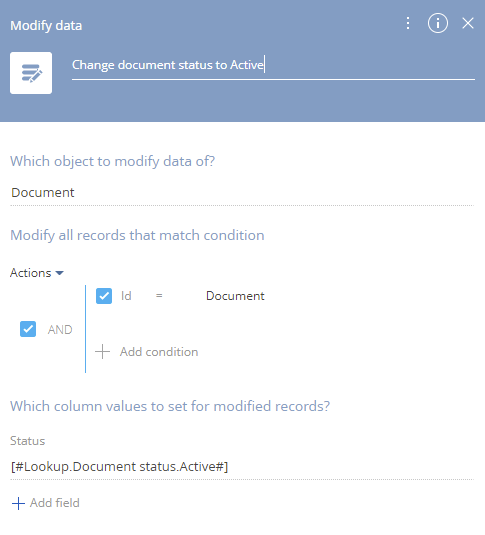
The “Change document status to Draft” and “Change document status to Active” elements are used to change the document status based on the approval result. Set up the element parameters (Fig. 5). The parameters of the two elements are identical, except for the resulting document status.
1.In the [Which object to read data from?], select “Document”. This will be set by default if approvals are enabled in the [Documents] section. In this case, it is the “Chart” component.
2.In the [How to filter records?] area, set the filter “Id = Document”. To do this, click <Add condition>, select the “Id” column, select the [Compare with parameter] value in the displayed menu, and choose the [Document] process parameter in the in the appeared window.
3.In the [Which column values to set for modified records?] area, select the resulting document status. If approved, the document status changes to “Active”. If not approved, the document status changes to “Draft”. To do this, click <Add field>, and select the “Status” column. In the [Status] field, click the  button, select “Lookup value”, and choose the following values: “Active” for the “Change document status to Active” element and “Draft” for the “Change document status to Draft” element.
Fig. 5 The “Change document status to Active” element parameters
Copy the previously created [Read data] element (“Read document data”) and place it after the [Change document status to Draft] element on the diagram (Fig. 3). This element determines the responsible individual for re-working the document.
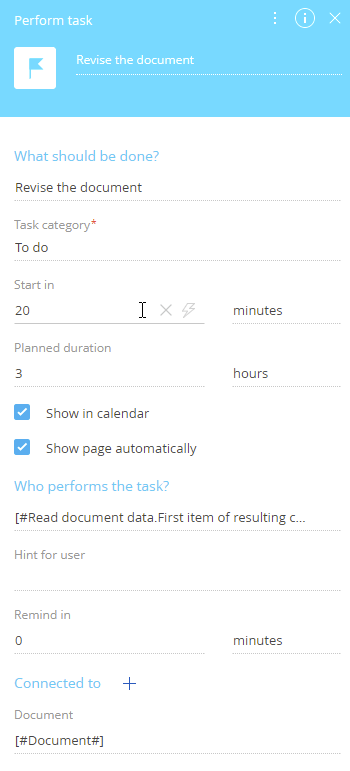
Add the [Perform task] element from the [User actions] group to the process diagram (“Revise the document”). This element will create a task (activity) for the individual to edit the document if it was not approved. Set up the element parameters (Fig. 6).
1.Enter the name of the task in the [What should be done?] field.
2.Select the start time of the task in the [Start in] field, and the approximate duration of the task in the [Planned duration] field. The value of the [Start in] field determines a time period at the end of which the task will be scheduled. In the [Planned duration] field, specify the approximate duration of the task.
3.Select the [Show in calendar] checkbox to display the task in the responsible individual’s calendar.
4.In the [Who performs the task?] field, click  and select the “Process parameter” option. In the appeared window, select the “Owner” option from the “Read document data” element.
5.In the [Connected to] field, connect the task to the document. To do this:
a.Click the  button and add the “Document” column.
b.Click the  button and select the “Process parameter” option, and choose the “Document” process parameter in the appeared window.
Fig. 6 The "Revise the document" element properties
After creating the process elements, connect each element with the next one by using the arrows in the upper right corner of the selected element.
1.Use conditional flows ( ) to connect the “Approve document” element to the “Change document status to Draft” and “Change document status to Active” elements/
2.Click the conditional flow connecting the “Approve document” element and the “Change document status to Draft” element and select the “Negative ”approval result.
3.Click the conditional flow connecting the “Approve document” element and the “Change document status to Active” element and select the “Positive ”approval result.
4.Use sequence flows ( ) to connect all other elements.
Save the business process. Once saved, configure the start of a business process.
Adding the document approval process to the processes of the [Documents] section
The process is launched by clicking the [Run process] button on the record page or in the section list. The button is not displayed by default and requires additional setup (Fig. 7).
To configure the button, connect the document approval process to records for which it will be launched. To do this:
1.Click the [View] button in the [Contacts] section and select the [Open section wizard] command.
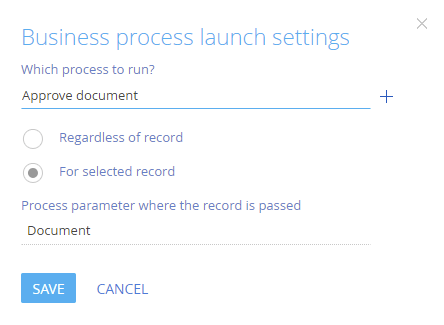
2.Open the [Business process] tab. Click the  button on the [Run business process from section] detail. The window of the business process launch settings will be opened.
3.Select the “Document approval” process in the [Which process to run?] field.
4.To start the process for separate section records, select the “For selected record” radio button.
The [Process parameter where the record is passed] field is populated automatically with the “Document” parameter of the “Document approval” process.
5.Save the changes in the window and the section wizard.
Fig. 7 Adding a business process to a section
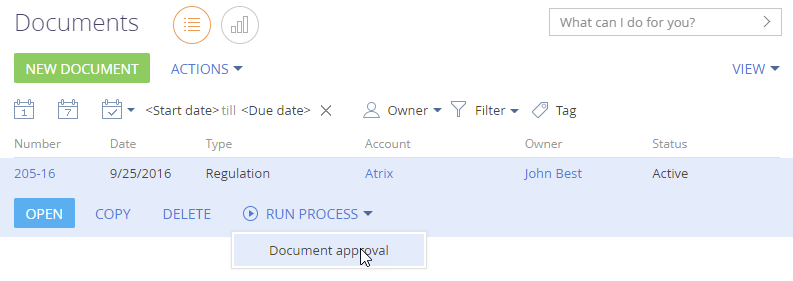
As a result, you will be able to launch the approval process for any record of the [Documents] section (Fig. 8).
Fig. 8 Launching the process from the [Documents] section list
See also
•Setting up custom email templates for approval notifications
•Notifying employees by email when a lead has been received via a landing page
•Notifying an employee when they become an activity participant
•Notifying a user about a comment to their message in the feed