


Using business processes to automate repeated tasks and using loops in the process flow
You can use business processes to automate repeated tasks or repeat certain tasks in a cycle. In an ideal situation, one cycle must correspond to one instance of a business process that automatically repeats. Several tasks may be executed repeatedly a part of one process instance, but generally it is not recommended to create business processes that loop too many times.
There are several ways you can approach a repeated task in a BPMN business process:
-
Run the process repeatedly, using the [Start timer] event.
-
Use an event sub-process to perform repeated actions.
-
Loop the process flow to repeat a specific sequence of actions, until certain conditions are met.
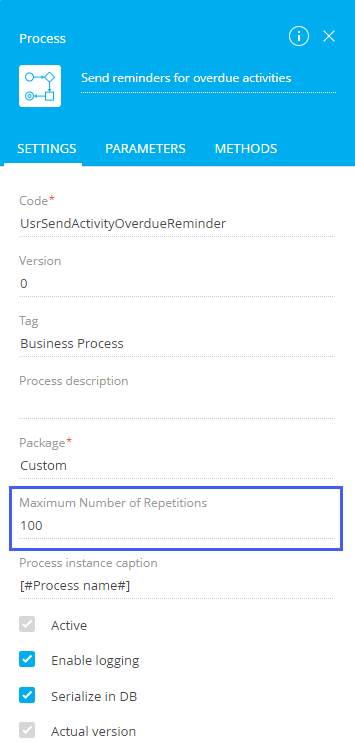
When designing business processes with actions that are supposed to execute repeatedly, within one process instance, please take into account the [Maximum Number of Repetitions] property of your process. It limits the number of times an element can be executed within a process instance and is set to 100 repetitions per element by default (Fig. 1).
Fig. 1 The [Maximum number of repetitions] property of the process
An implementation of a working process that automates repeated tasks, is available in the Engaging dormant customers template on the bpm’online marketplace. Let’s go through the step-by-step process of creating a simpler process similar to this template.
Example
Create a business process, which will regularly notify employees by email about their overdue tasks.
The general flow of such processes consists of the following general steps:
1.Trigger regularly, using timer.
2.Reset the processing status of the records that must be processed.
3.Check if there are any unprocessed records. If there are none – terminate the process.
4.Select the first record to process.
5.Process the record.
6.Mark the record as processed.
7.Check if there are any unprocessed records. If there are none – terminate the process.
...and so on, until all records have been processed.
To implement this example, create a diagram of a process, which is run regularly and loop until notifications for all activities have been sent (Fig. 2).
Fig. 2 The “Send reminders for overdue activities” process
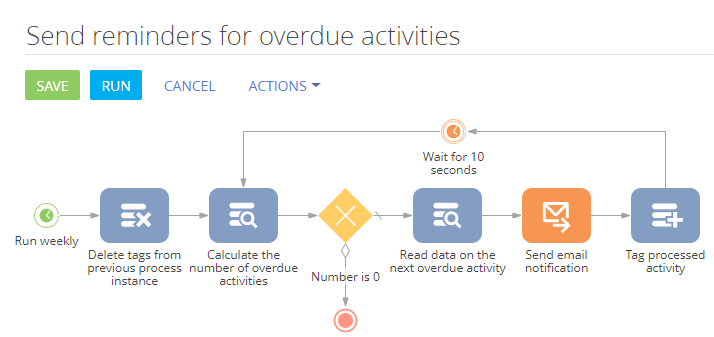
The process flow is as follows:
1.Start timer event: “Run weekly” – the process starts every Monday.
2.Delete data system action: “Delete tags from previous process instance” – the process deletes tags that were assigned to activities processed a week ago (during the execution of the previous instance of the process).
3.Read data system action: “Calculate the number of overdue activities” – the process checks if any unprocessed overdue activities exist.
4.Exclusive gateway (OR), which branches the process flow, depending on the result of the “Calculate the number of overdue activities” task:
a.If the number of unprocessed overdue activities is 0, the process ends (conditional flow).
b.Otherwise, the process proceeds to the “Read data of the next overdue activity” action (default flow).
5.Read data system action: “Read data of the next overdue activity” – the process reads the first unprocessed overdue activity and obtains data needed to send the email notification (assignee, due date and subject).
6.Send email user action: “Send email notification” – sends an email to the assignee of the last unprocessed overdue activity (the one whose data was obtained by the “Read data of the next overdue activity” element).
7.Add data system action: “Tag processed activity” – adds a “ReminderSent” tag to the activity whose assignee has been notified. The business process treas such activities as “processed” and will not send a notification for such activity twice during the same instance.
8.Wait for timer intermediate event: “Wait for 10 seconds” – pauses the process before next loop. Its outgoing flow loops the process by connecting the timer event back to the read data system action: “Calculate the number of overdue activities”, repeating steps 3-8 as a result.
A looping business process must have a way of differentiating processed records to avoid processing the same record more than once. This is easily achieved using tags:
-
Add a public tag in the section that contains processed records, which will be used by the business process. For example, for the process that sends reminders for activities, add a “ReminderSent” public tag in the [Activities] section.
-
At the start of each process instance, the “processed” status must be reset. To do this, use the [Delete data] element to remove the tag from all records.
-
At the start of each cycle within the instance, the process handles only unprocessed records. This can be done using a simple filter.
-
At the end of each cycle within the instance, the record(s) processed in it must be tagged with this tag, using the [Add data] element. This way, on the next cycle, the tagged records can be ignored.
Properties of the “Run weekly” element (Fig. 3):
Fig. 3 The “Run weekly” [Start timer] event
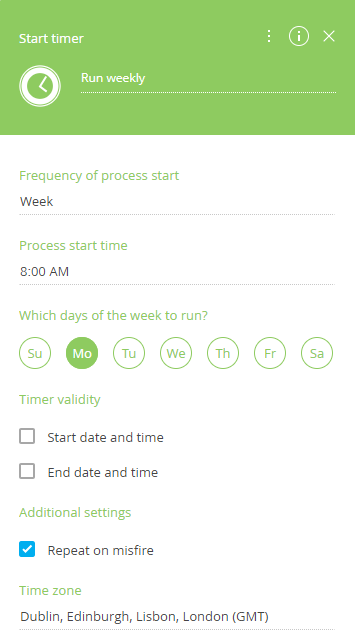
1.In the [Frequency of process start] field, select “Week”.
2.Select weekdays to run the process.
3.In the [Process start time] field block, specify the time of day when the process should start.
4.Select your time zone and configure other optional properties, if needed.
Properties of the “Delete tags from previous process instance” element (Fig. 3):
Fig. 4 The “Delete tags from previous process instance” [Delete data] element
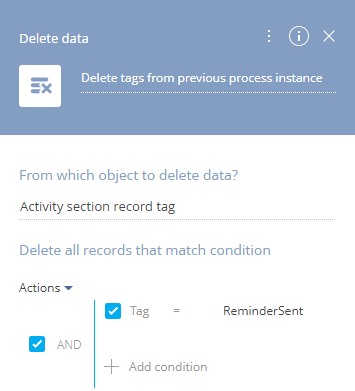
1.In the [From which object to delete data?] field, select the object where connections between tags and the tagged records are stored. In this case, select the “Activity section record tag” object.
2.Set the [Delete all records that match condition] filter to remove all connections to the “ReminderSent” tag: “Tag = ReminderSent”.
Properties of the “Calculate the number of overdue activities” element (Fig. 3):
Fig. 5 The “Calculate the number of overdue activities” [Read data] element
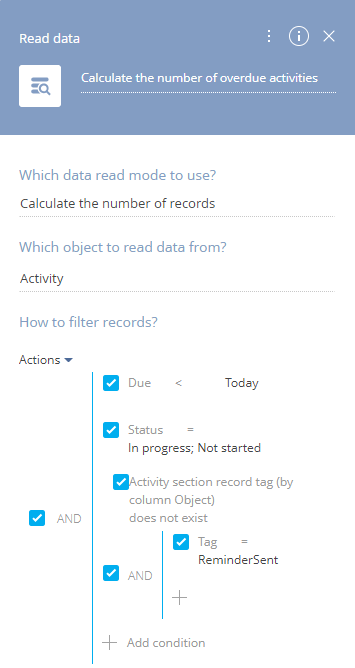
1.In the [Which data read mode to use?] field, select “Calculate the number of records”.
2.In the [Which object to read data from?] field, select “Activity”.
3.Set up the [How to filter records?] filter to include all overdue uncompleted activities, that have not been tagged with the “ReminderSent” tag:
a.To select overdue activities, set the filter by the [Due] column: “Due < Today”.
b.To select uncompleted activities, set the filter by the [Status] column: “Status = In progress; Not started”.
c.To filter activities that have not been tagged with the “ReminderSent” tag, set the filter by the records of a linked “Activity section record tag” object.
Note
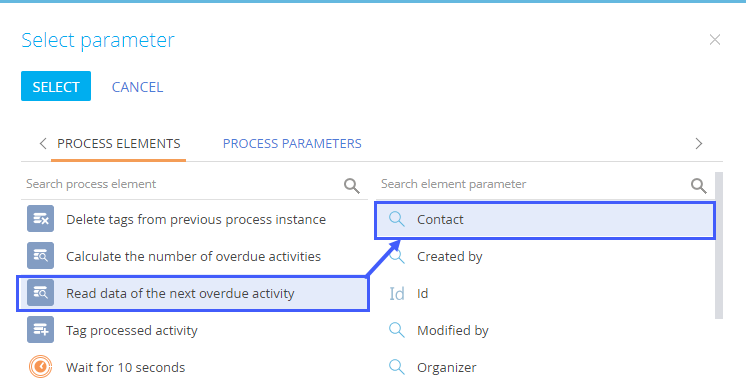
To set a filter by the linked “Activity section record tag” object, click [+ Add condition], then click [+] next to [Activity] to select a linked object. Select “Activity section record tag” in the list and click [Select] (Fig. 6). Specify the tag by adding a subordinate filter by the [Tag] column: “Tag = ReminderSent”.
Fig. 6 Setting up filter by the linked “Activity section record tag” object
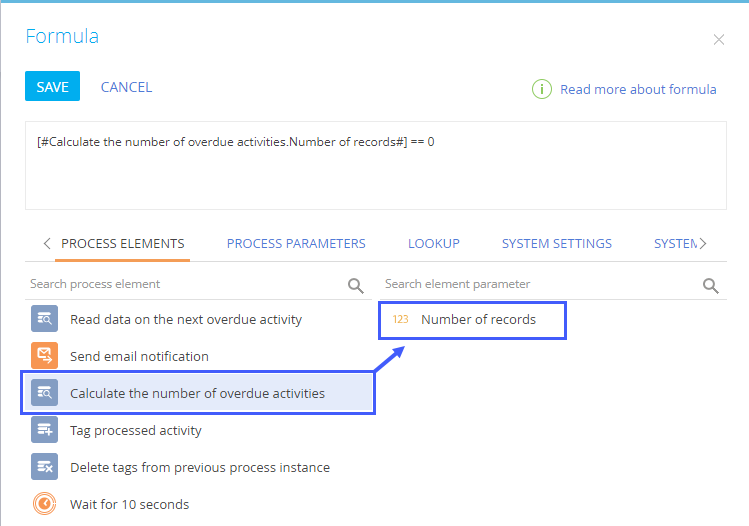
Properties of the “Number is 0” condition flow (Fig. 3):
Fig. 7 Specifying formula for the “Number is 0” condition flow
1.In the [Condition to move down the flow] field, click  .
.
2.In the opened [Formula] window, click [Process elements] tab.
3.Select the [Calculate the number of overdue activities] in the left column.
4.Double-click the [Number of records] parameter in the right column. The corresponding variable will be added to the formula:
[#Calculate the number of overdue activities.Number of records#]
5.Modify the formula by adding the formula to look like this:
[#Calculate the number of overdue activities.Number of records#] == 0
6.Click [Save].
Properties of the “Read data on the next overdue activity” element (Fig. 3):
Fig. 8 The “Read data on the next overdue activity” element
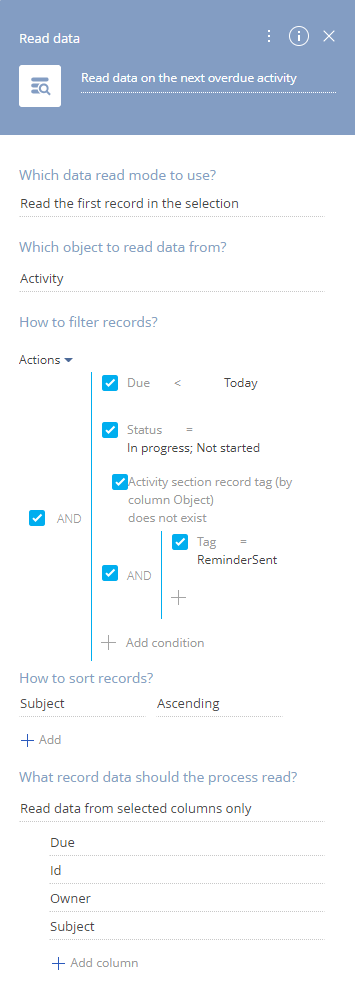
1.In the [Which data read mode to use?] field, select “Read the first record in the selection”.
2.In the [Which object to rad data from?] field, select “Activity”.
3.In the [How to filter records?] area, set the same filter as you did for the “Calculate the number of overdue activities” element (step 4).
4.Leave the default value in the [How to sort records?] area
Properties of the “Send email notification” element (Fig. 3):
Fig. 9 The “Send email notification” [Send email] element
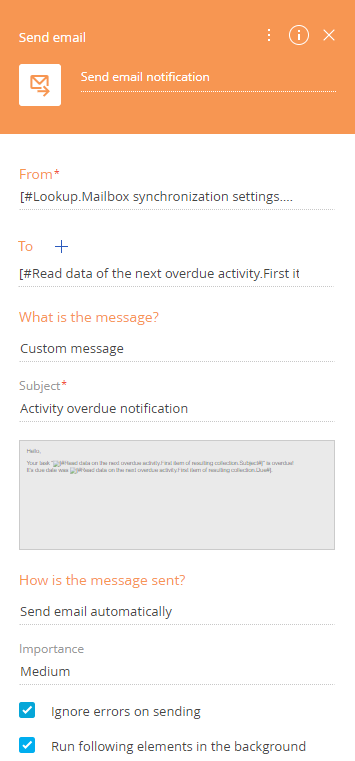
1.In the [From] field, select a mailbox to send notifications from.
2.In the [To] field, map the value to the [Id] parameter of the [Read data of the next overdue activity]:
Fig. 10 Mapping the email recipient parameter to a contact
a.In the [To] field, click  .
.
b.In the menu that appears, select [Contact] –› [Process parameter]. Parameter selection window opens.
c.Select the [Read data of the next overdue activity] in the left column.
d.Double-click the [Contact] parameter in the right column.
3.In the [What is the message?] field, select “Custom message” and populate the [Subject] field that appears below.
4.Set up the message template:
a.Click the gray bar below the subject field (marked with the  icon) to open your custom message in the template designer.
b.Drag&drop a text block to the message area and add your message text there.
c.To use parameter values in your message, place your cursor in the text block of your message and click  on the toolbar (Fig. 11). In the opened parameter selection window, select an element and its parameter to add to the email text.
Note
More information about sending custom messages as part of a business process flow is available in a separate article.
Fig. 11 Adding parameter values to a an email text

Properties of the “Tag processed activity” element (Fig. 3), which will tag processed activities with the “ReminderSent” tag:
Fig. 12 The “Tag processed activity” [Add data] element
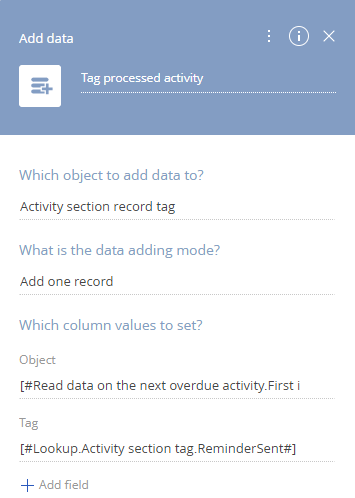
1.In the [Which object to add data to?] field, select the “Activity section record tag” object.
2.In the [What is the data adding mode?] field, select “Add one record”.
3.In the [Which column values to set?] block, click “+”. [Select columns] window opens.
4.Select chekboxes next to the [Object] and [Tag] columns. The [Object] and [Tag] fields will be added to the setup area.
5.Map the [Object] field to the [Id] parameter of the [Read data of the next overdue activity] element:
a.In the [Object] field, click  .
.
b.In the menu that appears, select [Process parameter]. Parameter selection window opens.
c.Select the [Read data of the next overdue activity] in the left column.
d.Double-click the [Id] parameter in the right column.
6.In the [Tag] field, specify the tag that must be set for processed records:
a.In the [Tag] field, click  .
.
b.In the menu that appears, select [Lookup value]. Lookup value selection window opens.
c.Select the [ReminderSent] tag.
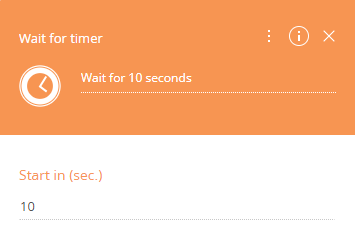
Set up the “Wait for 10 seconds” timer element (Fig. 3), which will set a short pause between the process cycles. Specify the pause duration in seconds in the [Start in (sec.)] field of the element setup area.
Fig. 13 The “Wait for 10 seconds” [Wait for timer] element
As a result:
-
The process will run automatically, every Monday at 8:00 AM.
-
It will delete the “ReminderSent” tag from all activities then calculate the number of uncompleted activities whose due date is earlier than today and that are not tagged with the “ReminderSent” tag.
-
If at least one such activity is found, the process will read its data, send an email to the activity assignee and tag it with the “ReminderSent” tag.
-
Then the process will pause for 10 seconds before calculating the number of overdue unprocessed (untagged) activities again.
-
If no unprocessed activities have been found, the process will end.
See also
•[Delete data] process element