


You can customize portal sections by configuring them in the Section Wizard in the main Creatio application. Section management capabilities are different depending on the portal configuration:
-
If you use the self-service portal, you can modify the existing portal sections but cannot add new sections.
-
If you use the customer portal or the partner portal, you can add up to 3 custom sections. You can set up the custom sections in the Section Wizard.
You can use additional objects for configuring section details, lookup fields, etc. The number of available objects depends on the portal configuration and is governed by the license conditions. On the self-service portal, you can add up to 25 objects to a page, and on the customer portal - up to 125. If the number of objects used on the section’s record page exceeds these limits, the portal will switch to “read-only” mode.
Note
More information about the sections in different portal configurations is available in the “Self-service portal”, “Customer portal” and “Partner portal” articles.
To set up the sections of a portal workplace:
a portal workplace:
1.Click  —> [Set up view] —> [Workplace setup].
2.Select the needed workplace with a “Portal” type from the list –> [Open] (Fig. 1).
Fig. 1 Opening a portal workplace

As a result, the workplace setup page opens. From here, you can add an existing section to the portal, create, and add a new custom section, or edit an existing portal section.
Let's configure the a portal workplace, namely:
Add an existing section to a portal workplace
The ability to display existing sections (and the number of sections) on the portal depends on the licensed portal configuration.
To add an existing section to the portal:
1.Click  —> [Set up view] —> [Workplace setup].
2.Select the needed workplace with a “Portal” type from the list –> [Open].
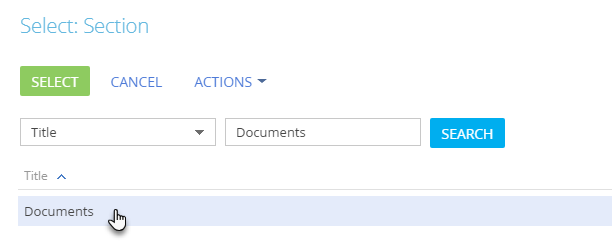
3.On the [Sections] detail, click  -> select the section -> [Select] (Fig. 2).
Fig. 2 Selecting a section to add to the portal
Section Wizard will open, and you will be able to set up the properties of the portal version of the section on the [Portal] tab (Fig. 3).
Fig. 3 Section Wizard page for adding a section to the portal
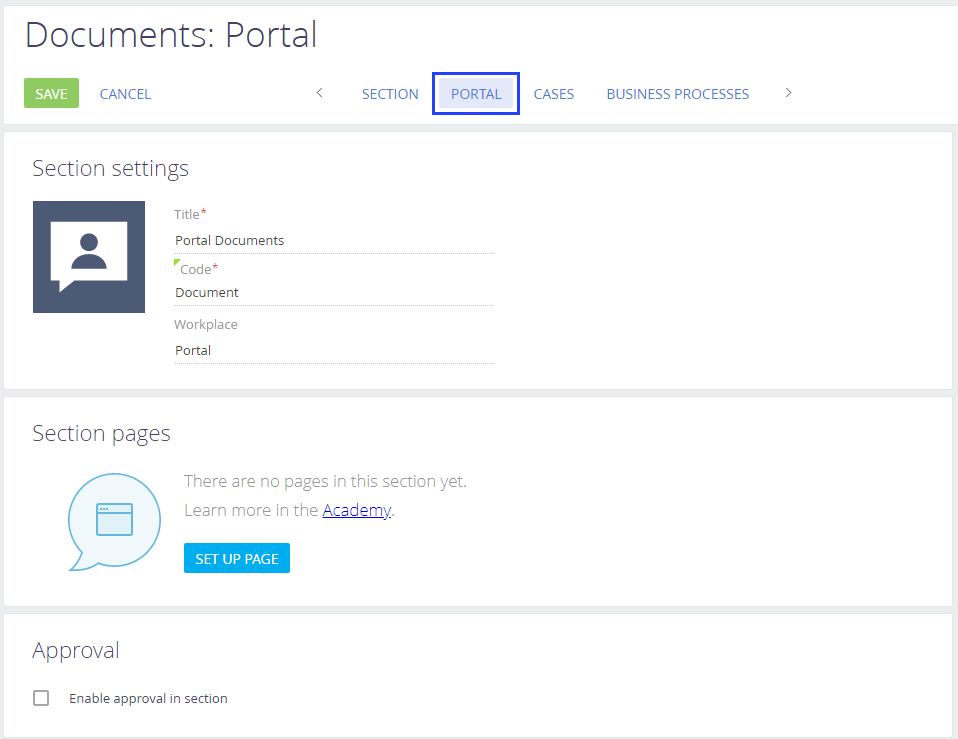
4.The [Title] field is populated automatically with the name of the section that is visible to portal users. You can specify a different title to display on the portal, if necessary.
5.The [Code] field is populated automatically and cannot be edited. The [Code] field contains the section code (unique name of the section object) for developers to use.
6.You can change the standard section icon, which will be displayed in the side panel on the portal.
To change the section icon, hover the cursor over the current icon and click  We recommend using a white icon on a transparent background. Image format: PNG or SVG, size: 38x38 px.
7.Set up the portal section fields and pages. To do this, click [Set up page]. The setup is similar to the section page setup in the primary application and is covered in the “Configure section pages” article.
Note
Access permissions to fields and details added to the portal page are granted to users automatically when editing portal sections in the Section Wizard. To enable a user to access a new portal section, make sure that the necessary object is managed by records and the portal user has sufficient object permissions. Learn more about access permissions on the portal in the “Access permissions on the portal” article.
8.Select the [Enable approval in section] checkbox to enable approval functions in the section. For more on configuring approvals, see the “How to set up approvals” article.
9.Save the changes in the window and the Section Wizard.
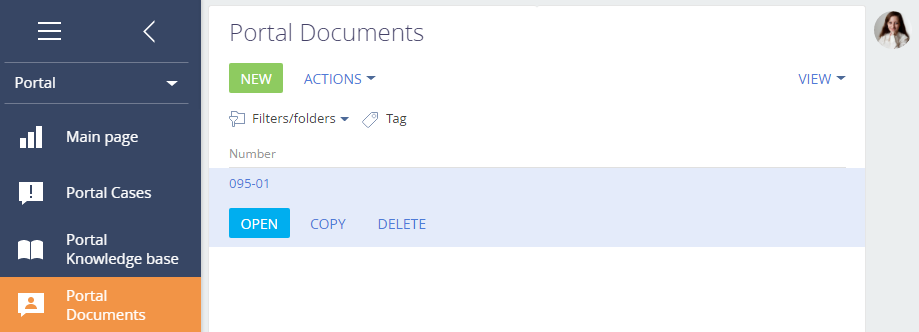
As a result, the selected section of the main application will be added to the portal workplace that you specify (Fig. 4).
Fig. 4 The [Documents] section on the portal
Adding new custom sections to the portal is only available in the customer and partner portal configurations.
Note
More information about the types of sections in different portal configurations is available in the “Self-service portal”, “Customer portal” and “Partner portal” articles.
To add a custom section to the portal:
1.Create a new section in the main application using the Section Wizard. Learn more about adding and configuring a new section in the “How to create a section” article.
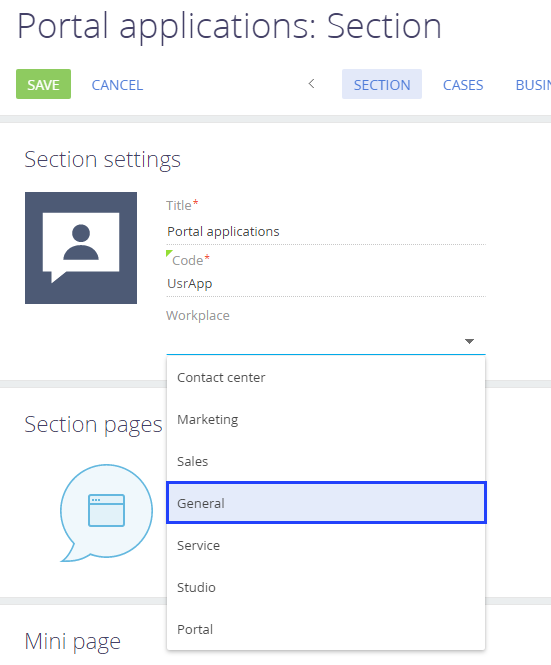
In the main properties of the section, specify any workplace of the main application, e.g., “General” in the [Workplace] field (Fig. 5).
Note
Please do not specify the “Portal” workplace, since a new section is created in the main application and only then added to the “Portal” workplace.
Fig. 5 Main properties of a new section
2.Click  —> [Set up view] —> [Workplace setup].
3.Select the needed workplace with a “Portal” type from the list –> [Open].
4.Add the new section to the “Portal” workplace. The process is described in the “Add an existing section to a portal workplace” article.
5.Save the changes in the Section Wizard.
Note
Access permissions to fields and details added to the portal page are granted to users automatically when editing portal sections in the Section Wizard. To enable a user to access a new portal section, make sure that the necessary object is managed by records and the portal user has sufficient object permissions. Learn more about access permissions on the portal in the “Access permissions on the portal” article.
As a result, a new custom section (created in the main b application) will be added to the portal.
Edit an existing portal section
While working with a portal section, you may need to change the set of fields or details on the record page. To do this, you will need to edit the “portal version” of the section page. For example, to add two new fields to the section page:
1.Click  —> [Set up view] —> [Workplace setup].
2.Select the workplace with a “Portal” type from the list –> [Open].
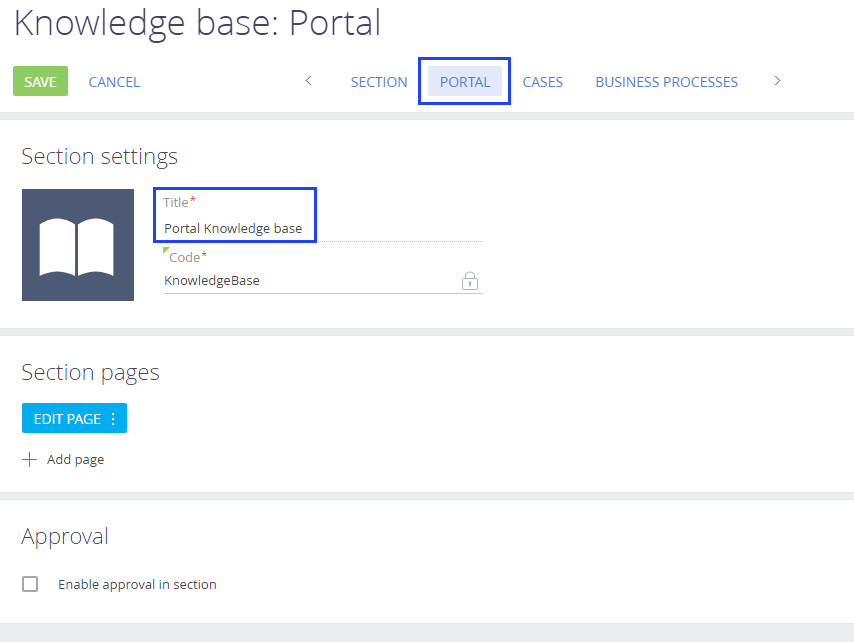
3.Click the name of the section, e.g., [Portal knowledge base] -> [Section wizard].
The [Portal] tab of the Section Wizard will open, and you will be able to set up the properties of the portal version of the selected section.
Fig. 6 The [Portal Knowledge base] section in the Section Wizard
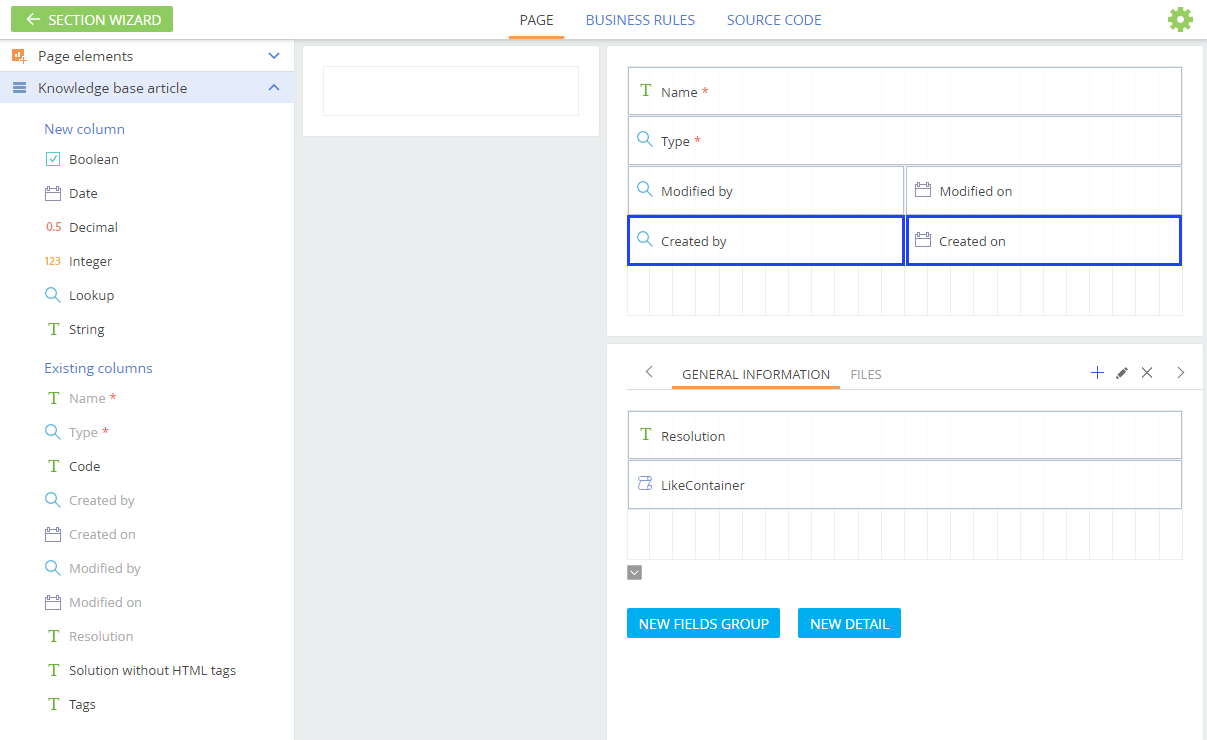
4.Click [Edit page]. The Page Designer opens.
5.Edit the page, e.g., add new fields (Fig. 7). For more on setting up the section page fields, see the “How to set up page fields” article.
Fig. 7 Adding the [Created by] and [Created on] fields to the [Portal knowledge base] record page.
6.Save the changes in the window and in the Section Wizard.
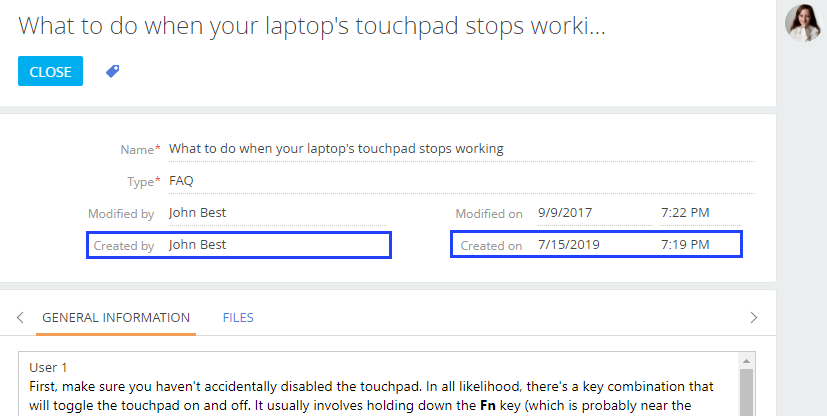
As a result, the new fields will be added to the record page on the portal (Fig. 8).
Fig. 8 New fields on the [Portal knowledge base] section record page
See also
•