


Cases can be added to Creatio in one of the following ways:
-
added manually by a help-desk agent;
-
submitted by a user through the customer portal;
-
Created automatically after starting a consultation in the manager's consultation panel.
-
Created automatically, when an incoming email is received in the designated support mailbox, even if support email address is specified in the CC or BCC fields of the email.
The case number is displayed at the top of the page. The system automatically generates numbers in accordance with a specified pattern. Use the “Case number mask” system setting to customize the automatic numbering of cases. This is a non-editable field.
Case profile is located on the left and contains primary information about the case.
The case workflow bar enables you to track current case status and advance case processing stages. Below the workflow bar you can find the action panel that displays activities created when processing a case, feed posts or emails.
Under the action panel you can find tabs that display other case information.
The profile is located on the left side of the case page and contains general information about the case.
The case profile contains the following fields.
| Resolution time | Case resolution deadline. This value is calculated automatically. The remaining resolution time / delay indicator is displayed to the right of the field. Read more >>> When assigning the case a pause status (for example, “Pending“), the remaining time till the resolution deadline is saved and the field is cleared. Further, when the case is assigned any other status, this field value is recalculated by adding the remaining resolution time to the current date. If the case is overdue, the planned resolution time remains changed. |
| Priority | An icon indicating the priority of the case. The field will be populated automatically for all cases registered from incoming emails if the case priority predicting model is active. Read more >>> |
|
| The customer who reported the case. If the [Account] field is populated, the list of contacts will display only the contacts of this account. When the user submits the case through the self-service portal, this field is automatically populated with the name of the reporter. Either the [Contact] or [Legal entity] field must be populated |
| Legal entity | The account on whose behalf the case was registered. If the [Contact] field is populated, the [Account] field is automatically populated with the account specified for this contact. Either the [Contact] or [Legal entity] field must be populated |
| Category | Case category: service request, consultation or incident. When the user submits the case through the self-service portal, this field is automatically populated according to the selected service. Configure automatic population of the category for cases registered from incoming emails. |
| Service | The service, which facilitates the case resolution. The list contains all services provided by your bank. When a case is submitted through the self-service portal, this field is automatically populated with the value specified by the user. The field will be populated automatically for all cases registered from incoming emails if the case service predicting model is active. Read more >>> |
| Assignee group | Group of specialists within the department who are responsible for resolving the selected problem. The lookup contains the values of all users registered in Creatio. The field will be populated automatically for all cases registered from incoming emails if the predicting model of case assignee group is active. Read more >>> |
| Assignee | The employee who works on case resolution. The lookup contains the values of all users registered in Creatio. The possible values of the [Assignee] field depend on the selected assignee group. If the [Assignee group] field is populated, click the [Down] button in the [Assignee] field to display the list of preselected employees. Click [Assign to me] to assign yourself as an assignee for this case. |
| Created on | Date and time of case registration. This is a non-editable field. |
History
Displays the history of communications with the case customer, as well as internal communications and automatic notifications.
The communication history includes:
-
Emails sent and received in the process of resolving the service request or incident.
-
Internal notes posted by employees in the feed of this case. These posts are not displayed on the customer portal.
-
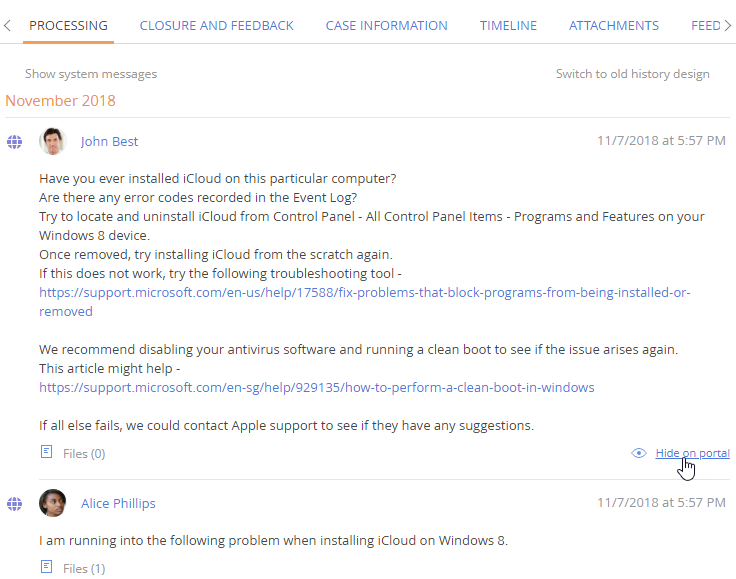
Messages posted by employees and portal users on the customer portal. Click [Hide on portal] in the lower right corner of the message (Fig. 1) to hide it from the customer portal users. Click [Show on portal] to display the hidden portal message.
Fig. 1 Hiding a message on the customer portal
The [History] detail also contains system messages that inform you about various system-wide events that are connected to the case. The system messages inform you about the following events:
-
An activity connected to the case has been created.
-
The title of an activity connected to the case has changed.
-
The status of an activity connected to the case has changed.
-
The owner of an activity connected to the case has changed.
-
An activity has been disconnected from the case.
-
An activity connected to the case has been deleted.
-
Case subject has changed.
-
Case service has changed.
-
Case status has changed.
-
New internal note has been added to the case.
-
Case assignee has changed.
-
Case feed message or comment to it has been added.
-
A knowledge base article has been connected to the case.
-
Assignee group has changed.
Click the [Show system messages] link to display system messages on the [History] detail.
The history displays the attachments of email and portal messages as well as the files added to the [Attachments] detail of the case. You can download the file by clicking its title.
Note
Drafts of email messages and hidden portal messages are displayed in the history in grey. You can delete email drafts right from the history by clicking the “Basket” button.
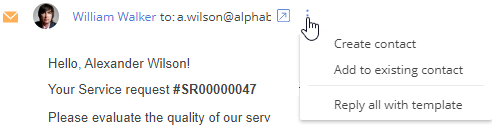
An action menu  (Fig. 2) is available for processing emails from the history. With this menu, you can (depending on the context):
•reply all with template;
•create a new contact record;
•link the message to an existing contact;
•enrich the contact (the  button is displayed in this case).
You can add custom actions to this menu as well.
Fig. 2 Email messages menu in the case history
Note
Use the [Email templates] lookup article to learn more about setting up the list of available templates.
To quickly process email messages, use the [Reply]  , [Reply all]
  , [Reply using template]
  and [Forward]
  buttons.
The detail features data enrichment functionality for cases registered via email. It enables you to:
-
populate the contact record with new data found in the email signature;
-
add a new email address to the contact page;
-
create a new contact based on the email and nickname of the applicant and specify it as a contact for the case.
Read more about contact data enrichment in the “How to enrich contact profile from the case page” article.
The [Consultation topics] tab
Consultation topics
The detail contains information about consultations that the customer received during case processing. During the processing of a case, several consultations on different topics can be provided to the customer. The data is entered by a contact center agent or manager after the consultation is complete in the consultation panel. The fields become uneditable after saving information about consultation results.
| Topic | Consultation topic. The field is populated with the value that an employee selected during the processing of consultation results. The available consultation topics are contained in the [Consultation topic blocks] lookup. The topics available during consultations are selected during the consultation panel setup. |
| Start | Date and time of the consultation start. The field is populated with data from the consultation panel. |
| End | Date and time when the consultation ended. The field is populated with data from the consultation panel. |
| Result | Consultation result, such as “Interested” or “Not interested”. Use the [Consultation results by topic] lookup to set up the list of available results. |
| Duration | Duration of the consultation. The duration is calculated automatically based on the data from the [Start] and [End] fields. |
| Comment | Employee’s comments and other supplementary information about the consultation. |
The [Closure and feedback] tab
The tab contains information gathered during the case resolution process and the customer feedback regarding the resolution.
| Reason for closing | Reason for closing or canceling the case, For example, “Resolved successfully“ or “No fault found“. If the field is not populated manually, it will be populated automatically, based on the case status. Default values for the [Reason for closing] field are stored in the [Default closure code] field of the [Case statuses] lookup. The field is editable at any stage of the case processing. If a case is reopened, the value in the [Reason for closing] field is cleared. |
| Parent case | Case that the current case is subordinate to. For example, several users can report identical cases that are caused by the crash of the same server, so all these cases will have the same parent case. On the parent case page, all subordinate cases are displayed on the [Subordinate cases] detail on the [Case information] tab. |
Feedback
Information about the case customer’s feedback. The detail is populated automatically. The data are passed to Creatio after the customer evaluates the quality of service using the customer feedback scale in the case resolution notification email.
| Satisfaction level | Customer’s evaluation of the quality of service delivered. This is a non-editable field. |
| Feedback notes | Customer's comments (customers can enter comments on the “thank-you” page displayed to them after evaluation). This is a non-editable field. |
Note
Use the [Ability to change case satisfaction level] system operation to manage permissions to modify information in the [Feedback] block. Only users who have permission to this system operation will be able to modify the case feedback.
Declarer comments
The detail displays case resolution complaints posted by the customers on the self service portal. All published complaints will be automatically added on this detail. The records on the [Declarer comments] detail cannot be modified or deleted.
| Created on | Date and time when the compliant was posted on the portal. |
| Message | The text of the complaint. |
| Email direction | Message type The detail contains only messages of the “Complaint” type. |
| Created by | The customer who posted the complaint. |
Knowledge base articles
Knowledge base articles that are connected to the selected case. For example, the articles that describe the method of resolving the case. This information is based on the data in the [Knowledge base] section.
Once the [Add] button is clicked, a lookup window will open, where you can select one or several articles that should be connected to the case. To remove an article from the list, select the [Delete] option.
Note
Executing this action will delete the connection between the case and the article. The knowledge base article itself is not deleted.
This tab contains detailed information on case origin, resolution deadline information and actual resolution dates, as well as customer feedback.
| Topic | Short case title |
| Notes | Case description |
| Source | Source of the case. By default, the field is populated with the “Personal visit” value. Contact center employee can change the field value at any stage of case processing When the user submits a case through the self-service portal, the field is automatically populated with the “Self-service portal“ value. |
Timeframe
Detailed information about the case resolution timeframe.
| Reported on | Date and time when the case was registered. The field is non-editable and is populated automatically with the current date and time. |
| Resolution time | Case resolution deadline. This value is calculated automatically. The remaining resolution time / delay indicator is displayed to the right of the field. Read more >>> When assigning the case a pause status (for example, “Pending“), the remaining time till the resolution deadline is saved and the field is cleared. Further, when the case is assigned any other status, this field value is recalculated by adding the remaining resolution time to the current date. If the case is overdue, the planned resolution time remains changed. |
| Response time | Time from when the case was registered until the moment when the status of the case is changed to “In progress“. This value is calculated automatically. To the right of the field, there is an overdue/remaining time indicator. Read more >>> |
| First resolution time | Date and time when the case was first resolved. This field is filled in automatically when the case is assigned the “Resolved” status for the first time. |
| Actual response time | Actual time before the service team starts investigating the case. This field is filled in automatically when the case status is changed for the first time. For example, if the case status is changed to “In progress“. This is a non-editable field. |
| Actual resolution time | Actual time for providing the reply to the customer. This field is filled in automatically when the case is assigned a resolution status (by default, “Resolved”). This is a non-editable field. The value can be modified if the case status is changed to “Resolved” again. |
| Closed on | Date when the case is completed. This is a non-editable field which is populated automatically once the case is assigned the “Closed“ status. |
Subordinate cases
The list of subordinate cases that are similar to the current case. Add subordinate records if several cases are either identical or connected to the same failure.
Once the [Add] button is clicked, a lookup window will open, where you can select one or several cases that should be connected to the current one as a subordinate. When subordinate cases are added, the [Parent case] field on their pages is automatically populated with the current case. To remove a case from the list, select the [Delete] option.
Activities
Tasks that are linked to the current case. This detail displays information from the [Activities] section. To connect an activity to a case, fill in the [Case] field on the [Connected to] detail of the activity page.
Emails that are connected to the current case. To connect an email to a case, fill in the [Case] field on the [Connected to] detail of the activity page.
Calls
Phone calls linked to this case. This detail displays information from the [Calls] section. To connect a call to a case, fill in the [Case] field of the call page.
Applications
The applications created as part of case consultations. The detail displays applications created during the consultation via the [New application] action in the consultation panel. You can also add a new application by clicking [+].
To connect the application to the case, populate the [Case] field of the application page. The field is not displayed on the application page, but it can be displayed in the [Applications] section list.
Case life cycle
The detail contains change history for primary case properties:
-
Status
-
Priority
-
Service
-
Assignee
-
Assignees group
Records on the detail are non-editable and are added automatically when one of the aforementioned parameters is changed. This detail enables you to track case processing stages. This detail also enables you to track the duration of each stage of the case life cycle in the “[Duration (minutes)]", "[Duration (hours)]" and "[Duration (days)]” columns.
Note
The [Case life cycle] detail may contain other fields. You can configure the saving of the change history for the other fields of the case page. To do this, extend the list of fields in the life cycle object. The preliminary setup is performed by the development tools.
Data on the detail is used for calculation of response and resolution time to exclude periods when a case was inactive. Additionally, this data can be used to build diagrams that display how long the case was in different statuses.
The tab contains the chronologically listed Creatio records linked to the case. Read more >>>
The [Attachments and notes] tab contains additional information about the case, as well as attachments and links related to the case. Read more >>>
Attachments
Use this detail to store files and links related to the case, For example, screenshots demonstrating errors, etc.
Notes
The detail is used to store additional text information about the case. You can edit and organize notes on this detail. if you switch to another tab of the contact page, the information on the [Notes] detail will be saved.
Feed messages linked to the case.
See also
•How to calculate response and resolution time
Video tutorials