Integration with email services by the IMAP/SMTP protocol
In Creatio, you can receive emails from email service providers that support the IMAP/SMTP protocol.
After you configure the list of email providers, users will be able to send and receive email messages directly from Creatio UI. The list of providers is used when setting up individual mailboxes.
Read more about setting up personal mailboxes in the “Configuring email accounts in Creatio” and “Email account individual settings” articles.
Note
To set up connection parameters for email providers, a user must have the permission to run the [Access to “Access rights” workspace] (CanManageAdministration) system operation.
Learn more about using system operations in the “System operation permissions” article.
Setting up the IMAP/SMTP email service provider
You can add an IMAP/SMTP email service provider using several methods.
Method 1. Adding the IMAP/SMTP provider from the [Email] tab of the communication panel
1.In the communication panel, click  to open the [Email] tab.
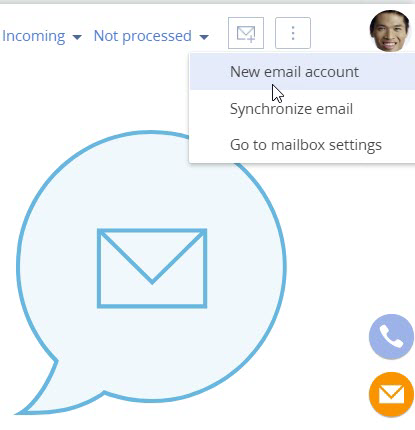
2.Click  and select the [New email account] action (Fig. 1).
Fig. 1 Adding a new email account

Note
You can also add a new email account by selecting the [Go to mailbox settings actions] under  and clicking [New] on the page that opens.
3.In the [New email account] widow that pops up, enter the email address and click [Next].
4.Select the email service provider from the list. If the needed provider is not available on the list, click [Add new server].
Note
Add the domains of a new provider to the [Email providers domains] lookup to have Creatio automatically identify this email provider in the future. As a result, users will not have to specify the mail provider manually when setting up an email account.
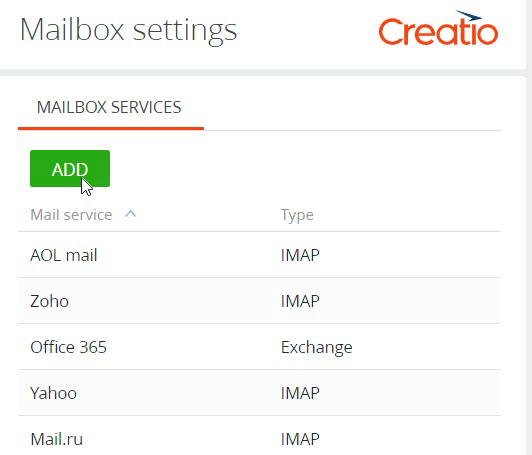
5.On the opened page, click [Add] (Fig. 2).
Fig. 2 Adding a new email provider

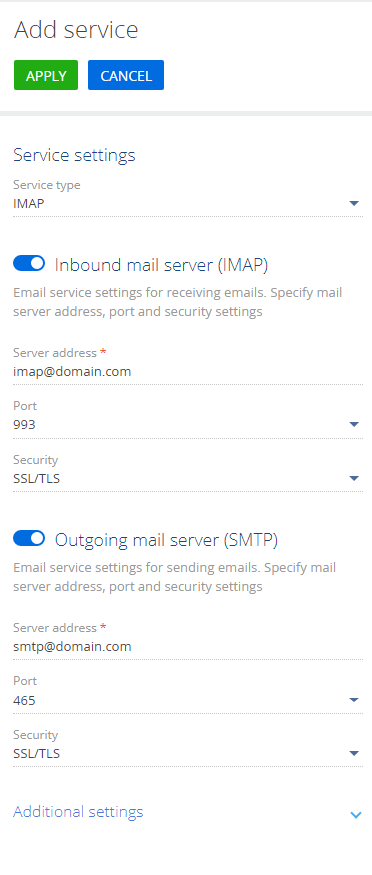
6.On the page that opens, select “IMAP” in the [Service type] field.
7.Enter two required parameters: the “Inbound mail server (IMAP)” in the “imap@domain.com” format and the “Outgoing mail server (SMTP)” in the smtp@domain.com format (Fig. 3).
Fig. 3 Setting up the IMAP/SMTP email service provider

8.The rest of the IMAP/SMTP server settings will be populated automatically. You can change them by selecting the needed option from the drop-down list to configure the mail server port and the security parameters.
Set the inbound mail server port:
•Select “143” to use the port without encryption.
•Select “993” to use the port for a secure connection.
Set the security parameters of the inbound mail server:
•Select “SSL/TLS” to use the standard data security protocol.
•Select “STARTTLS” to use the common protocol extension.
•Select “None” to disable the inbound mail data security.
Set the outgoing mail server port:
•Select “587” to use the port without encryption.
•Select “455” to use the port for a secure connection.
Set the security parameters of the outgoing mail server:
•Select “SSL/TLS” to use the standard data security protocol.
•Select “None” to disable the outgoing mail data security.
9.Populate the additional settings to set the login format:
•Select the [Use manual entry] option, if users enter their email address and login manually.
•Select the [Use email address] option, if the full email address is used as a login (for instance, “example@google.com”).
•Select the [Use mailbox name] option, if the part of the email address before “@” is used as a login. For example, the “test” will be a login for “test@google.com” email address.
10.Save the settings by clicking [Apply].
As a result, system users will be able to use the mailboxes of this provider to send and receive email messages.
Method 2. Adding the IMAP/SMTP provider from the user profile
1.Open the user profile page by clicking the [Profile] image button on the main page of the application.
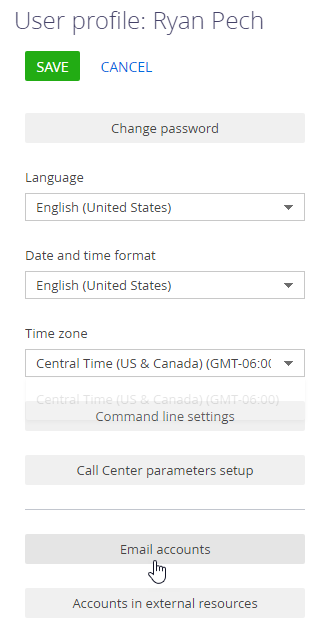
2.Click [Email accounts] (Fig. 4).
Fig. 4 Opening the email accounts

3.Click [New] in the opened window.
4.To complete the setup, perform steps 3–10, described above in Method 1.
Note
To delete a mail server, delete its connected mailboxes first.
See also
•How to set up a personal mailbox


