


The functionality is available in bpm’online marketing and CRM bundles.
Set up your email service integration with bpm'online for sending bulk emails. All cloud email service settings for bulk emails are consolidated on the bulk email setup page in the [Email] section. You can use it to edit general settings of sending bulk emails and receiving responses, sender domains as well as to monitor the connection status.
Contents
•How to set up integration with bpm'online cloud email service (for on-site users)
•How to set up sender domain list
•Additional settings for integration with bulk email service
•How to enable bulk email monitoring on-site
How to set up integration with bpm'online cloud email service (for on-site users)
To check integration with cloud email service:
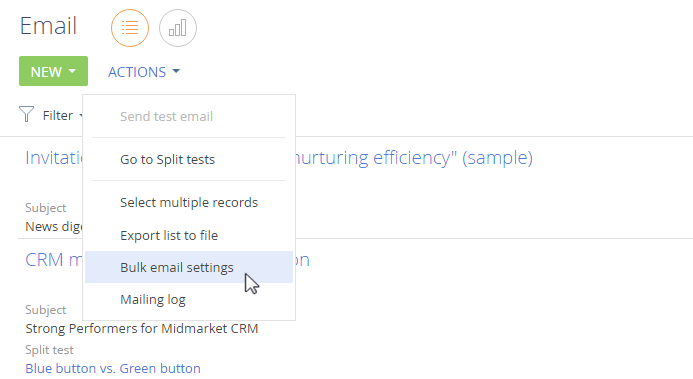
1.Go the [Email] section. Open the [Actions] menu and select [Bulk email settings] (Fig. 1).
Fig. 1 Opening the bulk email setting page
2.Populate the [General settings] tab fields.
•In the [API key] field, specify your personal access key to the bulk email service.
•In the [Bpm’online cloud services connection URL] field, specify the bulk email cloud service address in the “https://url_adress.com” format.
•In the [Auth key] field, specify the authentication key for receiving responses.
To obtain the API key and the Auth key, as well as the URL to bulk email cloud services after installing product licenses, please contact our support at support@bpmonline.com.
•The [Email provider] field will be populated automatically with the name of your email service provider after the [API key] and [Bpm’online cloud services connection URL] fields have been populated.
Attention
Contact bpm’online support to change your bulk email service provider.
3.In the [Domain to receive responses] field, specify the domain address of your bpm’online application in the following format: http://www.yourdomain.com.
Important
POST requests should be sent and received via the 443 port. To check the connection after you have completed the settings, open the following pages in the browser:
https://url_adress.com/metadata – checking connection via port 443;
“url_adress.com” is the received bpm’online cloud service URL.
If the page opens, your setting has been performed correctly. If the page does not open, check whether the port is opened correctly.
How to set up sender domain list
For the sender name to be displayed correctly in the bulk email and to avoid unauthorized bulk email sent on your behalf, perform the following settings:
-
Specify the list of your domains on the bulk email settings page.
-
Verify each domain by using specific text SPF-, DKIM- and DMARK-records.
-
Save the changes.
To do this:
1.Add the list of your domains by clicking the  button on the [Sender domains] tab.
Note
All added domains, including those that are no longer in use, are displayed in the list. Domains cannot be deleted from the list.
2.Select a domain from the list for verification. A DKIM/SPF setup manual for the selected domain will be displayed on the right side of the screen. The manual text will contain correct SPF and DKIM records generated for your domains.
Note
DKIM/SPF manuals are different for each domain. To view a specific manual, select the required domain from the list.
3.Set up domain verification. The verification setup process is covered in a separate article. Read more >>>
As a result, the bulk email settings [Connection status] field will display the “ Connection active” message.
Additional settings for integration with bulk email service
Set up one of the bpm’online access options for Bpm'online Cloud Email Service for correct operation of bulk email functions:
1.In the server firewall, permit receiving POST requests from Internet to the domain where bpm'online is deployed: http://www.yourdomain.com.
2.In the server firewall, permit receiving POST requests from a specific web service. For example, if the application is deployed on http://www.yourdomain.com, then the following address must be accessible: http://www.yourdomain.com/0/ServiceModel/CESWebhooksService.svc/HandleWebHooks.
Note
There is no need to set up processing of unsubscribe requests and to check if bpm’online application server is able to receive GET-requests. Bpm’online will process unsubscribe queries automatically.
Attention
If the HTTPS protocol is used to access bpm'online, the application server must have an active certificate installed. In case the data transfer protocol or application address are changed, make the appropriate changes on the bulk email setup page.
It is not recommended to use IP address “white lists“ to limit access to open ports because the Bpm'online Cloud Email Service may send analytical information about responses from different IP addresses. If the “white list“ doesn't contain the IP address that the analytical information is sent from, the data will be lost.
When using a “black list”, we recommend checking that the received IP addresses are not in this list.
How to enable bulk email monitoring on-site
We recommend that you set up monitoring of your bulk email status by the support service before you start working with bulk emails. If you do this, bpm’online support will be able to resolve any potential bulk email issues faster. Support service employees will have access to aggregated bulk email metrics that does not contain personalized email message texts, email templates, etc.
Note
The procedure is different for cloud and on-site applications. The setup for cloud-based applications is described in a separate article – “How to permit monitoring bulk email status by bpm’online support”.
To set up:
1.Go to the system designer by clicking the  button in the top right corner of the application window and click [System settings].
2.Open the [Enable monitoring of the email troubleshooting indicators] system setting and select the [Default value] checkbox. Save the changes.
3.In the application server firewall, permit the access from the Internet to the web service:
/0/ServiceModel/CESTroubleshootingService.svc/emailstate.
For example, if the application is deployed on http://www.yourdomain.com, then the following address must be accessible:
http://www.yourdomain.com/0/ServiceModel/CESTroubleshootingService.svc/emailstate.
As a result, the support service employees will be able to identify and eliminate potential bulk email issues.
See also