Set up automatic lead registration from social networks
You can set up automatic lead registration in Creatio when a customer fills out a form on Facebook or Instagram. Creatio automatically links the form submission for a contact or account. This lets you view all your leads in a single place and nurture them using Creatio tools.
The setting is available for users that have a preconfigured Facebook Ads Manager account. Facebook forms support only English, Spanish, and Russian languages.
Connect a Facebook form
Before you start connecting a Facebook form, make sure that the values of the following Creatio system settings are populated:
- "Identity server Url" ("IdentityServerUrl" code)
- "Identity server client id" ("IdentityServerClientId" code)
- "Identity server client secret" ("IdentityServerClientSecret" code)
If the values of these settings are empty, contact Creatio support.
Make sure to allow browser pop-up windows for your Creatio instance.
To connect a Facebook form:
-
Open the Facebook forms section.
-
Click Connect form → specify whether the form registers contacts or leads. This opens a page.
-
If synchronization with social networks is already configured in Creatio, proceed to step 4.
If you are setting up lead registration from social networks for the first time and Creatio is not synchronized with any Facebook account yet, click Manage pages.-
Log in to Facebook. To ensure the correct setup, log in to your user account that has administrator permissions to your Facebook public page and the "Ads manager" role.
ImportantAfter you set up the integration, do not degrade the administrator user permissions. This might cause issues with the functionality operation.
-
Select one or more pages to synchronize with Creatio → Next.
Fig. 1 Select a Facebook page to synchronize with Creatio 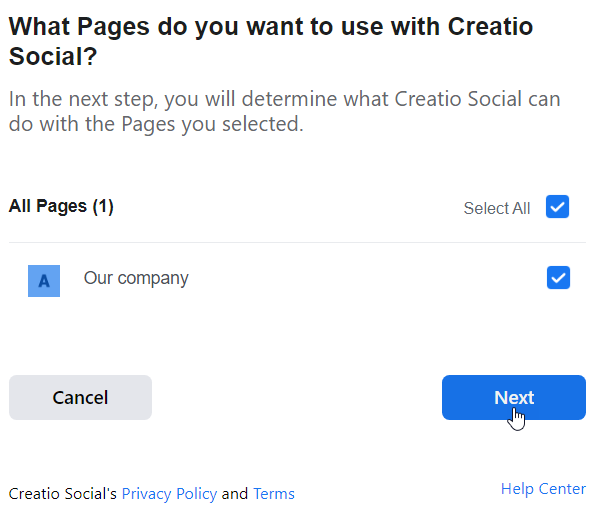
- Permit Creatio to manage your public page. This will enable Creatio to receive data from social networks and open the form selection page. If you restrict Creatio from managing the page, lead registration might not work properly.
Fig. 2 Set up access to managing the page 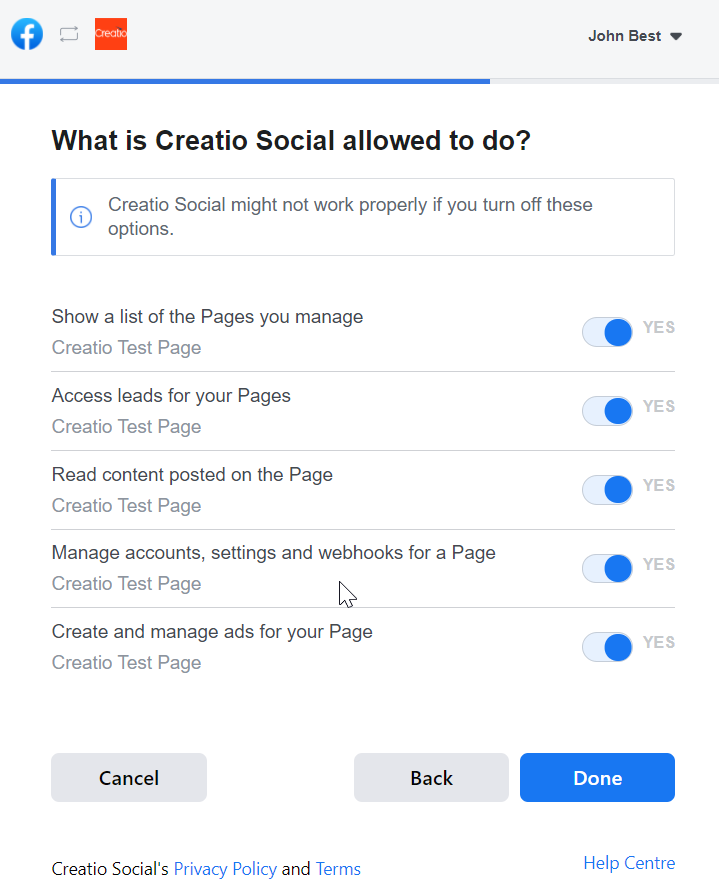
-
-
Specify the following on the form selection page:
- The Facebook page that has a configured campaign.
- Lead registration form that was created for this page in Ads Manager.
Fig. 3 Select a Facebook page and form to synchronize with Creatio 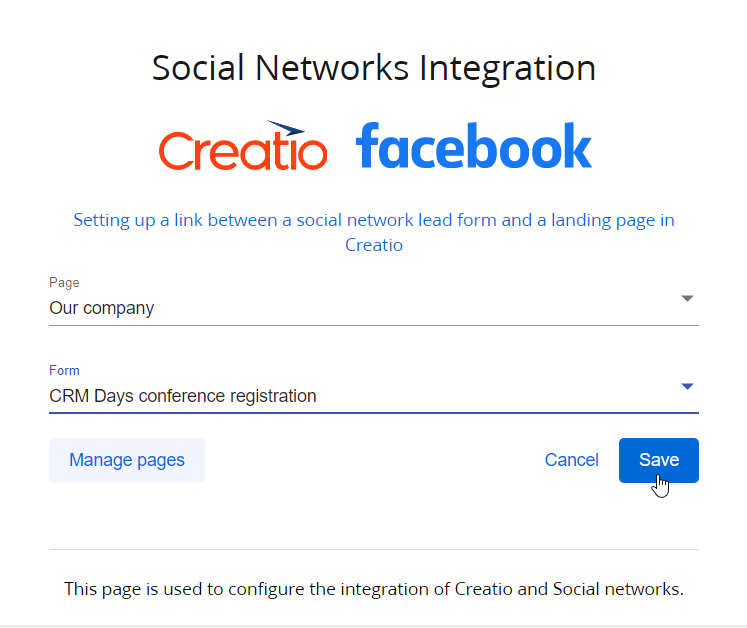
-
Click Save. This opens the form record page in Creatio.
-
Save the form record.
As a result, Creatio will add a contact or lead the first time they submit the form. A form submission or lead can be linked to either a new or existing contact, depending on your contact search process.

The following values can be passed to the leads added via social networks: email, phone number, address, city, region, country, postal code, full name, position, work phone, work email, account name. If you add other fields to the Facebook form, their values will be stored in the Notes detail. Learn more: Facebook field mapping to Creatio.
You can only pass text field values to Creatio due to restrictions on the Facebook side.
If you change the default captions of the Facebook Ads Manager fields in the form, the field values might not be passed to Creatio properly.
Assign default values for form submissions
You can assign default values for any field of the form submission, including UTM marks. To do this:
- Open the Facebook forms section.
- Select the needed form.
- Click
 at the top of the Submitted form default values expanded list. This opens a window.
 - Select the relevant field.
- Assign the default value in the Value field (Fig. 5).
Fig. 5 Assign the default field value 
- Click Save.
As a result, Creatio will populate the field of every subsequent form submission using the value you assigned.
Customize the contact creation mechanism
Out of the box, Creatio searches and creates contact using the "Searching and creating contact" business process. The process reads the new record, searches for a contact by multiple parameters, and creates a new record if the contact is not found. You can customize the mechanism by customizing the process. You can also create a custom process from scratch and add it to the "Web form contact identification processes" lookup. Learn more: Manage lookup values. To switch between the out-of-the-box and custom business process:
- Open the Facebook forms section.
- Select the needed form.
- Select the required process in the Contact search process field.
- Save the changes.
See also
Facebook field mapping to Creatio