Set up automatic lead registration from LinkedIn
Connect the forms from your LinkedIn lead generation campaigns to Creatio to automate lead import. Once you do that, Creatio will add leads based on form submissions from LinkedIn automatically. In general, the setup process consists of the following steps:
- Create a new LinkedIn ad account integration. Read more >>>
- Set up default mapping. Read more >>>
- Set up custom mapping (optional). Read more >>>
Before you start the integration, make sure you meet the following prerequisites on LinkedIn's end:
- You have an ad account with lead forms. Set up the ad account in the LinkedIn Campaign Manager. Learn more about how to set up the ad account and lead generation forms in the official LinkedIn documentation: Create an Ad Account, Create Lead Gen Forms.
- Your user account has access to the ad account.
- Your user account has a "Super admin" or "Lead gen forms manager" role on the company page connected to the ad account.
Also, make sure that the values of the following Creatio system settings are populated:
- "Identity server Url" ("IdentityServerUrl" code)
- "Identity server client id" ("IdentityServerClientId" code)
- "Identity server client secret" ("IdentityServerClientSecret" code)
If the values of these settings are empty, contact Creatio support.
If you use Safari, make sure to allow pop-up windows for your Creatio instance.
Set up a LinkedIn ad account integration
You can integrate as many LinkedIn user accounts as necessary. Each LinkedIn user account can be connected to any number of ad accounts. Add a separate Creatio integration record per ad account.
After you add the integration record, map the LinkedIn form fields to Creatio columns to ensure LinkedIn passes the data correctly. You can also use the mapping feature to specify constant values for Creatio columns with "String," "Decimal," "Boolean," "Date," "Date/Time," and "Lookup" data types. This will help you filter the imported records easier. For example, specify "CRM Days" in the Event lookup field.
There are several mapping options:
-
Default mapping applies to all forms in your ad account. This option supports fields from the "Profile information" group in the "Lead details & custom questions" section of your LinkedIn form. The data type of these fields can be "String" or "Date."
-
Custom mapping applies to a specific form. It supports fields from the entire "Lead details & custom questions" section, as well as "Custom checkboxes" and "Hidden fields" sections of your LinkedIn form. The data type of these fields can be "String," "Date," or "Boolean."
If you specify custom mappings, Creatio will ignore the default mappings for the corresponding form.
Learn more about the LinkedIn form fields in the official LinkedIn documentation: Create Lead Gen Forms, Lead Gen Form Fields.
By default, both mapping options map the Notes column to "not_mapped_fields" macro that passes the data of the entire form submission as a string. This macro is required. If necessary, map the macro to a different string column, preferably with unlimited text length.
After you create the integration record and map the form fields, Creatio will register all newly-captured leads with unique LinkedIn lead IDs from the ad account automatically.
In general, the ad account integration procedure is as follows:
- Create a new ad account integration. Read more >>>
- Set up default mapping. Read more >>>
- Set up custom mapping (optional). Read more >>>
Step 1. Create a new LinkedIn ad account integration
To create a new integration record:
-
Click the
 button to open the System Designer.
 -
Go to the "Import and integration" block → "Social lead generation service settings." The Settings page will open automatically.
-
Enter the URL of Creatio instance where you want to register leads in the Url to get leads field (Fig. 1) on the Settings page. By default, Creatio will populate the field with the URL from the browser tab.
noteThe URL has to be accessible worldwide for the integration to work correctly. If your Creatio instance must be located in a private network, contact Creatio support to receive the list of IP addresses to whitelist.
-
Select the role that will receive the lead generation related system messages in the Role for receiving notifications field (Fig. 1).
-
Click Apply.
Fig. 1 The Url to get leads field 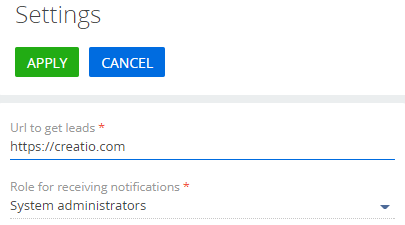
-
Click New in the Social leadgen integrations section list. This will open a dialog box.
-
Specify the ad account to integrate in the box:
-
Select "LinkedIn" → Next.
-
Sign in to the LinkedIn user account that meets the prerequisites and grant permissions to Creatio → Next.
You only need to grant permissions once per LinkedIn user account.
-
Select the checkboxes next to the ad accounts grant Creatio access to them → Next.
You only need to perform this step once per LinkedIn user account.
-
Select the ad account for this integration in the dropdown list → Next.
-
-
Enter the custom integration name in the Name field in the left area (optional).
-
Repeat steps 6-8 for the other relevant ad accounts (optional).
As a result, Creatio will add a new LinkedIn ad account integration.
Step 2. Set up default mapping
Creatio automatically imports data of ad campaign, ad banner, and lead generation form that are connected to the lead to the Extended lead information detail on the lead page. To ensure Creatio populates new leads using the profile data of LinkedIn users who fill out the lead generation form, map the default fields. To do this:
-
Go to the Default mapping detail in the left area → Add.
-
Select the columns of the Lead object to map → Select.
-
Hover over the relevant column → the
 button → fill out the field (Fig. 2) in one of the following ways:
Fig. 2 Mapping a form field to Creatio column 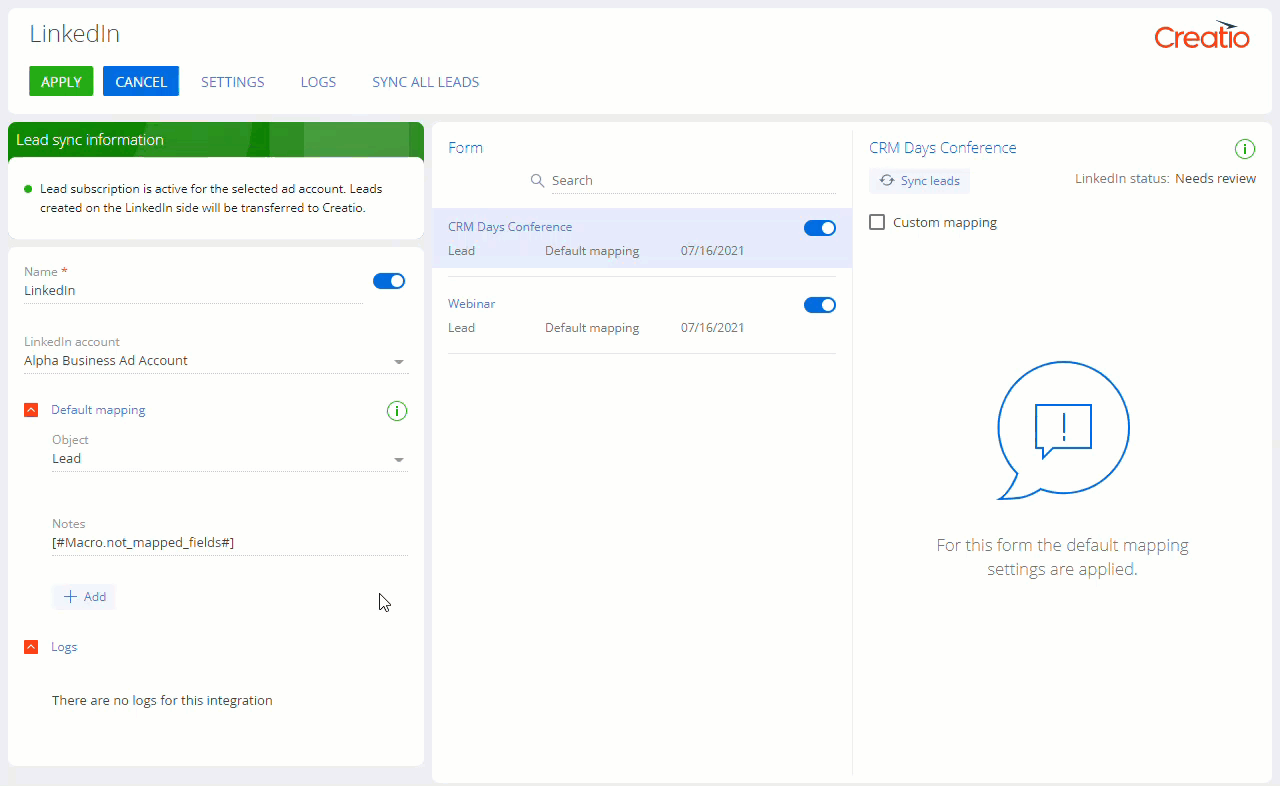
- Click Form field and select a LinkedIn form field. Creatio will populate this column with the values leads enter in the corresponding field.
- Click Text value and enter a constant value. Creatio will populate the column with this value for all registered leads.
- Click Boolean value and specify a "true" or "false" value. Creatio will populate the column with this value for all registered leads (for boolean fields).
- Click Lookup value and select a lookup value. Creatio will populate the column with this value for all registered leads (for lookup fields).
- If there is no column mapped to the "not_mapped_fields" macro, click Other → Unmapped form fields to map a column to the macro. Creatio will populate this column with the data of the entire form submission (for string fields).
-
Repeat step 3 for all needed fields. We recommend mapping all form fields to Creatio columns to ensure you receive all the relevant data.
-
Click Apply.
Step 3. Set up custom mapping (optional)
Set up custom mapping to map the fields of the "Lead details & custom questions," "Custom checkboxes," and "Hidden fields" sections of a specific LinkedIn form to Creatio columns or specify constant values in Creatio columns. To do this:
- Select one of your LinkedIn ad account forms in the Form list.
- Go to the setup area to the right of the list → select the Custom mapping checkbox.
- Click Add.
- Fill out the fields similarly to default mapping.
- Click Apply.
As a result, Creatio will register the future leads with unique LinkedIn IDs captured by your LinkedIn forms.
For test forms LinkedIn creates only one lead per user per day. If you submit the same form multiple times during a day, Linkedin updates the existing lead. When you launch an ad campaign this limit is removed automaticaly.
The existing duplicate search rules apply to the registered leads as well. Learn more in separate articles: Lead duplicate search, Find and merge duplicates.
Synchronize leads captured prior to the integration
Creatio will register only the leads captured after you set up the integration automatically. To register the previously captured leads:
-
Click the
button to open the System Designer. -
Go to the "Import and integration" block → "Social lead generation service settings."
-
Open the relevant integration record.
-
Click Sync all leads on the toolbar to register leads from the entire account. Alternatively, click Sync leads in the setup area of the needed form to register leads captured by a specific form (Fig. 3).
Fig. 3 The lead synchronization buttons 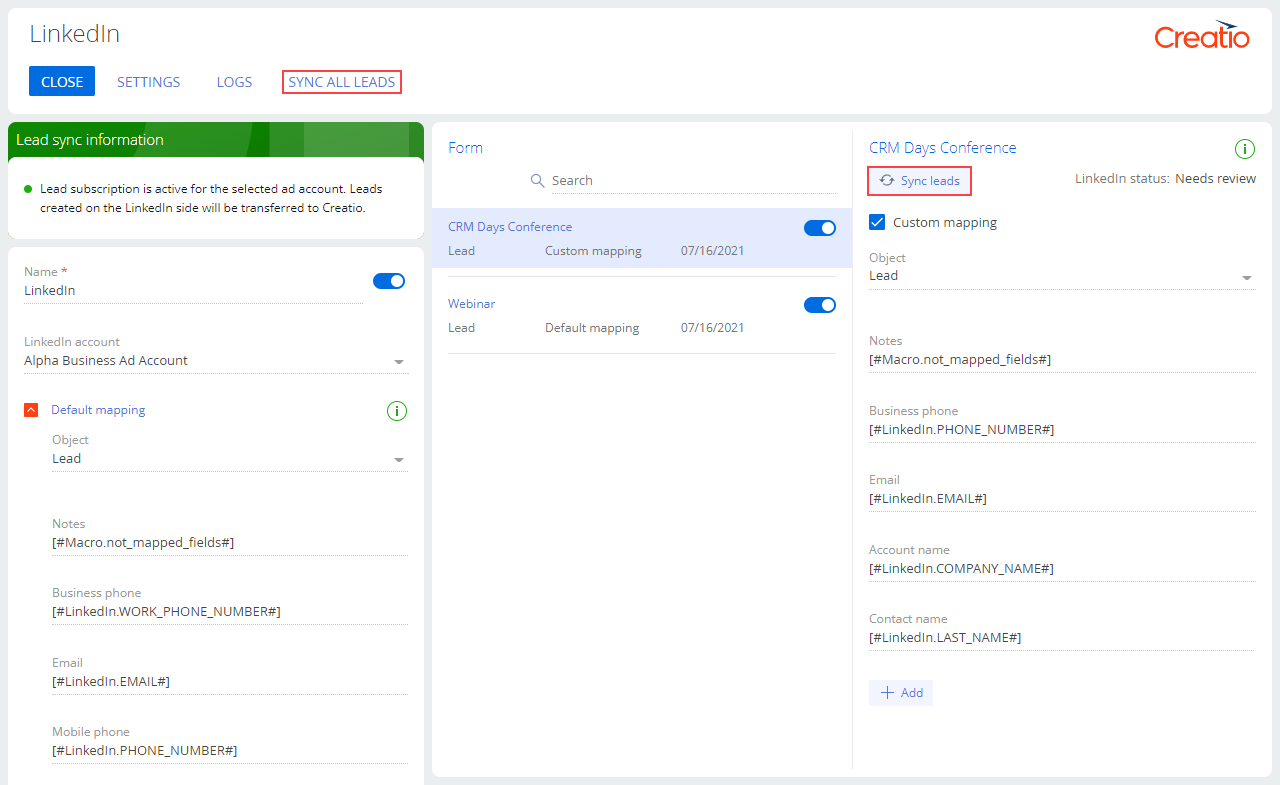
-
Specify the lead capture period within the last 90 days in the box that opens. Creatio will calculate the period using calendar dates regardless of the integration status at the time.
-
Click Sync.
As a result, Creatio will register leads with unique LinkedIn lead IDs for the corresponding period.
Synchronize changes in an active lead generation form
If you add new fields to your LinkedIn form, update the mapping in Creatio. Otherwise, Creatio will import data of new form fields only using the "not_mapped_fields" macro.
When you rename a form in LinkedIn, the form name in Creatio remains unchanged. You can update the name manually in the Lead forms ("LeadGenLeadForms" code) lookup.
Disable the LinkedIn lead generation integration
There are several ways to disable the integration that accommodate for different needs and security requirements. For example, toggle off the integration on Creatio's end while keeping your LinkedIn user and ad account tokens or the tokens themselves.
Toggle off lead registration from the form or the account
-
Click the
button to open the System Designer. -
Go to the "Import and integration" block → "Social lead generation service settings."
-
Open the integration record.
-
Toggle off the switch next to the form in the Form list or the Name field in the left area, respectively (Fig. 4).
Fig. 4 The lead registration toggles 
-
Click Apply.
As a result, Creatio will stop registering leads captured by the form or the account. Toggle the corresponding switch back on to resume lead registration.
Revoke your LinkedIn user account token
-
Click the
button to open the System Designer. -
Go to the "Import and integration" block → "Social lead generation service settings."
-
Click Settings.
-
Click the
 button next to your LinkedIn user account in the LinkedIn ad accounts detail → Delete → confirm the deletion (Fig. 5).
Fig. 5 Revoke a LinkedIn token 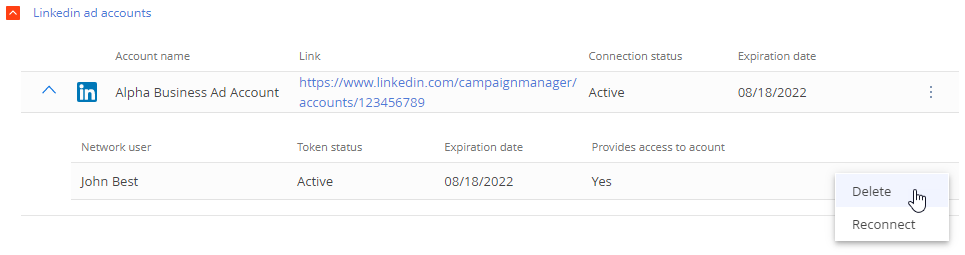
As a result, Creatio will no longer use your LinkedIn user account to access the LinkedIn ad account. If your token is the only one that provides access to the ad account, revoking it will disable lead registration from the account.
Disconnect the LinkedIn ad account
- Click the button to open the System Designer.
- Go to the "Import and integration" block → "Social lead generation service settings."
- Click the button next to the integration that uses the corresponding ad account → Delete → confirm the deletion.
- Click Settings.
- Click the button next to the ad account in the Linkedin ad accounts detail → Delete → confirm the deletion.
As a result, Creatio will lose access to your LinkedIn ad account and will be unable to register new leads.
Update LinkedIn integration permissions
On May 15, 2024, LinkedIn will implement critical updates to its API. To ensure uninterrupted lead acquisition, update permissions for each of your active LinkedIn integrations before this date by disconnecting and reconnecting the LinkedIn user. Every lead acquired during the period of downtime will be registered in Creatio automatically after you reconnect the user.
To update permissions:
- Click to open the System Designer.
- Go to the Import and Integration block → Social lead generation service settings.
- Click Settings. This opens a page.
- Click
 next to the relevant LinkedIn user → Delete → confirm the deletion (Fig. 6).
Fig. 6 Delete a user 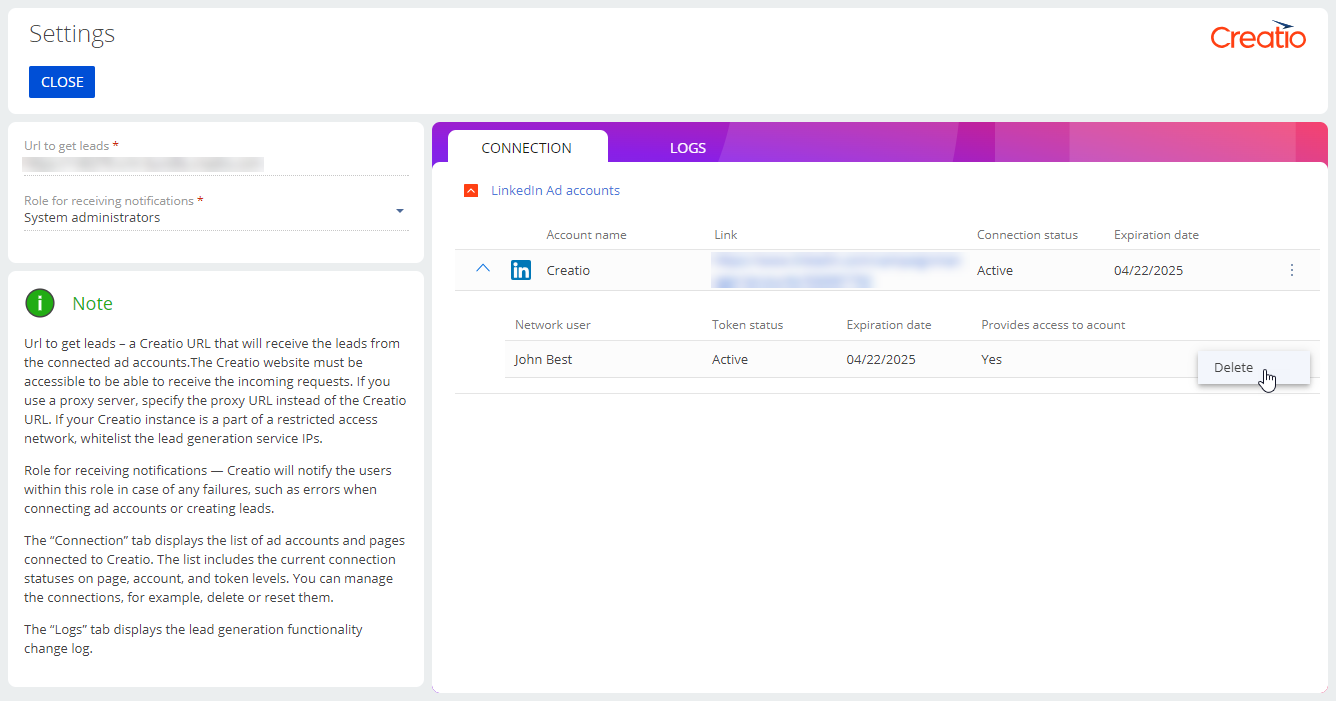
- Repeat step 4 for other relevant users.
- Click Close.
- Open the page of the relevant integration.
- Click
 (Fig. 7). This opens a pop-up window.
Fig. 7 Reconnect the integration 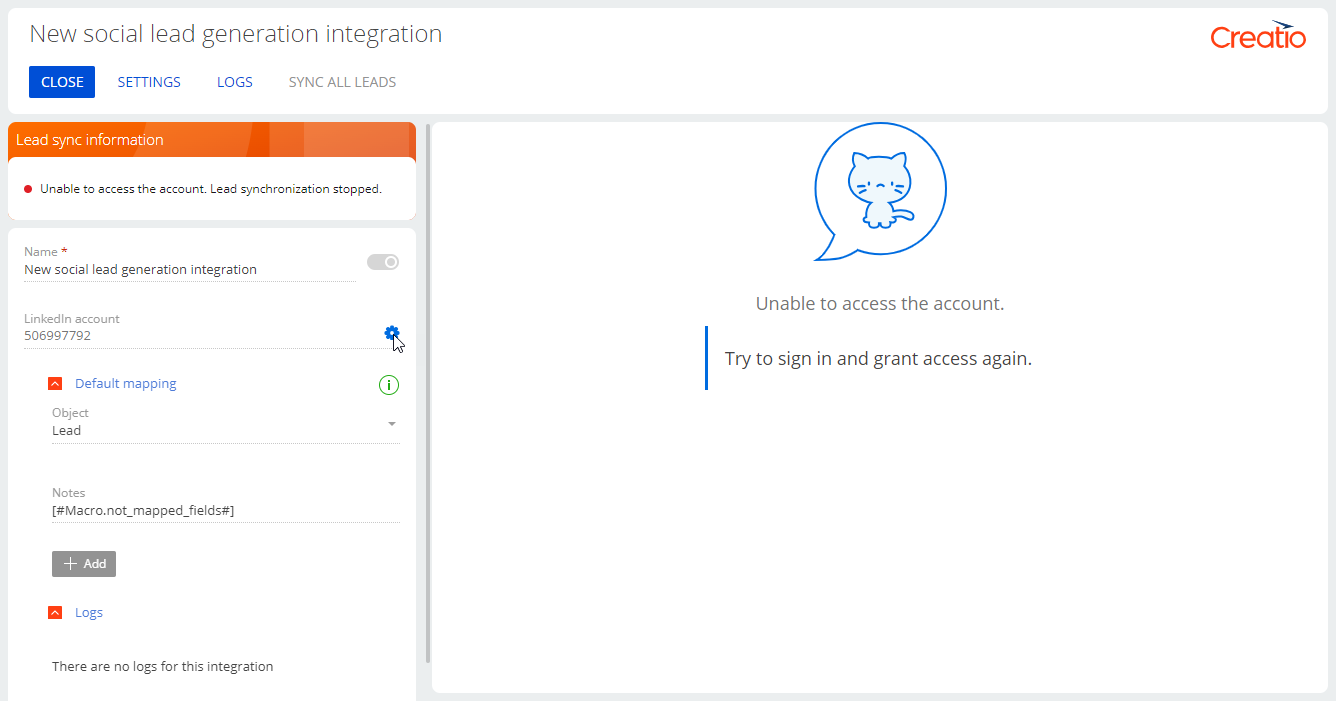
- Sign in to LinkedIn.
- Select the relevant ad accounts → Complete.
- Repeat steps 7-10 for all relevant integrations.
See also
Integrate with landing pages and web forms
Create a landing page on your website
Connect your website landing page to Creatio
Set up autofill for lead page field