The Stage case element denotes a general progression milestone within the case workflow. A stage can contain several required and optional steps. The stages of a case are displayed on the workflow bar in the order of their completion. To modify the sequence of stages, drag a stage.
Add a case stage
To add a stage, click the  button on the stage panel. The button is displayed next to the last stage on the workflow bar, and when hovering the mouse over the spaces between stages. That enables you to add stages both sequentially and in random order. (Fig. 1).

The setup area will be displayed once you add a stage.
Set up stage properties
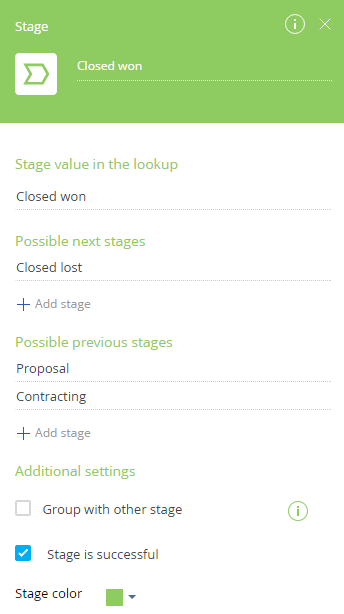
Specify stage parameters in the setup area (Fig. 2).

The name of the element is indicated at the top of the parameters panel. If you rename an element, the corresponding record in the lookup will be modified as well. If you rename an element, the corresponding record in the lookup will be modified as well.
Stage value in lookup – the lookup record that corresponds to the current case stage. Map case stages to lookup values here. If the lookup does not have the required stage, you can create it directly from the setup area. To do this, enter the name of the stage in the Stage value in the lookup field. Each new stage added in the Case Designer will be saved in the corresponding lookup. This is a required field.
Possible next stages – select case stages to which you can transition from the current stage. By default, all case stages are available.
Possible previous stages – select case stages from which you can transition to the current stage. By default, all case stages are available.
Automatic transition to next case stage – used to configure an automatic transition to the next case stage. The current stage can automatically transition to any stage specified in the Possible next stages list.
-
“Only manually (no automatic transition)” – the transition to the next case stage is performed only when the user clicks the next stage on the workflow bar.
-
“If required steps are completed” – the transition to the next case stage occurs automatically when all required case steps of the current stage are completed. Required steps are case elements with the "Required step" type.
-
“If all steps are completed” –the transition to the next case stage occurs automatically once both required and optional stage steps are completed.
Group with other stage – select stages from the lookup to group with the current stage. Grouping stages enables them to occupy the same slot on the workflow bar. The workflow bar displays grouped stages as a drop-down list. The stage specified in this field becomes primary and is placed before the current stage on the stage panel. The Group with other stage checkbox becomes uneditable if the stage is already grouped.
The Stage is successful checkbox determines the stage at which the case is considered successful. The checkbox is displayed only for the final stages.
Stage color – the color of the workflow bar on this case stage.
Delete a case stage
You can always delete unnecessary case stages and steps. To do this, select the stage and click  .
.