
Any Creatio product is a set of packages.
A Creatio package is a collection of configuration elements that implement certain functionality. On the file system level, packages are directories with subdirectories and files.
Package classification
-
Simple packages:
-
 – preinstalled packages. They are part of Creatio. Predefined packages are available in the workspace by default. They cannot be modified.
Preinstalled package types:
- Base functionality packages. For example, Base, NUI.
- Third-party packages.
They are installed from *.zip archives using Creatio IDE or the WorkspaceConsole utility.
 – custom packages. They are created by other Creatio users. Custom packages are locked in the version control system. They cannot be modified.
 – custom packages. They are created by the current user or retrieved from the version control system. They can be modified.
-
- Project package is a package that enables you to develop functionality similarly to a standard C# project. Learn more: Project package.
- Assembly package is a package whose source and automatically generated code is compiled into a separate assembly. Assembly packages are available in Creatio version 7.18.3 and later. Creatio IDE depicts assembly packages as custom packages (). Read more: Assembly package.
Compare Creatio packages using the table below.
|
|
|
|
|
|
|---|---|---|---|---|
|
|
||||
|
|
|
|
|
...\Terrasoft.WebApp\ |
|
|
||||
|
|
|
|
(use an external IDE) |
For .NET Framework: ...\Terrasoft.WebApp\ For .NET Core: ...\Terrasoft.WebApp\ |
|
|
||||
|
|
(with restrictions) |
|
|
For .NET Framework: ...\Terrasoft.WebApp\ For .NET Core: ...\Terrasoft.WebApp\ |
This article covers simple packages.
To expand or modify functionality, install the package with the desired features. Development of additional functionality or modification of the existing functionality is only possible with custom packages.
Primary packages
Creatio's primary packages include packages available in all products.
|
|
|
|---|---|
| Base | Base schemas of the primary objects and Creatio sections, as well as connected objects, pages, process schemas, etc. |
| Platform | Modules and pages of the Section Wizard, List Designer, Dashboard Designer, etc. |
| Managers | Client modules of the schema managers. |
| NUI | Functionality connected to the Creatio UI. |
| UIv2 | |
| DesignerTools | Schemas of designers and their elements. |
| ProcessDesigner | Process Designer schemas. |
[Custom] package
The Section Wizard and Detail Wizard create various schemas that must be saved to a custom package. A fresh Creatio installation has no packages open for modification with the exception of the Custom preinstalled package. You can add schemas to this package manually or using the Wizards.
The Custom package specifics:
- The Custom package cannot be added to the version control system. As such, you can transfer the package's schemas to a different environment only using the export and import functionality.
- Unlike the other preinstalled packages, the Custom package cannot be exported to the file system via the WorkspaceConsole utility.
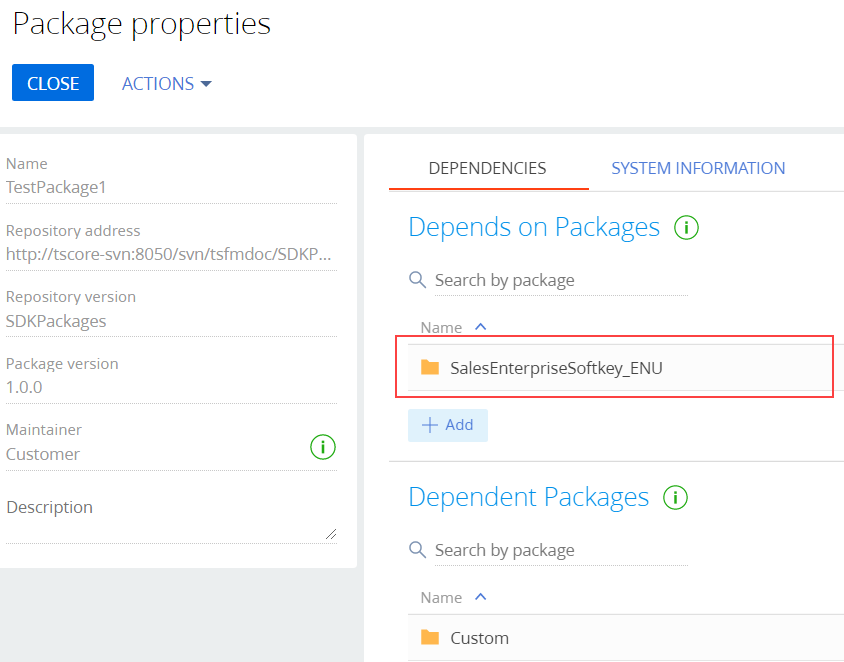
- The Custom package has all of the other preinstalled packages as dependencies. If you create or install a custom package, the new package will become a dependency for the Custom package automatically. Therefore, always place the Custom package the last in the package hierarchy.
- Custom packages cannot have the Custom package as a dependency.
We recommended using the Custom package if:
- You are not going to transfer changes to a different environment.
Not only do the Section Wizard and Detail Wizard create various schemas, they also bind data to the current package. The Custom package does not support the standard package import mechanism. Therefore, if the Custom package is your current package, you can only transfer the bound data to another custom package via database queries. We strongly recommend against this method as the changes may affect the database structure and render Creatio inoperable.
If you have to modify Creatio functionality significantly, create a custom package and use a version control system.
- You customize Creatio either manually or using Wizards, and the changes are minor.
- You do not need to use a version control system.
Custom package
To develop in a custom package, specify the name of the relevant package in the Current package (CurrentPackageId code) system setting.
Package structure
If you upload the package to the version control system, the directory that matches the package name will be created in the package repository.
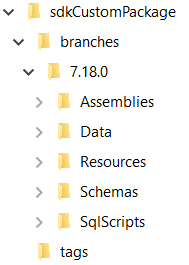
The structure of the package directory:
- The branches directory.
Stores the versions of the current package. Each version is a subdirectory whose name matches the package version number in Creatio. For example, 7.18.0.
- Tags directory
Stores tags. The tags in the version control system are a snapshot of the project, i. e., a static copy of files made to preserve a development stage.
SVN integration is enabled in Creatio by default. To set up SVN integration, modify the value of the defPackagesWorkingCopyPath setting's connectionString attribute in the ConnectionStrings.config configuration file. This setting contains the path to the directory that stores working copies.
Creatio makes and uses a working copy of each custom package with versioning enabled in SVN integration mode. The working copy contains custom packages organized as a set of directories and files. The Creatio SVN client synchronizes this data with an SVN repository. We recommend specifying the path to a permanent directory in the defPackagesWorkingCopyPath system setting. The OS may clear the temporary directory specified by default. Do not specify ...\Terrasoft.WebApp\Terrasoft.Configuration\Pkg as the repository of working package copies in Creatio .NET Framework.
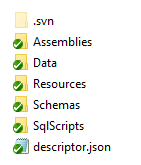
The package directory structure in the file system:
- The Schemas directory contains the package schemas.
- The Assemblies directory contains third-party builds bound to the package.
- The Data directory contains data bound to the package.
- The SqlScripts directory contains SQL scenarios bound to the package.
- The Resources directory contains the localized package resources.
- The Files directory contains the package file content.
- The Descriptor.json file stores the package metadata in JSON. The package metadata includes the identifier, title, version, dependencies, etc.
Dependencies and package hierarchy
Creatio application development follows the basic principles of software design, including the “don't repeat yourself” (DRY) principle.
Creatio architecture implements this principle using package dependencies. Each package contains certain Creatio functionality, which the other packages should not duplicate. If a package requires functionality from a different package, set up dependencies between the corresponding packages.
Dependency types:
- If the current package must inherit the entire Creatio functionality, set the package next to the Custom package in the hierarchy as the parent package.
- If the current package must inherit the functionality of a package, set the package with the functionality to inherit as the parent package.
Packages can have multiple dependencies. For example, package C depends on packages A and D. Thus, the functionality of packages A and D is available in package C.
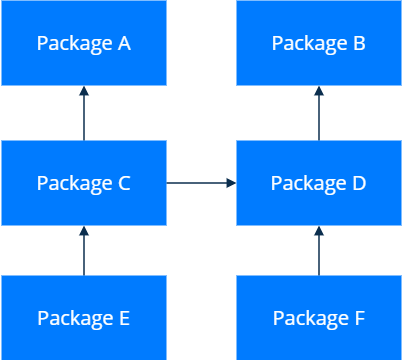
Package dependencies form hierarchical chains. This means that the package contains the functionality of the inheritor package and the functionality of all packages that depend on the inheritor. The closest analogy to the package hierarchy is the class inheritance hierarchy in object-oriented programming. For example, package E contains not only the functionality of package C on which it depends, but also the functionality of packages A, B, and D. In addition, package F contains the functionality of packages B and D.
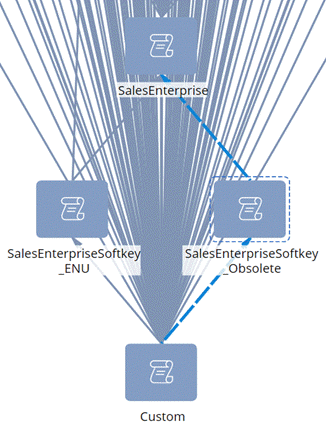
Creatio package hierarchy
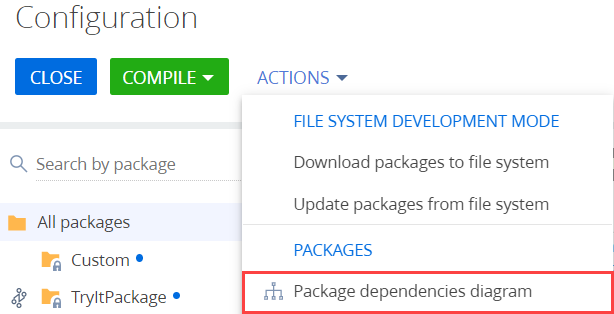
View the package hierarchy and dependencies on the package dependencies diagram. To open the diagram:
- Go to the Configuration section.
- Select Package dependencies diagram in the Packages group of the Actions dropdown list on the toolbar.
The dependencies diagram will open in a new tab.
Click a diagram node with the package name to view the package dependencies as animated arrows. For example, the SalesEnterpriseSoftkey_Obsolete package in the SalesEnterprise product depends only on the SalesEnterpise package and its parent packages. Also, the SalesEnterpriseSoftkey_Obsolete package is a parent package to the Custom package.
Add package dependencies
You can add dependencies to a custom package at any time.
To add dependencies:
- Go to the package page.
- Click Add on the Depends on packages detail in the Dependencies tab. This will open the package lookup box.
- Select the desired package in the box and click Select.
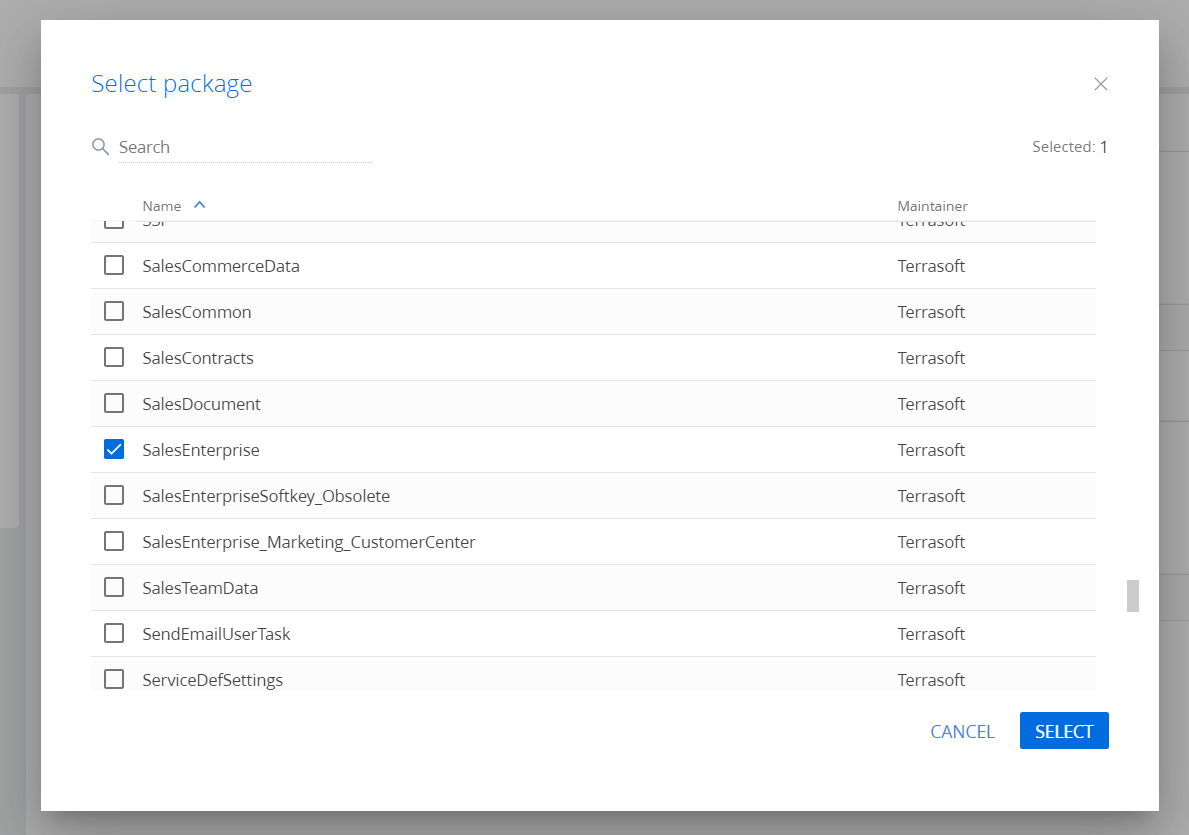
As a result, Creatio will display the selected package in the current package's list of dependencies. If you add other dependencies to the current package, Creatio will hide the packages you have already selected from the lookup.
Creatio adds new packages to the dependencies of the Custom preinstalled package automatically.
List of dependencies in the package metadata
Creatio stores the list of dependencies in the package metadata. View the metadata in the DependsOn property of the object defined in the descriptor.json file.
The DependsOn property is an array of objects that contain the package name, version, and unique identifier. Use the identifier to define the package in the Creatio database. Creatio adds separate descriptor.json files for each package version.
Bind data to the package
Developers often need to provide certain data together with the developed functionality when transferring changes between environments. For example, lookup values, new system settings, demo section records, etc.
If you create a section in the Section Wizard, Creatio will bind data the section requires to get registered and operate correctly to the package automatically.
Bind data to the package that contains the developed functionality in the Configuration section.

1. Create a package
- Click the
 button to open the System Designer.
 - Click Advanced settings in the Admin area block.
- Click the
 button in the package workspace. This will open the package mini page.
2. Fill out the package properties
Fill out the properties on the package mini page.
The package properties:
- Name – the package name. Required. The package name cannot match the names of other packages.
- Description – the package description. For example, package functionality details.
- Version control system repository – the name of the version control system repository that will store the package changes. Required. Only repositories from the configuration storage list that are marked as active will be available in the dropdown list.
- Version – the package version. Required. The field accepts digits, Latin characters, as well as “.” and “_” characters. The value must start with a digit or a letter. All package elements are of the same version as the package itself. The package version does not have to match the actual Creatio version.
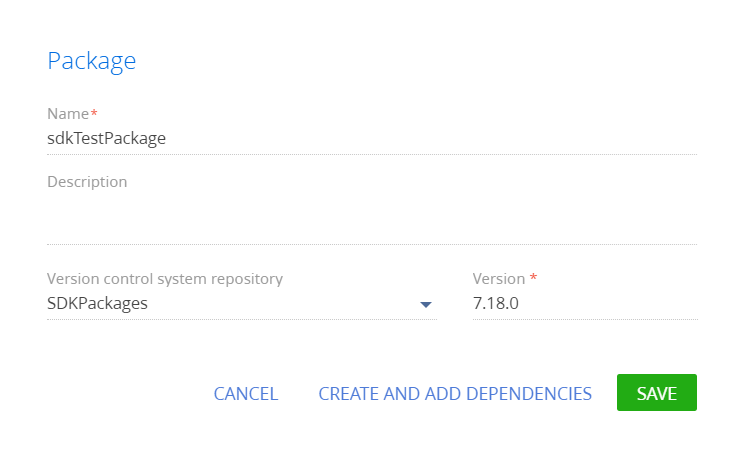
Creatio will save the package properties to the package metadata.
In addition to these properties, the package metadata contains information about the dependencies (DependsOn property) and the developer (Maintainer). Set the value of the Maintainer property in the Publisher (Maintainer code) system setting.
3. Define the package dependencies
If the current package must inherit Creatio functionality, define the package dependencies.
To add dependencies:
- Click Create and add dependencies on the package mini page.
- Set the relevant dependencies in the Depends on packages detail on theDependencies tab. If the current package must inherit the entire Creatio functionality, set the package that follows the Custom package in the hierarchy as the parent package.
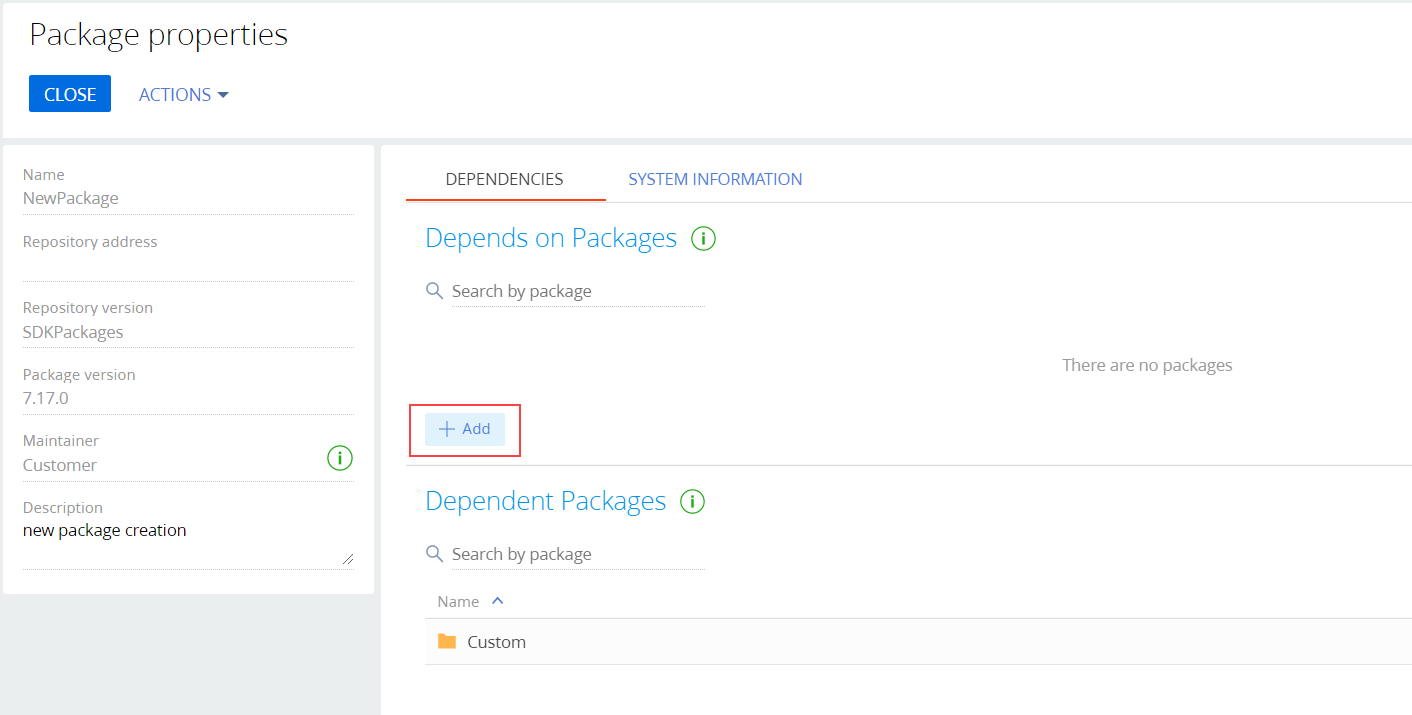
4. Check the Custom package dependencies
The Custom package must depend on all Creatio packages. As such, make sure that the [Custom] package depends on the new package as well.

1. Create a section
For this example, create the Books section in the Section Wizard. Take the section fields from the table below.
Learn more about how to create a section: Section.
2. Add demo records to the section
To add records to the Books section list:
- Add a record to the Contacts section and enter "David Flanagan" in the Full name field.
- Add a record to the Contacts section and enter "Andrew Troelsen" in the Full name field.
- Add a record to the Accounts section and enter "Apress" in the Name field.
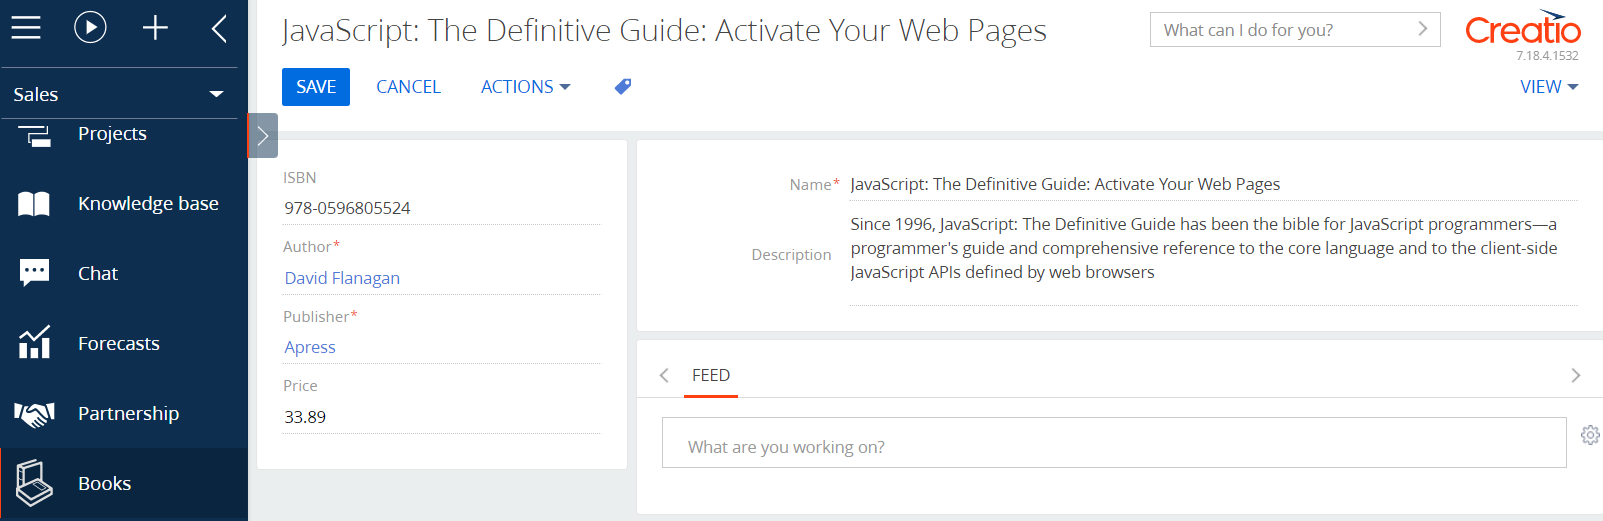
- Add the JavaScript: The Definitive Guide: Activate Your Web Pages book:
- Go to the Books section.
- Click New.
- Fill out the fields of the book mini page:
- Enter "JavaScript: The Definitive Guide: Activate Your Web Pages" in the Name field.
- Enter "978-0596805524" in the ISBN field.
- Select "David Flanagan" in the Author field.
- Select "Apress" in the Publisher field.
- Enter "33.89" in the Price field.
- Add the Pro C# 7: With .NET and .NET Core book in a similar way.
The Books section list must look like on the figure below.

3. Bind data to the package
Since the Books section records are connected to the Contacts section records by the UsrAuthor column, bind the author data to the package first.
To bind data to the package:
- Bind the contacts:
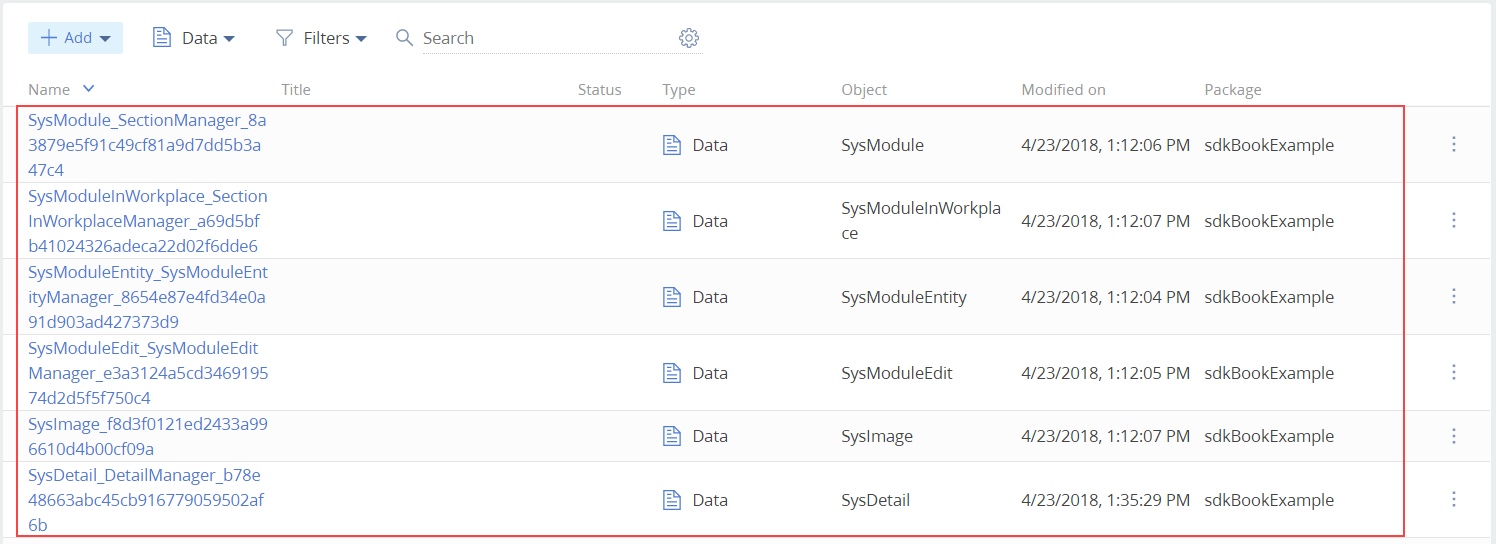
- Go to the Configuration section and select a custom package.
- Click Add on the workspace toolbar and select the Data configuration type.
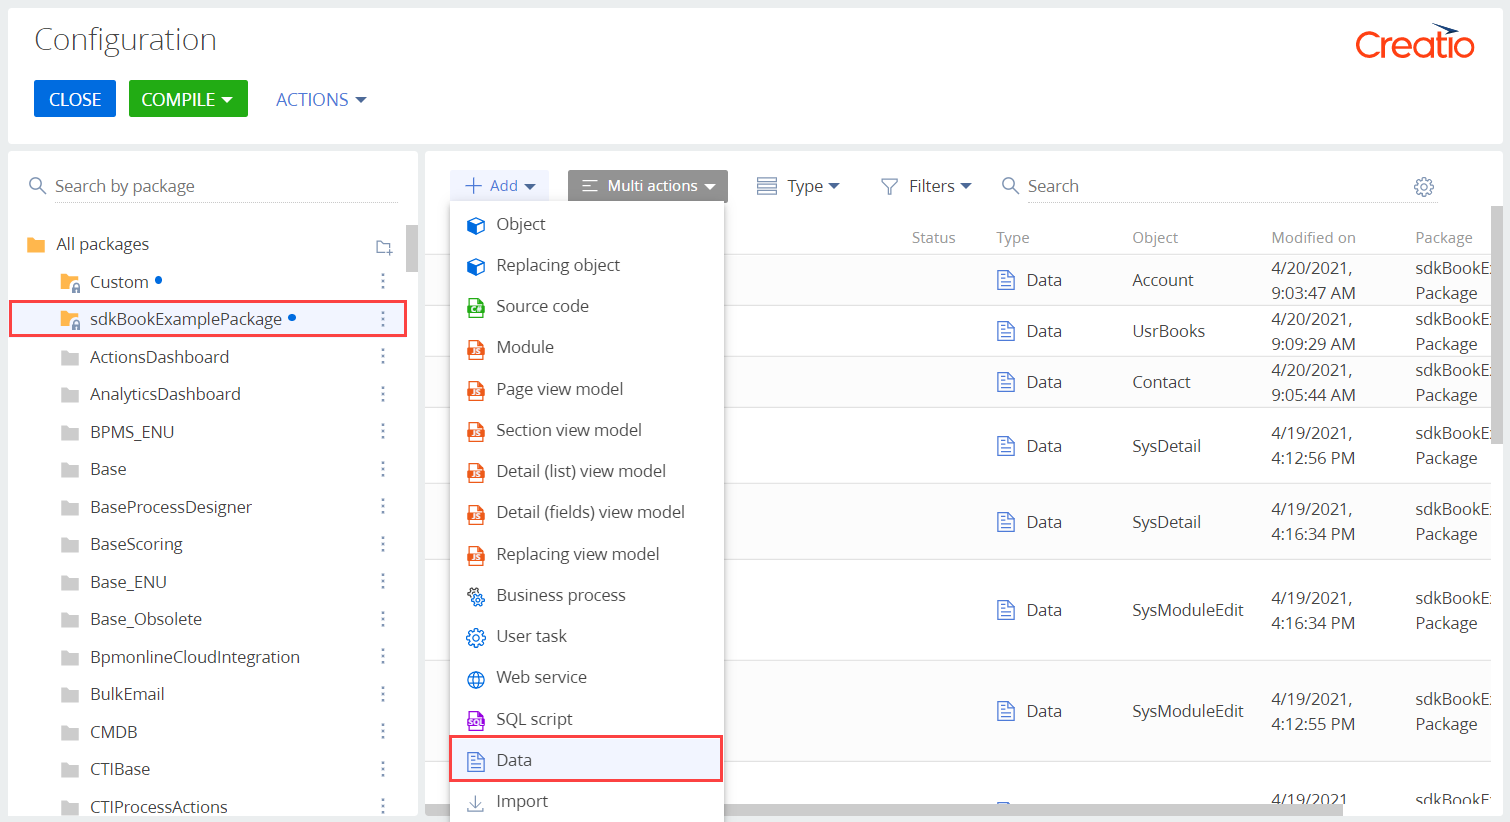
- Fill out the properties of the data binding page:
- Enter "ContactsInBooks" in the Name property.
- Select "Contact" in the Object property.
- Select "Installation" in the Installation type property.
- Select the records with "David Flanagan" and "Andrew Troelsen" values in the Full name field on the Bound data tab.
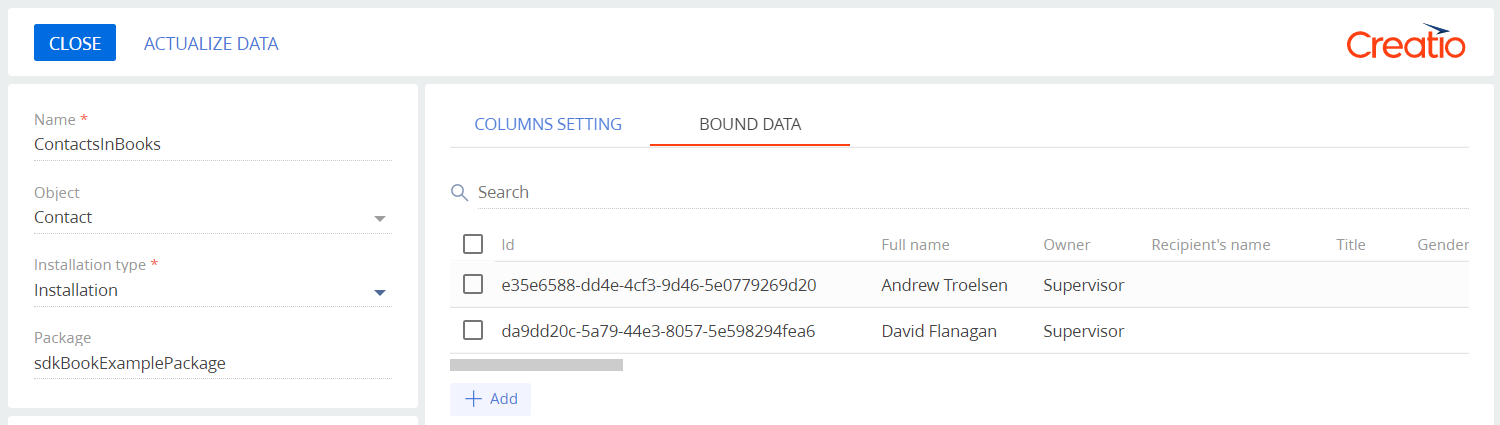
- Save the data.
- Bind the account:
- Go to the Configuration section and select a custom package.
- Click Add on the workspace toolbar and select the Data configuration type.
- Fill out the properties of the data binding page:
- Enter "AccountsInBooks" in the Name property.
- Enter "Account" in the Object property.
- Select "Installation" in the Installation type property.
- Select the record with the "Apress" value in the Name field on the Bound data tab.
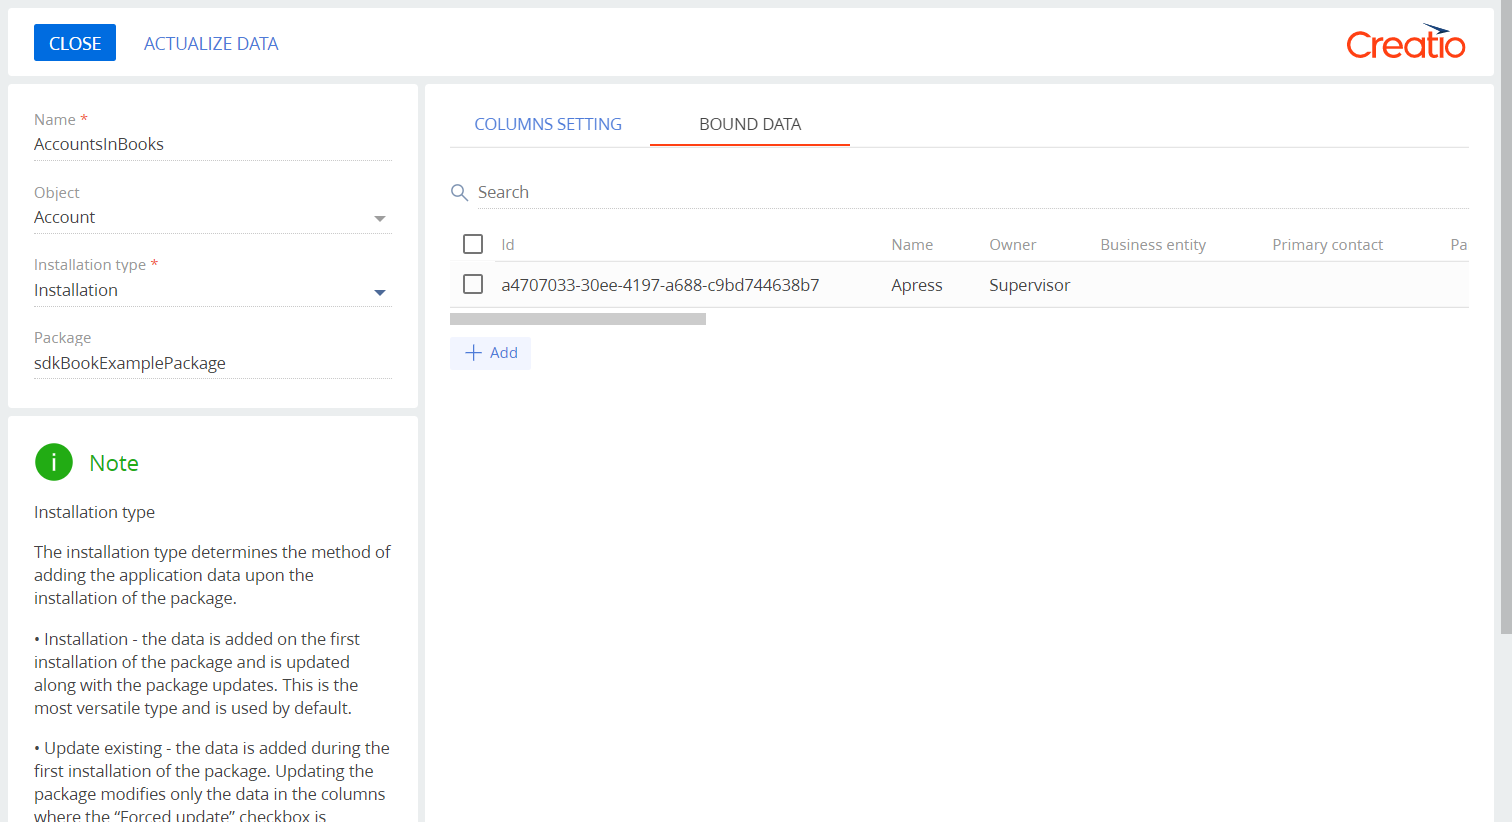
- Save the data.
- Bind the books:
- Go to the Configuration section and select a custom package.
- Click Add on the workspace toolbar and select the Data configuration type.
- Fill out the properties of the data binding page:
- Enter "Books" in the Name property.
- Select "UsrBooks" in the Object property.
- Select "Installation" in the Installation type property.
- Select the records with the "JavaScript: The Definitive Guide: Activate Your Web Pages" and "Pro C# 7: With .NET and .NET Core" values in the Name field on the Bound data tab.
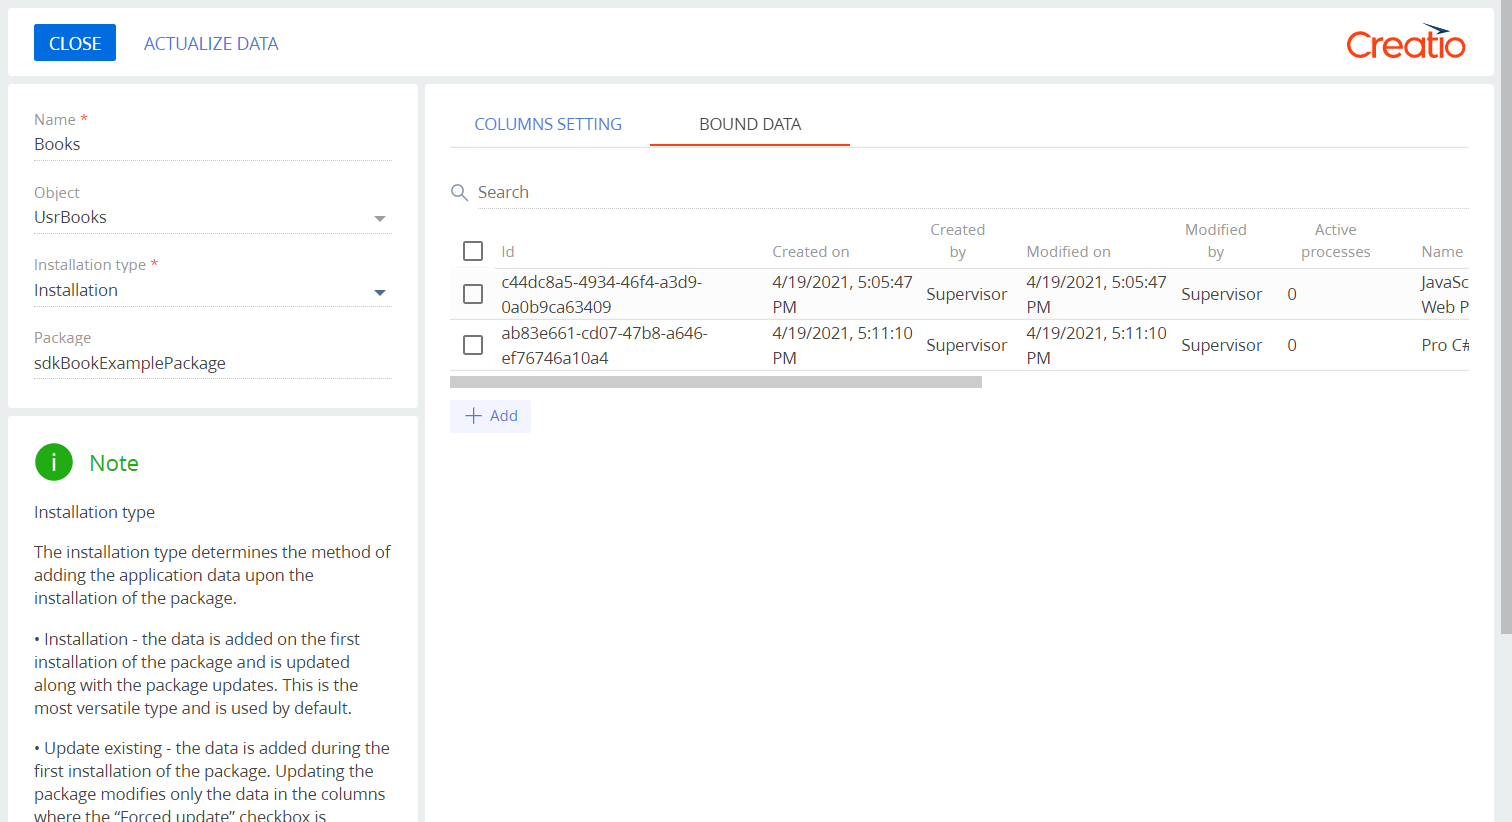
- Save the data.
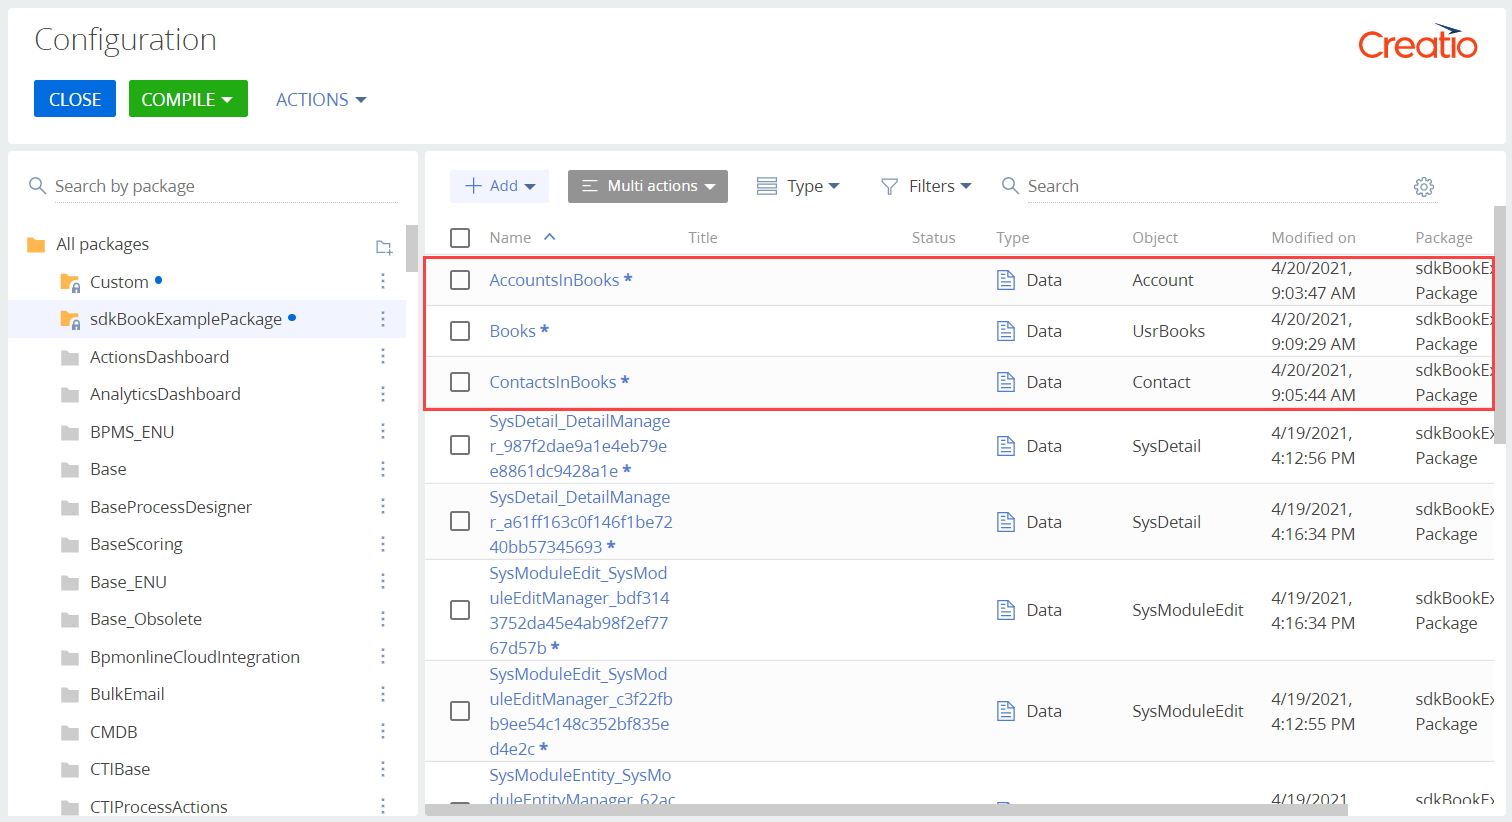
4. Check the data bindings
As a result, Creatio will bind the data of the Books, Contacts, and Accounts" sections to the custom package.
You can transfer the package between environments using the package export and import mechanism in Creatio IDE. After you install the package into another environment, the bound records will be displayed in the corresponding sections.