
Use an external integrated development environment (IDE) like Visual Studio or WebStorm to speed up Creatio solution development.
External IDEs let you create, edit, and compile Creatio solution code as well as debug it, develop in a multi-user environment, use version control systems, and much more.
Development in the file system
Creatio supports external IDEs using the file system development mechanism of configuration packages.
File system development (FSD) mode lets you:
- Download package contents from the database as files.
- Edit the schema source code using the IDE.
- Upload changed packages to the database.
FSD has the following special features:
- If FSD is enabled, only schemas of the Source code and ClientUnitSchema types support full-fledged development.
The following rules apply to other package elements, for example, resources or SQL scripts:
- After you download the elements from the database to the file system, the downloaded elements will replace the elements in the file system. Schemas of the Source code and ClientUnitSchema type are not replaced.
- After you upload the elements from the file system to the database, the uploaded elements will replace the existing elements in the database. Creatio will still work with schemas of the Source code and ClientUnitSchema types from the file system.
- If FSD is enabled, integrate a version control system (SVN) using a third-party tool instead of the out-of-the-box Creatio SVN integration.
The Configuration section still lets you install packages from the SVN repository to help to manage all the connected packages. We recommend using third-party utilities, such as TortoiseSVN, to install individual packages.
To use the out-of-the-box SVN repository integration, disable FSD.
Set up Creatio to work with the file system
- Enable FSD.
.NET Framework. In the Web.config file in Creatio root directory, set the enabled attribute of the fileDesignMode element to true.
.NET Core. Perform a similar setup in the Terrasoft.WebHost.dll.config file in the root Creatio directory.
- Disable the retrieval of static file content from the file system.
FSD is not currently set up to work with retrieving static content from files that have already been generated. To ensure that FSD works correctly, disable retrieving static client content from the file system.
.NET Framework. In the Web.config file in Creatio root directory, set the UseStaticFileContent flag to false.
.NET Core. Perform similar setup in the Terrasoft.WebHost.dll.config file in the root Creatio directory.
- Compile Creatio.
Execute the Compile all action on the Configuration section toolbar.
After you enable FSD, the File system development mode action group in the Configuration section becomes active:
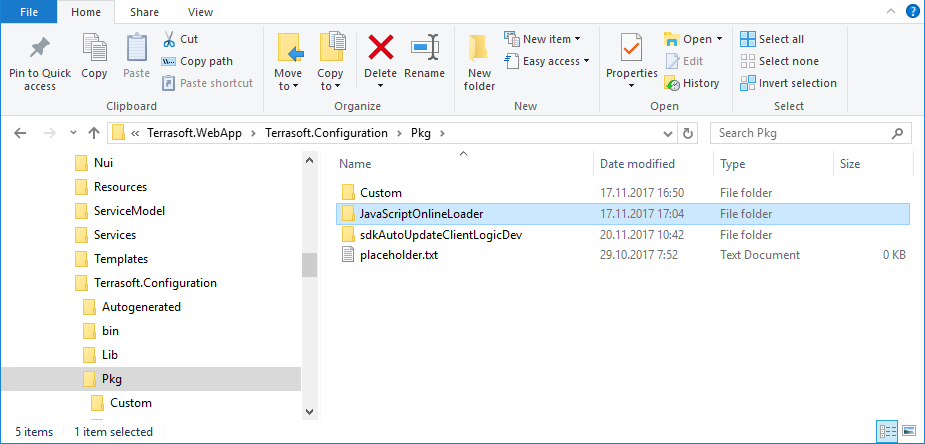
- Download packages to file system. Downloads packages from the Creatio database to the [Path to Creatio]\Terrasoft.WebApp\Terrasoft.Configuration\Pkg directory.
- Update packages from file system. Uploads packages from the [Path to Creatio]\Terrasoft.WebApp\Terrasoft.Configuration\Pkg directory to the database.
/configuration_buttons.png)
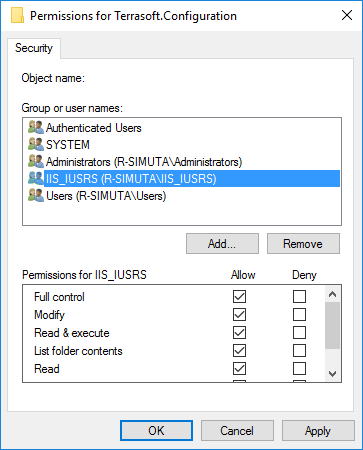
- Grant IIS access to the configuration directory.
To make sure Creatio works as intended with the configuration project, grant the OS user who runs the IIS application pool full access to the [Path to Creatio]\Terrasoft.WebApp\Terrasoft.Configuration directory. Usually, this is a built-in IIS_IUSRS user.
Manage packages
Create a package
If you are not using SVN, the procedure to create a package with FSD enabled is the same as the general procedure.
Add a package element
We recommend adding new elements to the package, for example, a schema or resource, only from the Configuration section. To create and edit a new element in a custom package, follow these steps:
- Select a custom package in the Configuration section and add a new element to the package, such as client schema, source code, etc.
- Add resources to the schema if needed, for example, localizable string.
- Select the Download packages to file system action of the Actions drop-down list in the Configuration section.
- Use the IDE, for example, Visual Studio, to edit the source code of the schema or localizable resource stored in the files of the [Path to Creatio]\Terrasoft.WebApp\Terrasoft.Configuration\Pkg\[Package name] directory.
- Execute the Update packages from file system action to upload the changes to the Creatio database.
- Compile Creatio if you changed schemas of the Source code type.
Write C# code
Compilation options in Visual Studio
- Use the default Visual Studio compiler. However, this option might not take into account package dependencies and positions.
- Use the WorkspaceConsole utility integrated with Visual Studio. The option has the following advantages:
- Compilation is sped up since the configuration assembly is divided into separate compilable modules. The utility recompiles only modules whose packages were changed.
- You do not need to exit debugging mode or detach from the IIS process to recompile a configuration assembly.
Set up WorkspaceConsole for compilation
- Enable FSD for WorkspaceConsole.
The WorkspaceConsole utility is delivered together with Creatio. Before using the utility, ensure that it is set up correctly. Besides general setup, enable FSD in the Terrasoft.Tools.WorkspaceConsole.exe.config configuration file as well.
Enable FSDTo speed up compilation, divide the configuration assembly into separate compilable modules. In this case, set the CompileByManagerDependencies setting to true in the internal Web.config file of the Terrasoft.WebApp directory and the Terrasoft.Tools.WorkspaceConsole.exe.config file of the WorkspaceConsole utility.
Set up the internal Web.config - Integrate Microsoft Visual Studio with WorkspaceConsole.
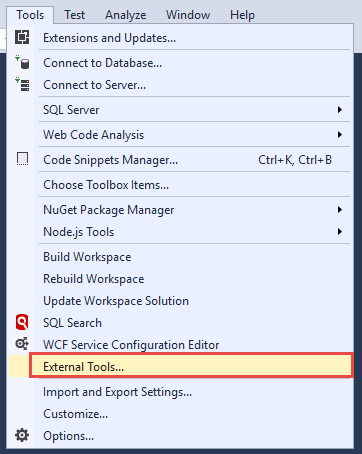
- Execute the Tools → External Tools… menu command in the Visual Studio environment. This opens a dialog.
-
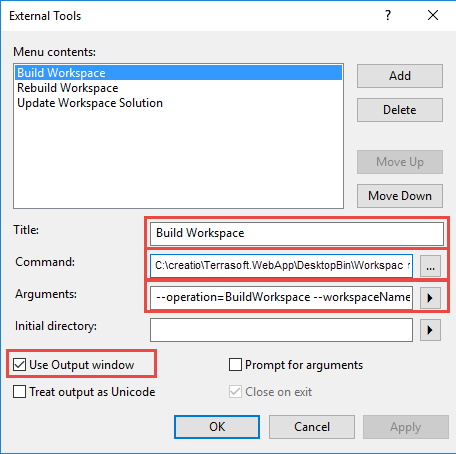
Add and set up the following commands that call the WorkspaceConsole utility:
- Build Workspace. Compiles the configuration project changes.
Build Workspace command properties
Command Arguments - Rebuild Workspace. Fully compiles the configuration project.
Rebuild Workspace command properties
Command Arguments - Update Workspace Solution. Updates the Visual Studio solution from the Creatio database. Applies the changes made by Creatio users.
Update Workspace Solution command properties
Command Arguments
- Build Workspace. Compiles the configuration project changes.
-
Select the Use Output window checkbox for all commands.
- Execute the Tools → External Tools… menu command in the Visual Studio environment. This opens a dialog.
Set up debugging in Visual Studio
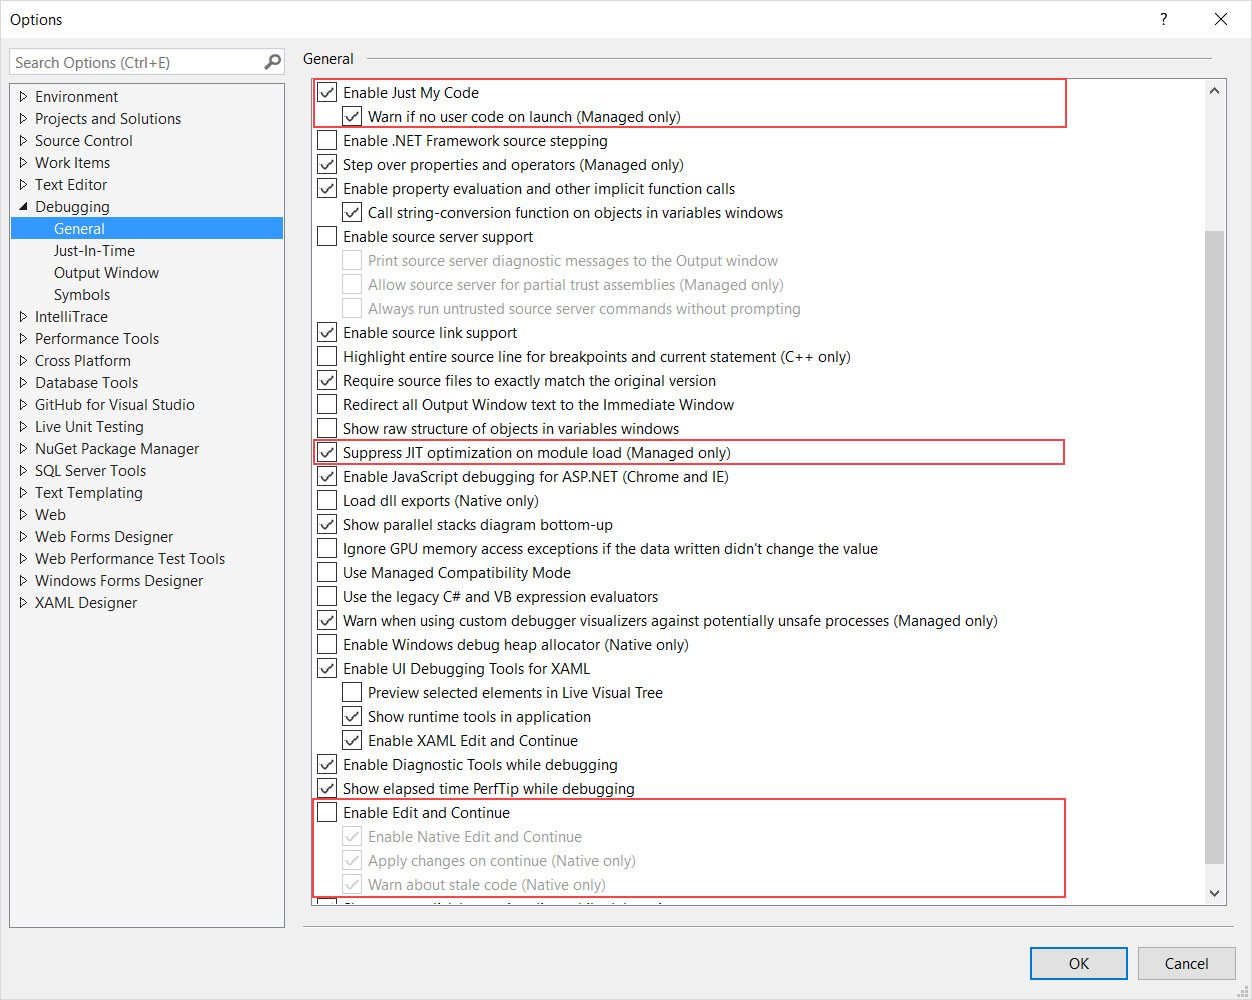
Execute the Debug → Options… menu command. This opens a dialog. Change the following settings:
- Enable Enable Just My Code to ensure that the debugger does not try parsing source code that is not a part of the project.
- Disable Enable Edit and Continue. Since Creatio restarts automatically after the configuration compilation, the setting is not supported.
- Make sure Suppress JIT optimization on module load is enabled so that the debugger stops at breakpoints correctly.
Write C# code in a configuration project
The Terrasoft.Configuration.sln configuration project is a Visual Studio solution delivered together with Creatio and located in the [Path to Creatio]\Terrasoft.WebApp\Terrasoft.Configuration directory.
The configuration project has the following advantages for development:
- The configuration project is a fully configured solution for developing complex back-end functionality.
- You can use the entire scope of the IDE functionality: debugging, refactoring, autocomplete, etc.
The configuration project has the following limitations:
- Performance is relatively low since the entire configuration part of Creatio (Terrasoft.Configuration.dll) is recompiled.
- FSD of C# code is possible only by interacting with the on-site Creatio database.
To begin FSD using a configuration project, open [Path to Creatio]\Terrasoft.WebApp\Terrasoft.Configuration\Terrasoft.Configuration.sln in Visual Studio.
| Directory | Purpose |
|---|---|
| Lib | Stores the downloaded third-party class libraries bound to packages. |
| Autogenerated\Src | Stores the files that contain the autogenerated source code for pre-installed package schemas. The files are non-editable. |
| Pkg | Stores the downloaded packages required for FSD. |
| bin | Stores the downloaded compiled configuration and third-party libraries. |
Write C# code in a custom project
The custom project is an individual class library project that is preconfigured for interaction with Creatio.
To debug and test the development results in a custom project, you can use a local database connected via the WorkspaceConsole utility or Creatio in the cloud connected via the special Executor utility.
Development in a custom project has the following advantages:
- Speed of change testing, compilation and execution is high.
- Visual Studio functionality is fully supported.
- Any tools within the Continuous Integration pipeline are supported, for example, unit testing.
- Project setup is simple and does not require the configuration source code.
- Both Creatio on-site and cloud databases are supported.
Development in a custom project has the following limitations:
- Only the development and debugging of individual classes or small back-end functionality blocks are supported.
- Required Creatio class libraries must be added to the project dependencies individually.
Write JavaScript code
To develop front-end functionality using external IDEs, follow these steps:
- Preconfigure Creatio for FSD.
- Create, obtain, or update a package from the SVN repository
- Create a client schema to code in the Configuration section.
- Download the schema from the database to the file system.
- Write the schema source code in an external IDE.
To write code, open the file that contains the schema source code in the preferred IDE (or any text editor) and add the needed source code.
- Save the schema and debug the source code.
Every time you make changes to the schema source code, refresh the browser page that has Creatio open. This can slow down the development significantly.
To mitigate this, we developed functionality that reloads the browser page automatically after the source code is changed.
Set up the automatic display of JavaScript code changes
When Creatio starts, it creates an object that tracks changes to the *.js file that contains the source code of the developed module in the file system. If changes are made, a message is sent to the client Creatio instance notifying it of the changes. An object in the client application listens to the message, defines the objects that the changed module uses, destroys connections, registers new paths to modules, and attempts to reload the changed module. As a result, the browser requests the initialized modules from new paths, and the modules load changes from the file system.
The automatic display of JavaScript code changes has the following advantages:
- It will save you time spent on the interpretation and load of other modules. The individual development page lets you omit loading a number of auxiliary modules, for example, left and right panel, notification panel, etc.
- This reduces the number of server requests.
- It will help you detect redundant module connections. This approach to the development of individual modules lets you find unnecessary dependencies early and eliminate them.
The automatic display of changes to the JavaScript code has the following limitations:
- Code syntax errors cause issues. If the module source code has a syntax error, Creatio does not refresh the page automatically. You have to force a refresh, for example, by pressing F5. Once the error is fixed, the page becomes operable again.
- Module coupling is strong. Not all Creatio modules can be downloaded separately.
To enable the automatic display of JavaScript code changes, take the following steps:
-
Install the JavaScriptOnlineLoader package.
Enable FSD and add the JavaScriptOnlineLoader directory that contains the needed package to the [Path to Creatio]\Terrasoft.WebApp\Terrasoft.Configuration\Pkg directory.
Execute the Update packages from file system action. This will load the package to your configuration.
As a result, Creatio will display the package in the package workspace.
-
Open the page of the developed module in the browser.
To do this, open the ViewModule.aspx page with the following parameter added: ?vm=DevViewModule#CardModuleV2/<Module name>
For example, the custom package includes a KnowledgeBasePageV2 schema that replaces the schema of the Knowledge base section edit page.
where http://localhost/creatio is the URL of Creatio on-site.
Follow the URL to open the ViewModule.aspx page that contains the loaded module.
-
Change the source code of the developed schema.
You can change the source code of the developed schema in any text editor, for example, Notepad. After you save the changes, Creatio refreshes the browser page automatically.

1. Preconfigure Creatio
Set up the IDE for file system development.
2. Create, read, or update a package from the SVN repository
Create a sdkPackageInFileSystem custom package in the Configuration section using SVN or not using SVN.
3. Create a Source code schema
Create a Source code schema in the package:
- Set Code to "UsrGreetingService."
- Set Title to "UsrGreetingService."
- Set Package to "sdkPackageInFileSystem."
4. Develop the solution in Visual Studio
- Download the existing schemas from the database to the file system.
To do this, execute the Download packages to file system action of the Actions drop-down list in the Configuration section toolbar.
/scr_download_to_fs.png)
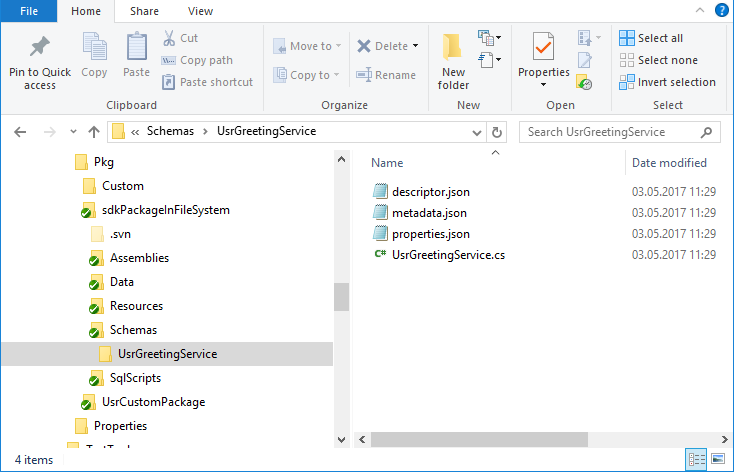
As a result, Creatio will add the UsrGreetingService.cs file of the schema source code to the Pkg\sdkPackageInFileSystem\Schemas\ directory in the file system. In this case, the UsrGreetingServiceSchema.sdkPackageInFileSystem_Entity.cs schema file generated by Creatio is placed in the Autogenerated\Src directory.
- To develop in Visual Studio, open the Terrasoft.Configuration.sln solution.
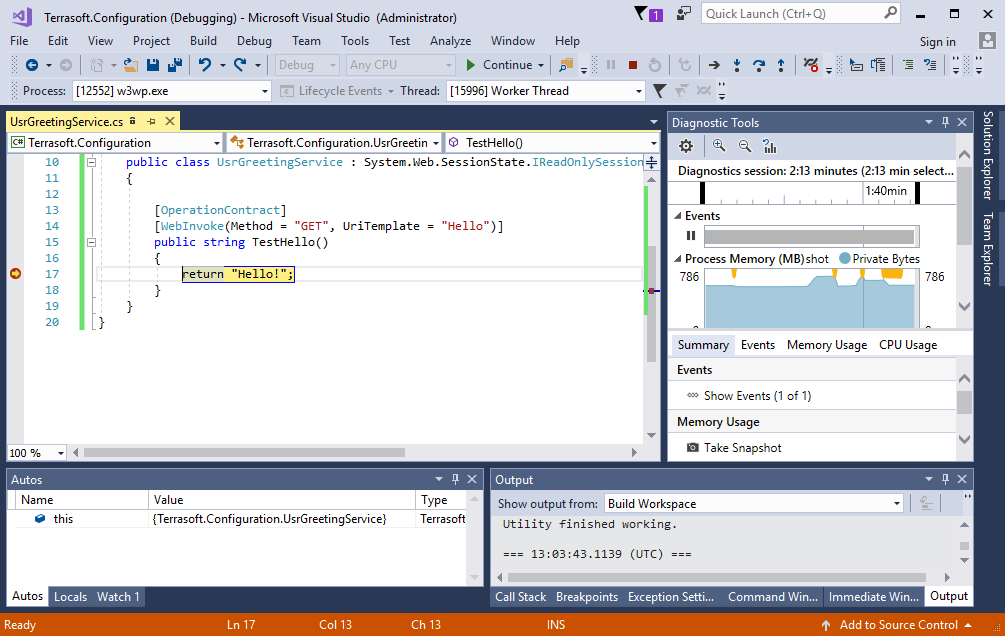
- Go to the Explorer of the Visual Studio solution, enable the display of all file types (1), open the UsrGreetingService.cs (2) file, and add the needed source code (3).
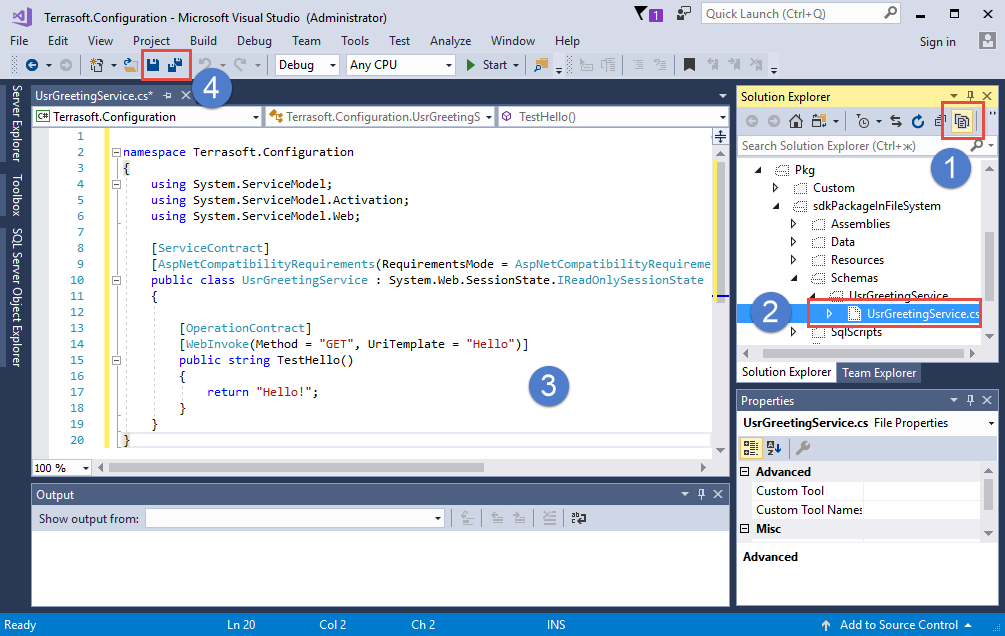
Example of the source code that must be added to the UsrServiceGreeting.cs file contents to implement a custom web service.
5. Save, compile, and debug the source code
- Save the source code (4) after you change it and before you compile and debug it.
Usually, Visual Studio saves code automatically, but since the Visual Studio compiler is not used, you must save the code manually.
- Compile the changed source code by running the Build Workspace or Rebuild Workspace command after saving the code. If the compilation is successful, the web service becomes available.

- Attach the debugger to the process of the IIS service that runs Creatio to start debugging. To do this, execute the Debug → Attach to process menu command. This opens a window.
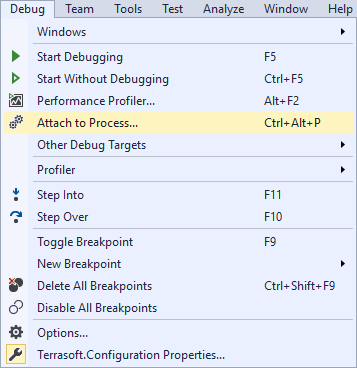
Select the IIS worker process that runs the Creatio application pool from the list of processes.
Recompile the code after attaching the debugger to the IIS worker process.
After that, you can start debugging using Visual Studio means, for example, set breakpoints, view the values of variables, call stack, etc.
For example, after you set the breakpoint on the line that returns from the TestHello() method, recompile Creatio, and execute the service request, the debugger stops the program execution on the breakpoint.
Preliminary setup
We recommend using a local Creatio instance to connect the libraries of Creatio classes, deploy the local database from an archive copy, and use the WorkspaceConsole utility. The examples in this article assume Creatio is installed into the C:\Creatio local directory.
The examples for Creatio in the cloud use the Executor utility in the C:\Executor directory. You can download the utility set up to execute the example via the following link: Download the utility.
Write C# code for Creatio on-site
1. Restore the database from backup (if needed)
Deploy the Creatio database from backup. The archived Creatio database backup is in the C:\Creatio\db directory.
2. Set up the WorkspaceConsole utility
To manage the deployed database, set up the WorkspaceConsole utility using Creatio files:
- Open the C:\Creatio\Terrasoft.WebApp\DesktopBin\WorkspaceConsole directory.
- Execute the PrepareWorkspaceConsole.x64.bat or PrepareWorkspaceConsole.x86.bat batch file depending on the Windows version.
- Specify the database connection parameters in the Terrasoft.Tools.WorkspaceConsole.exe.config file in the C:\Creatio\Terrasoft.WebApp\DesktopBin\WorkspaceConsole directory. For example, if the CreatioDB database is deployed on the dbserver server, the connection string looks as follows:
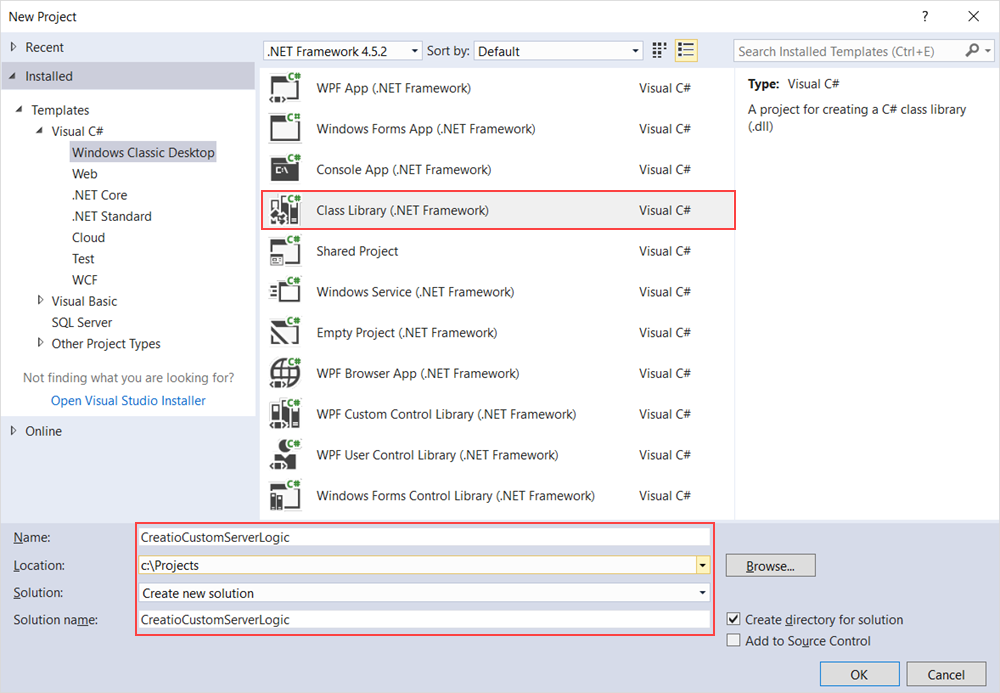
3. Create and set up a Visual Studio project
Create a standard class library project in Visual Studio.
Use the Debug tab of the class library project's properties window to specify the full path to the configured WorkspaceConsole utility in the Start external program property. The WorkspaceConsole utility is used as an external debugger of the developed software logic.
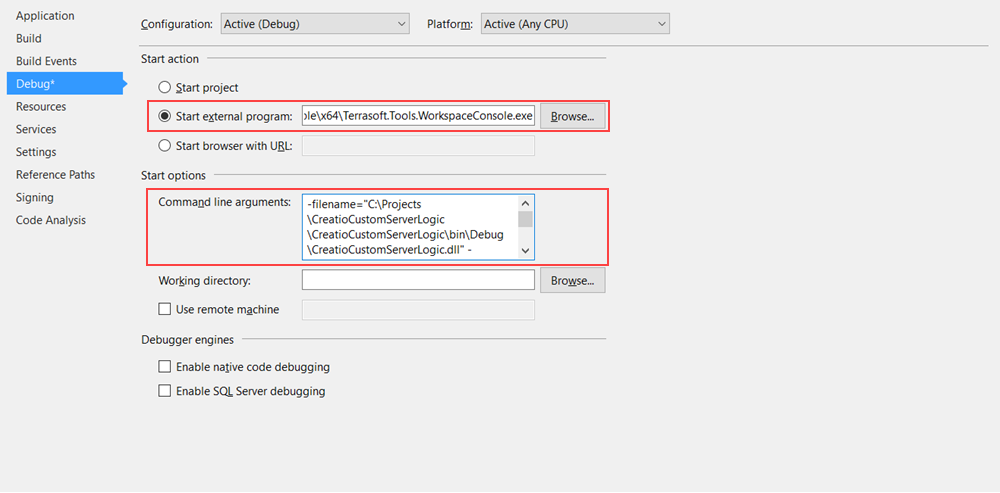
Set the following WorkspaceConsole launch arguments in the Command line arguments property:
- Specify the full path to the debug version of the developed class library in the -filename argument, for example, "C:\Projects\CreatioCustomServerLogic\CreatioCustomServerLogic\bin\Debug\CreatioCustomServerLogic.dll."
- Specify the full name of the class to implement the developed software logic, including the names of every namespace, in the -typeName argument, for example, "CreatioCustomServerLogic.MyContactCreator."
- Specify the WorkspaceConsole operation in the -operation argument, for example, "ExecuteScript."
- Specify the workspace name in the -workspaceName argument, for example, "Default."
- Specify the path to the parent directory of the conf directory in the -confRuntimeParentDirectory argument, for example, "C:\creatio\Terrasoft.WebApp."
To use the Creatio core’s server-side classes, set up dependencies from the appropriate Creatio class libraries in the created project. For example, add a dependency from the Terrasoft.Core.dll library.
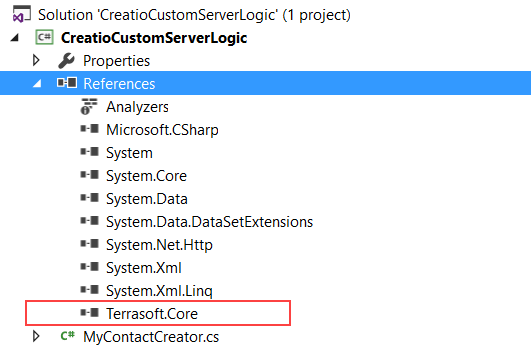
You can find class libraries of the Terrasoft namespace in the Terrasoft.WebApp\DesktopBin\WorkspaceConsole directory of the Creatio distribution.
4. Develop the functionality
Add a class to the created class library project. The full class name must match the name specified in the -typeName argument of the WorkspaceConsole utility’s launch argument string. For example, "CreatioCustomServerLogic.MyContactCreator." The class must implement the Terrasoft.Core.IExecutor interface.
After you run the project (F5 key), the WorkspaceConsole window that contains the corresponding message appears.
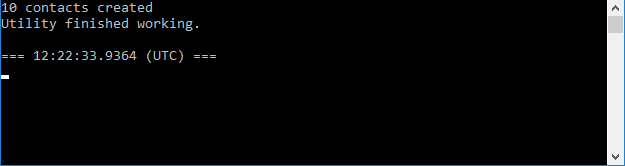
You can also set a breakpoint on any line of code and see what the values of variables are while the program is running (i. e., debug the program).
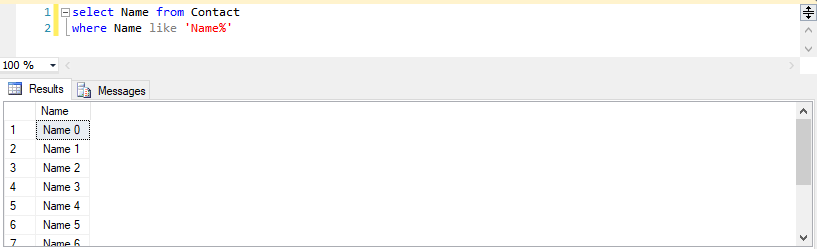
View the execution outcome of the aforementioned code in the Contacts Creatio section or by executing the database request.

Write C# code for Creatio in the cloud
1. Create a class library project
Create a standard class library project in Visual Studio. For example, name the project "CreatioCustomServerLogic.Cloud."
To use the Creatio core’s server-side classes, set up the dependencies from the necessary Creatio class libraries in the created project. For example, add a dependency from the Terrasoft.Core.dll library.
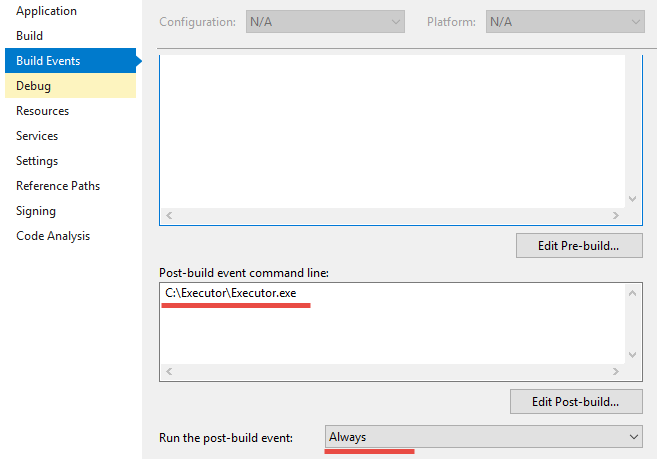
Specify the full path to the configured Executor utility ("C:\Executor\Executor.exe") and select the condition to launch the library build event (Always) in the Post-build event command line property on the BuildEvents tab of the created class library project’s properties window.
2. Develop the functionality
Add the class that implements the Terrasoft.Core.IExecutor interface to the created class library project.
3. Set up the Executor utility
Open the directory that contains the installed Executor utility (C:\Executor). Then, set the values of the following setup elements in the configuration file:
- Specify the URL of the Creatio application loader in the Loader element. Usually, this is the Creatio website URL, for example, "https://mycloudapp.creatio.com."
- Specify the Creatio application URL in the WebApp element. Usually, this is the path to the default Creatio configuration, for example, "https://mycloudapp.creatio.com/0."
- Specify the name of the Creatio user in the Login element, for example, "Supervisor."
- Specify the password of the Creatio user in the Password element.
- Specify the path to the original class library copy in the LibraryOriginalPath element. Usually, this is a path to where the Visual Studio creates a class library after the compilation, for example, "C:\Projects\CreatioCustomServerLogic\CreatioCustomServerLogic.Cloud\bin\Debug\
CreatioCustomServerLogic.Cloud.dll ." - Specify the path to create a class library copy that interacts with the remote server in the LibraryCopyPath element. You can specify any temporary directory or a directory that contains the Executor utility, for example, "C:\Executor\CreatioCustomServerLogic.Cloud.dll."
- Specify the full name of the class to implement the developed software logic, including the names of all namespaces, in the LibraryType element, for example, "CreatioCustomServerLogic.Cloud.MyContactReader."
- Enter the name of the class library in the LibraryName element, for example, "CreatioCustomServerLogic.Cloud.dll."
4. Execute the developed code
To launch the building process, use the Build Solution and Rebuild Solution menu commands.
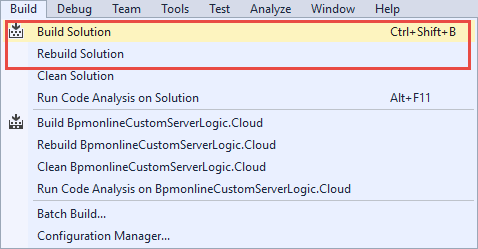
View the execution outcome of the developed code in the Output window of Visual Studio after each successful build of the class library.

To improve the developer experience, Creatio lets you manage the files of client module schemas in an external IDE, for example, WebStorm, Visual Studio Code, Sublime Text, etc. To do this, download the schema source code from the database. Creatio downloads the source code of client module schema as *.js files and client module styles as *.less files. Since database access is required to write client code, this instruction is relevant only for Creatio on-site.
To write the source code of client module schemas in the file system:
- Enable the file system development mode.
- Set up the package in the SVN repository.
- Create a client module schema in Creatio IDE.
- Download the package to the file system.
- Write the source code of the client module schema in an external IDE.
- Debug the source code (optional).
- Disable the file system development mode (optional).
1. Enable the file system development mode
To enable the file system development mode, follow the instruction in a separate article: External IDEs.
2. Set up the package in the SVN repository
To set up the package in the SVN repository, take one of the following steps:
-
Create a package in the SVN repository.
Creatio lets you create a package in the following ways:
- Using SVN. To do this, follow the instruction in a separate article: Create a custom package.
- Without using SVN. To do this, follow the instruction in a separate article: Create a package in the file system development mode.
- Install a package from the SVN repository. To do this, follow the instruction in a separate article: Install an SVN package in the file system development mode.
- Update a package from the SVN repository. To do this, follow the instruction in a separate article: Update and commit changes to the SVN from the file system.
The steps below use the sdkPackageInFileSystem package installed from the SVN repository as an example.
3. Create a client module schema in Creatio IDE
To create a client module schema in Creatio IDE, follow the instruction in a separate article: Client module.
For example, create a schema of the ContactPageV2 replacing view model and schema of the ContactPageV2CSS view model in the sdkPackageInFileSystem package.
4. Download the package to the file system
To download the package that contains the client module schema to the file system, select Download packages to the file system in the File system development mode action group on the toolbar.
/scr_download_to_fs.png)
For example, after you download the sdkPackageInFileSystem to the file system, the ..Terrasoft.WebApp\Terrasoft.Configuration\Pkg\sdkPackageInFileSystem\Schemas subdirectories will contain the ContactPageV2.js (source code of the client module schema) and ContactPageV2CSS.less (client module styles) files.

5. Write the source code of the client module schema in an external IDE
For example, to hide the Full job title field from the contact page:
-
Open the ContactPageV2.js file in an external IDE and add the source code displayed below.
- Save the ContactPageV2.js file.
As a result, Creatio will hide the Full job title field from the contact page.
Note that the changes will be displayed automatically.
6. Debug the source code (optional)
Debug the source code if it was written with errors. To do this, follow the instruction in a separate article: Front-end debugging.
7. Disable the file system development mode (optional)
If you do not need to use the file system for further development, disable the file system development mode.
To disable the file system development mode:
-
Select Update packages from file system in the File system development mode action group on the toolbar.
/scr_updating.png)
- Set the enabled attribute of the fileDesignMode element in the Web.config file in Creatio root directory to false.