If you plan to send emails using the Elastic Email provider in Creatio, verify your email address and the corporate domain.
In this case, your recipients who use MS Outlook, Hotmail, Gmail and other common mailing services, will see that an email was sent from your provider's server on your behalf (this information is available in the “From” field). For example, if you are sending emails via Elastic Email, the “From” field of the emails may contain the following text: “Creatio <info@creatio.com> via elasticemail.com”.
To verify your email addresses and domain, perform the following steps:
-
Add your corporate domain to the Bulk email settings page. Read more >>>
-
Obtain SPF and DKIM records. Read more >>>
-
Add the necessary records to the DNS area of your domain. Read more >>>
Add corporate domain to the Bulk email settings page
To start sending the emails, perform the following settings:
-
Select Email settings in the Email section of the Actions menu (Fig. 1)
Fig. 1 Open the email settings page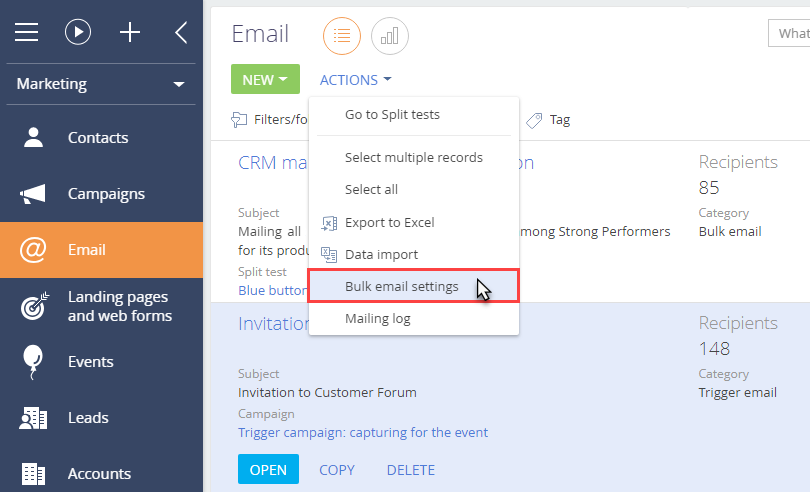
-
On the Email settings page, specify the domain of the necessary email address in the Sender domain area, i.e., “mycompany.com” (Fig. 2).
Fig. 2 Sender domains area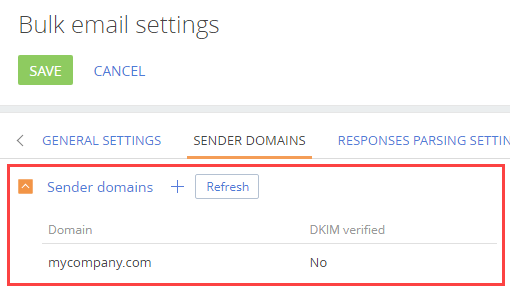
Obtain SPF and DKIM records
SPF and DKIM records are generated automatically in the Email section once the domain is added to the email settings page.
To obtain these records, in the Emails section, select Email settings in the Actions menu.
The SPF and DKIM records will be generated automatically in the DKIM/SPF setup instructions area on the Bulk email settings page (Fig. 3) for your specified domain once your email is verified.
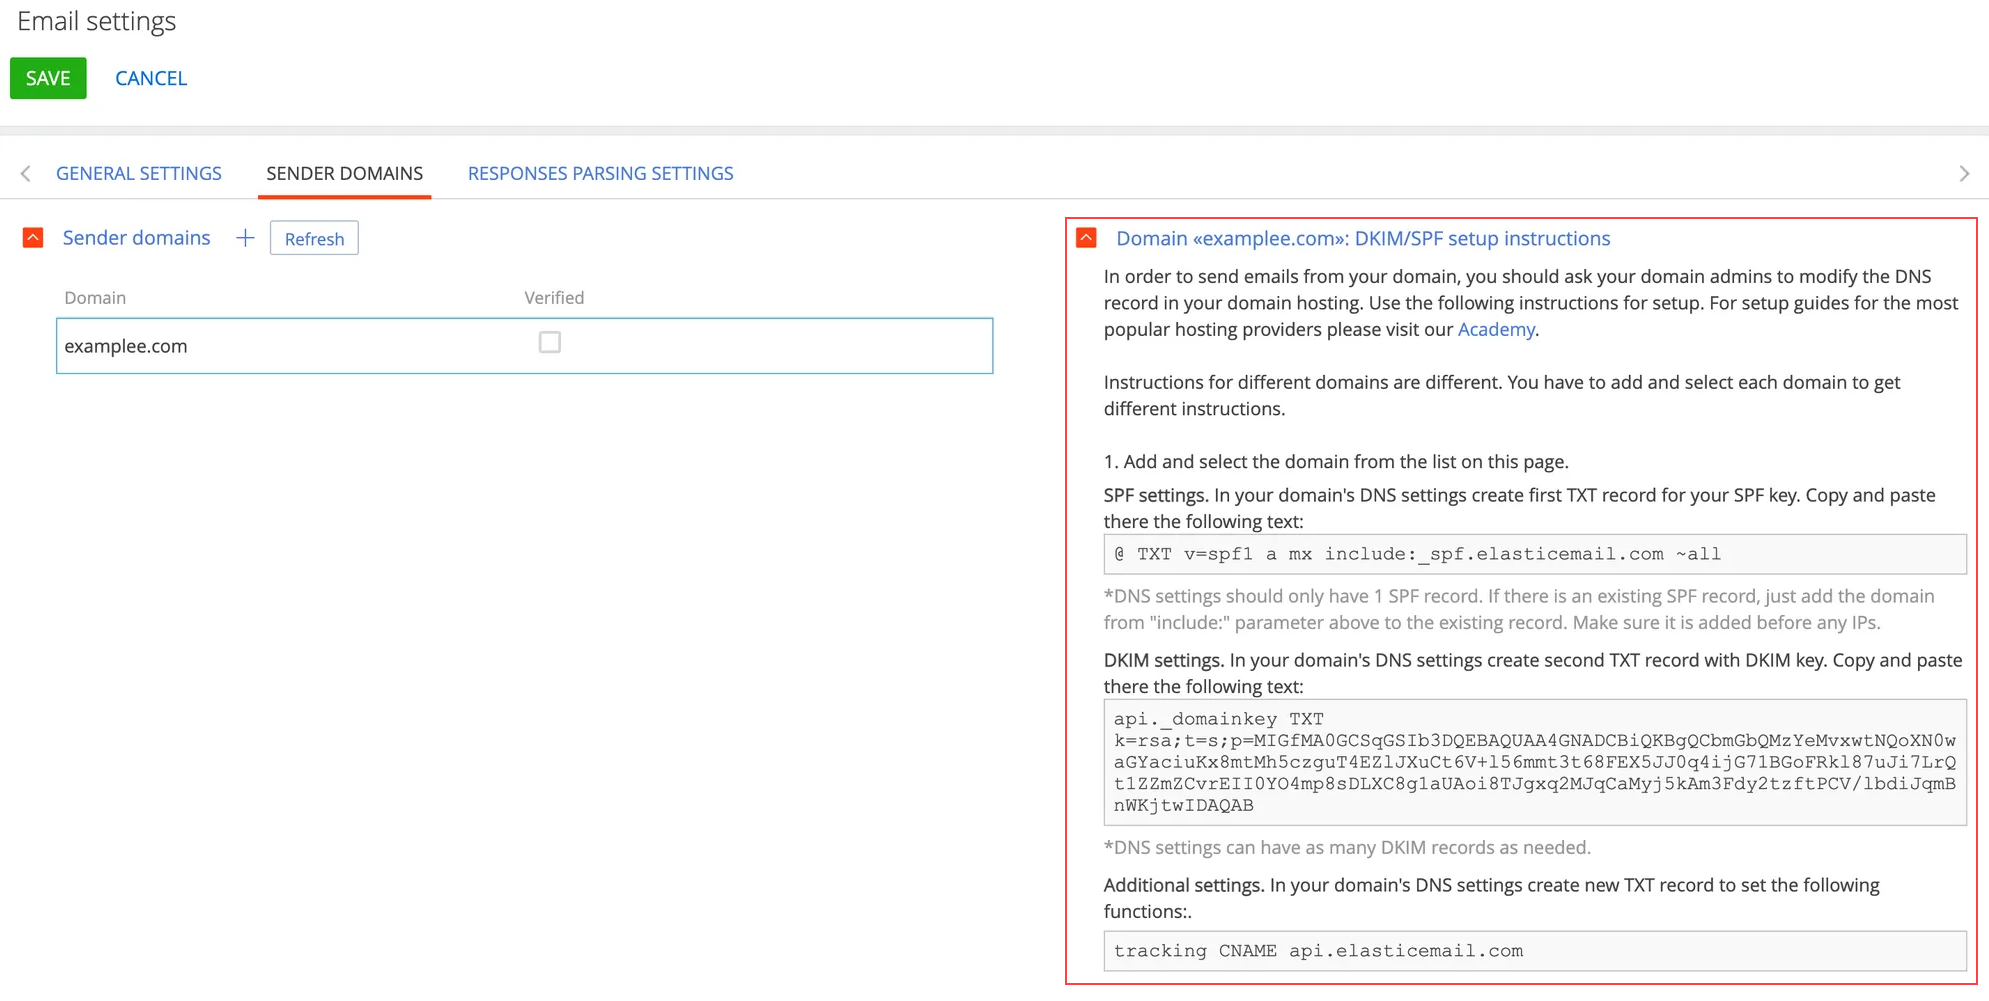
Elastic Email SPF and DKIM records are identical for all domains.
Add the necessary records to the DNS area of your domain
To ensure high level of domain reputation and email deliverability, add the SPF, DKIM, Tracking Domain records and the DMARC policy to the DNS-zone of the email domain settings.
The setup procedure is as follows:
-
If the DNS zone of your domain does not have an SPF record yet, you need to copy the generated SPF record from the DKIM/SPF setup instructions area on the Email settings page. The record will look as follows:
Name
Type
Value
@
TXT
v=spf1 a mx include:_spf.elasticemail.com ~all
-
If you already have a TXT record with SPF information, add the following to the record:
- “a mx” right after v=spf1. If the record already includes these characters, skip this step.
- “include:_spf.elasticemail.com” at the end of the record before its last statement, for example, ?all, ~all, or –all.
-
Specify the DKIM record in the DNS area of your domain. For the Elastic Email provider this record will look as follows:
Name
Type
Value
api._domainkey
TXT
k=rsa;t=s;p=MIGfMA0GCSqGSIb3DQEBAQUAA4GNADCBiQKBg
QCbmGbQMzYeMvxwtNQoXN0waGYaciuKx8mtMh5czguT4EZlJX
uCt6V+l56mmt3t68FEX5JJ0q4ijG71BGoFRkl87uJi7LrQt1ZZmZCvrEII
0YO4mp8sDLXC8g1aUAoi8TJgxq2MJqCaMyj5kAm3Fdy2tzftPCV
/lbdiJqmBnWKjtwIDAQAB -
Specify CNAME (tracking) record in the DNS area of your domain.
To track the clicked link in the received email, Elastic Email overwrites the link address in the email template. When the recipient clicks to the link, the address with the domain "api.elasticemail.com" will be displayed in the browser first, and then the redirect to the link specified in the email will be performed. To specify your domain in the first link (for tracking), create the CNAME-record in the DNS settings of the domain:
Name
Type
Value
tracking
CNAME
api.elasticemail.com
-
Activate DMARC in the DNS area of your domain.
DMARC verification is only added after adding SPF and DKIM records and it provides the receiving server with the information upon further actions with emails from the unverified domain. Add a rule as TXT record of the DNS domain to activate DMARC:
Name
Type
Value
_dmarc
TXT
v=DMARC1;p=none;
The v tag specifies the protocol version, while p specifies the method of processing emails that have not been verified.
Learn more about the protocol in Wikipedia: DMARC. Learn more about setting up the SPF and DKIM records, DMARC policy, and the tracking domain in the official Elastic Email documentation: How to verify your domain.