Use the Chat settings section of the System Designer to set up Creatio chat and messenger integration. Chat setup is performed by the system administrator or by a user with the “Access to "Setup chats" section” (CanManageChats) operation permission.
Add a chat queue
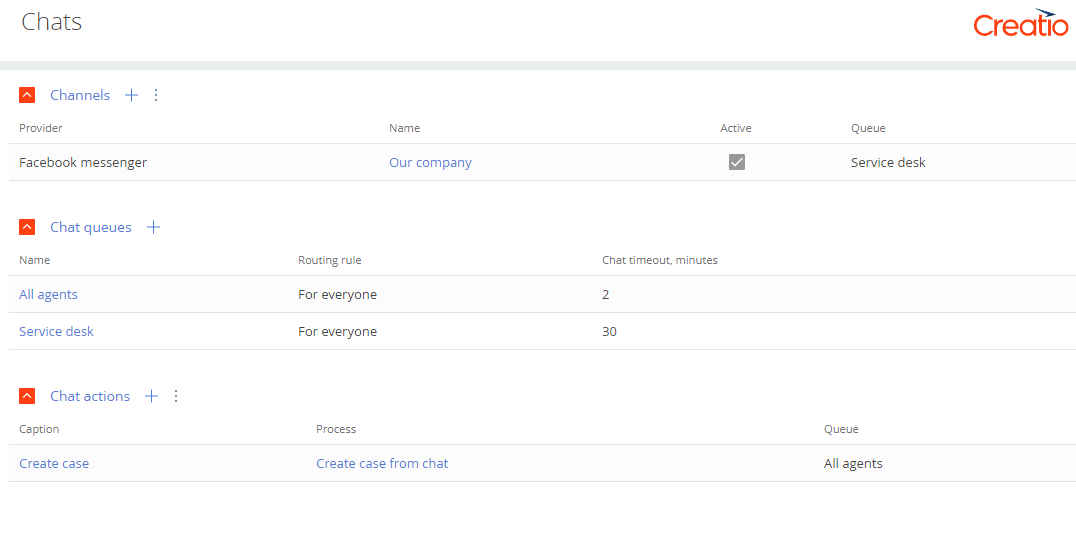
To process chat messages, you need to set up chat queues. A chat queue determines the team of agents that will be processing the chat. The number of queues does not depend on the number of channels. For example, to process messages coming from the brand page, set up a “Support service” chat queue, while to process online shop requests - create a “Sales assistants” chat queue. Use the Chat settings section of the System Designer to create queues for chat agents. To add a chat queue:
- Open the System Designer by clicking
 .
. - Click Chat settings.
- In the Chat queues area, click
 .
. - Populate the parameters of the new queue in the window that opens.
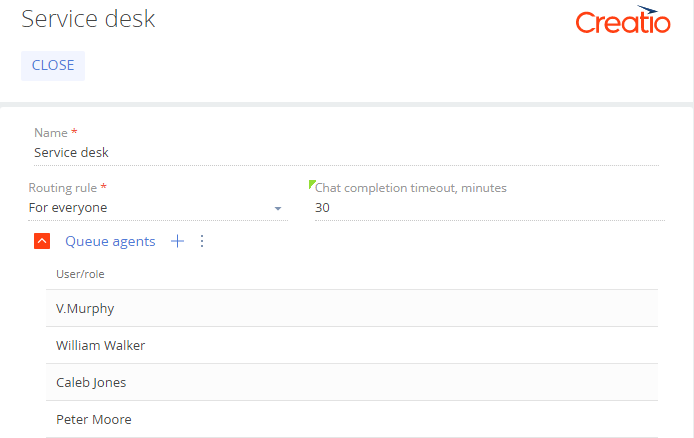
- Name – provide a name that would imply the queue purpose and the target role. For example, “1st-line support”.
- Routing rule – determines the agent who will be processing the chat.
- “To all agents” – the new chat will be available for all agents of the current queue.
- “To an available agent” –automatically assign the chat to the available agent for processing. The available agent is the one with the least number of chats in progress. If several agents have the same number of chats in progress, the new chat will be assigned to the agent who has not taken any chats longer than others. If an agent does not take the chat within 5 minutes, the chat will be assigned to the next agent. The current agent will become “inactive”. You can change this time using the “Omni chat operator accept chat timeout” (OmniChatOperatorAcceptChatTimeout) system setting. To continue processing the chat, the agent must change their status for the “Active” in the communication panel.
- Chat completion timeout, minutes – the maximum waiting time from the moment of the last outgoing chat message to closing the chat automatically. When the specified time expires, the chat will close automatically. When the chat closes due to timeout, the subsequent messages will be processed as new chats and will be redistributed to the active operators. If you do not specify any value in the field, the chat will not close.
- On the Queue agents detail, click
 . Specify the users and roles that will be processing chat messages. For example, you can use the “Call center managers” organizational role. You can add several users or roles to the list of agents. Similarly, the same user can be added as an agent to several chat queues.
Add a chat channel
A chat channel displays message feed from specific sources. For example, a channel can display messages posted on a specific public Facebook page. The following chat integrations are available as channel sources in Creatio:
- Facebook Messenger
- Telegram (available for version 7.17.1 and up)
The channels with at least one integrated chat cannot be deleted. If the channel is no longer valid, deactivate the channel.
Add Facebook Messenger channel
- Open the System Designer by clicking.
- Click Chat settings.
- In the Channels area, click. In the menu that appears, select “Facebook messenger”. Facebook login window opens.
- In the opened Facebook window:
- Log in to Facebook.
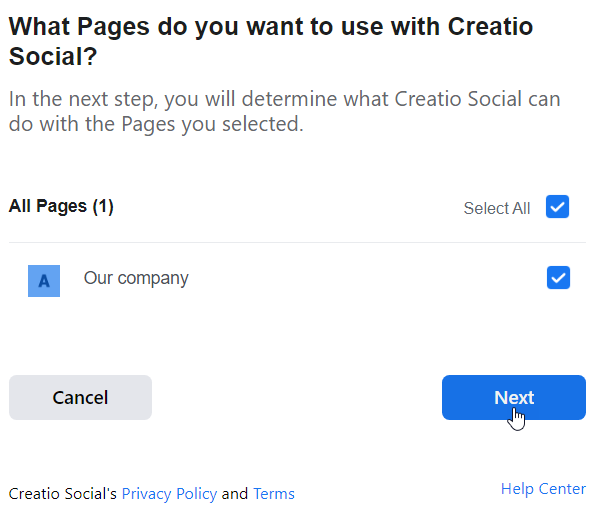
- Select the checkboxes for the pages that you want to synchronize with Creatio. Note that you can only set up synchronization for public pages and not for personal profiles.
- Click Next.
Select a public Facebook page to synchronize with Creatio
- Permit Creatio to manage your public page. This will allow the application to send and receive messages on behalf of your brand using the Facebook Messenger channel. If you restrict Creatio from managing the page, the chat functionality may not work properly.
- Click Done.
As a result, a separate channel will be created for each of the selected pages. The channel name will match the name of the corresponding Facebook page.Set up access to managing the page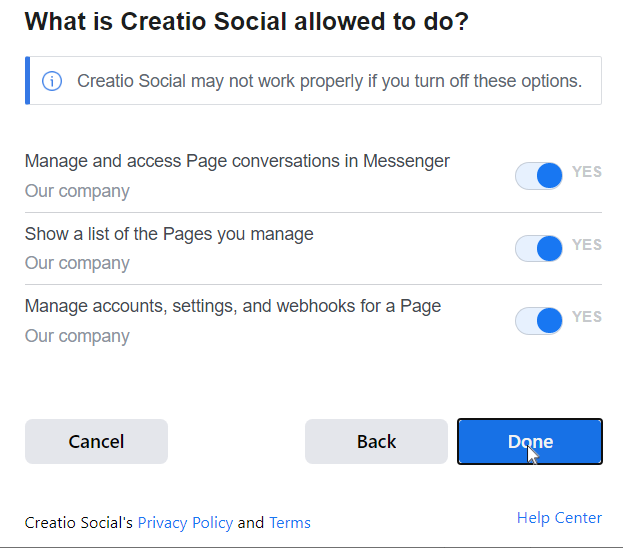
- To process the messages from the created channel in the communication panel, activate the channel, and link it to the queue.
- In the Channels detail list, click the created channel name.
- On the mini page that opens:
- Set the switch to “Active.”
- Select the chat queue to process the messages that come via this channel.
- Click Apply.
- Repeat step 5 for all created channels if needed.
Add a Telegram channel
- Open the System Designer by clicking.
- Click System settings.
- In the “Website URL” (SiteUrl) system setting, specify the URL of your Creatio application that will be synchronized with Telegram. To specify the URL, use the following format: https://yoursite.domain.com/0.
- Go back to the System Designer by clicking.
- Click Chat settings.
- In the Channels area, click. In the menu that appears, select “Telegram.” A mini page with channel parameters opens.
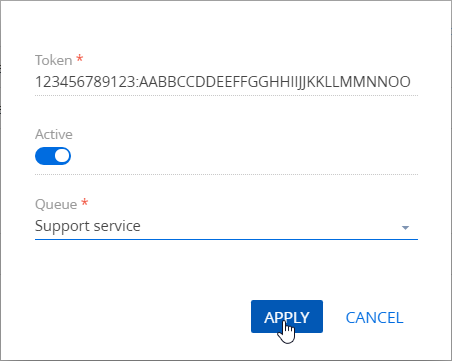
- Populate the channel parameters:
- Specify the token for your chatbot. The token is generated on the Telegram side.
- Set the switcher to the “Active” position to enable processing chat messages in the communication panel.
- Select the chat queue to process the messages that come via this channel.
- Click Apply.
Example of setting up a Telegram channel
Set up the chat actions
Chat actions simplify and automate the processing of messages. A pre-configured “Create case” action (available for the Service Creatio products) triggers the “Create case from chat” (CreateCaseFromChat) business process. You can set up a list of actions that will be available for the agent when processing the chat, e.g., “Create order”, “Notify a manager about invoice payment” or “Notify system administrator.” To implement this, create a corresponding process to run when working in the chat. Learn more about creating and setting up processes in the Business process setup (BPMN) block of articles. When the process is ready, add a corresponding chat action:
- Open the System Designer by clicking.
- Click Chat settings.
- In the Chat actions area, click.
- On the “Chat action” mini page, specify:
- Caption – the action title that will display for the agent when working with the chat.
- Chat queue – select the chat queue. The agents of the selected queue will have access to this action.
- Process – select the process that will be triggered by the action.
- Click Apply.
Set up a chat action

Set up third-party chatbot integration
Creatio allows you to integrate third-party chatbots that will process common user requests, reducing the load on the agents. This option is only available for Facebook Messenger chats. The chatbot setup and Facebook integration procedure depend on the bot platform. These instructions are usually available in the bot platform's vendor documentation.
This functionality requires:
- A Facebook Page.
- A working Creatio Facebook Messenger channel.
- A third-party bot platform that supports the Handover Protocol and is integrated with your Facebook Page.
To integrate Creatio with the chatbot:
- Go to the “Settings” section of your Facebook page → “Advanced Messaging.”
- Configure the “Messenger receiver” parameters in the “Connected Apps” block:
- Primary Receiver for Handover Protocol – your bot platform
- Secondary Receiver for Handover Protocol – Creatio Social application
Fig. 3 Configuring the Messenger receiver
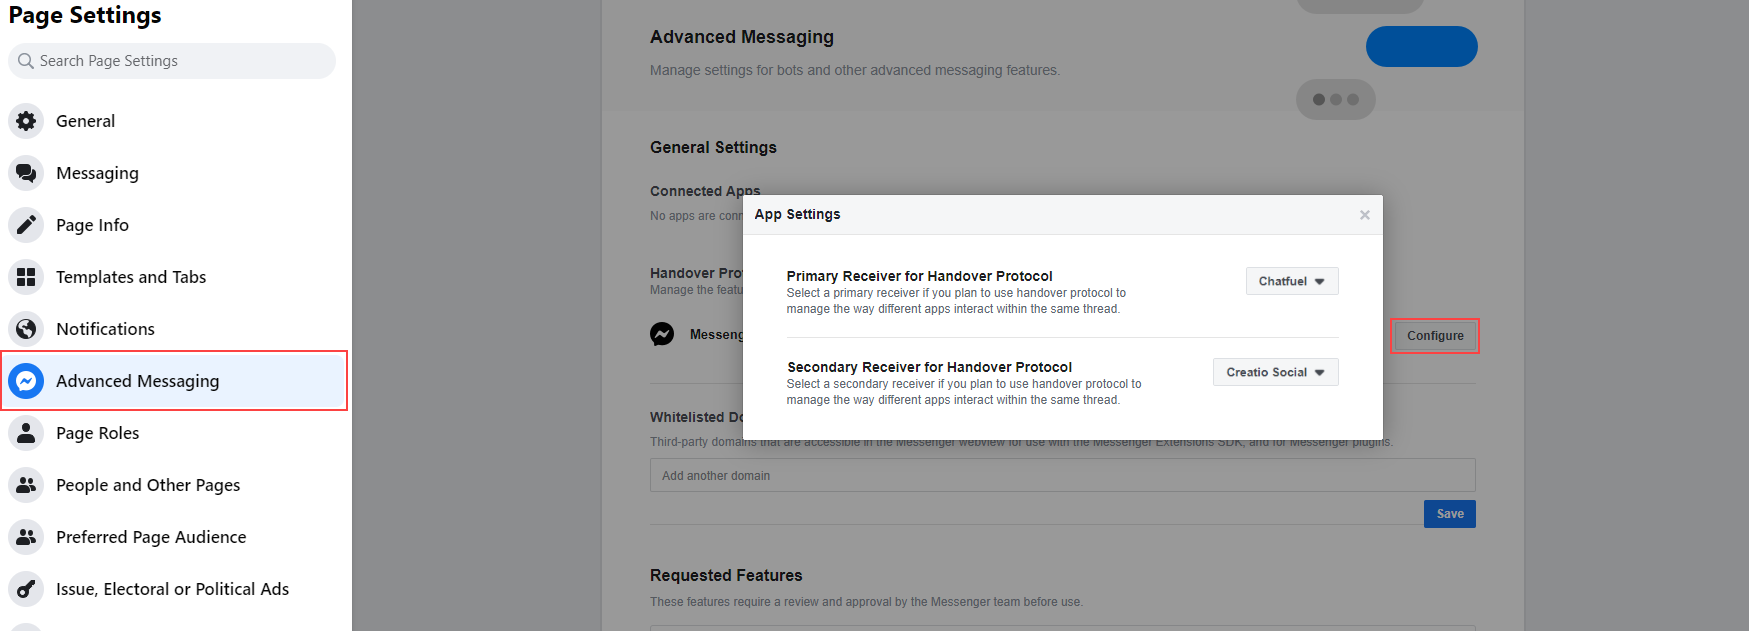
As a result, the chatbot will process messages sent to your Facebook Page. Creatio will display them in the Chats section. The Agent field will be left empty for bot-processed chats.
Additional chat settings
Restrict the number of active chats in the communication panel
You can set up restrictions for the number of active chats that agents can process at a time. By default, the number of chats is restricted by 2. To change the active chat settings:
- Open the System Designer by clicking.
- Click System settings.
- Open the “Simultaneous Chats” (SimultaneousChats) system setting.
- In the Default value field, specify the number of chats that the agent can process at a time. For example, 5. If an agent has a maximum number of chats in progress, they will not see any new chats until they terminate at least one of their chats. This restriction is valid for all chat channels available to the operator.
- Click Save.
Change the chat notification alert
You can change the standard notification alerts about new chat messages to make them easily recognizable by the agents. To do so:
- Open the System Designer by clicking.
- Click System settings.
- Open the “Omni chat notification sound” (OmniChatNotificationSound) system setting.
- Click Clear value to delete the standard alert.
- Select a local audio file.
- Click Save.