Depending on the web service specifics, you may need to authenticate the service before it becomes available. Creatio supports two authentication types for web service integrations:
-
OAuth 2.0 Authorization — a secure authentication option supported by most popular service providers, including Facebook, Google, and Amazon.
-
Basic HTTP authentication — an authentication option that passes a login and a password during the web service request. The HTTP authentication compares this data with the login details passed from Creatio during the web service integration setup. This authentication method is simpler to implement, but less secure.
Set up the basic authentication
To enable the HTTP authentication:
-
Retrieve the login credentials for the basic authentication. The way to retrieve the credentials depends on the web service.
-
Open the System settings section and add the following settings:
-
A “Text” type system setting that stores the web service login.
-
An “Encrypted string” type system setting that stores the web service password.
Creatio binds the system settings used during the authentication to the package that contains the web service integration settings.
-
-
Set the system setting values to the web service authentication login and password.
-
Open the web service page and go to the Authentication tab.
-
Select “Basic” in the Authentication dropdown.
-
Select the system settings that contain the web service login and password in the Username and Password fields (Fig. 1).
Fig. 1 The Authentication tab on the web service page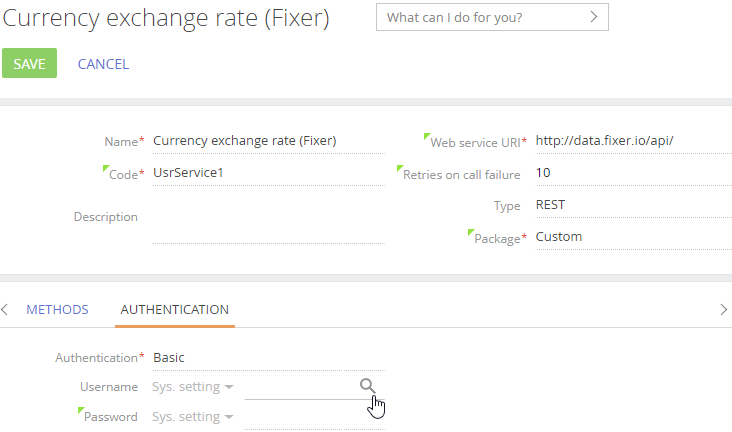
- Click Save.
Set up the OAuth authentication
Set up the integration with an existing OAuth 2.0 application
If you have already set up the OAuth application (e. g., when installing a package with the web service integration settings), follow these steps to set up the OAuth authentication:
-
Go to the Studio workplace and open the Web services section. Open the web service page and go to the Authentication tab.
-
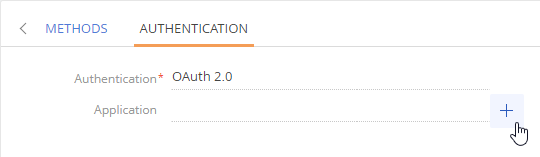
Select “OAuth 2.0” in the Authentication dropdown.
-
Select an existing OAuth application in the Application dropdown (Fig. 2).
Fig. 2 Selecting an existing OAuth application
- Click Save.
Set up a new OAuth 2.0 application
To set up a new OAuth application with OAuth 2.0 authentication method:
-
Go to the Studio workplace and open the Web services section. Open the web service page and go to the Authentication tab.
-
Select “OAuth 2.0” in the Authentication dropdown.
-
Click + in the Application field (Fig. 3).
Fill out the OAuth application setup page (Fig. 4). You can usually find the needed settings in the web service documentation or retrieve the settings via the service API. For instance, the data to access the Google API is available in the Credentials section of the Google developer console, as well as in the API documentation.
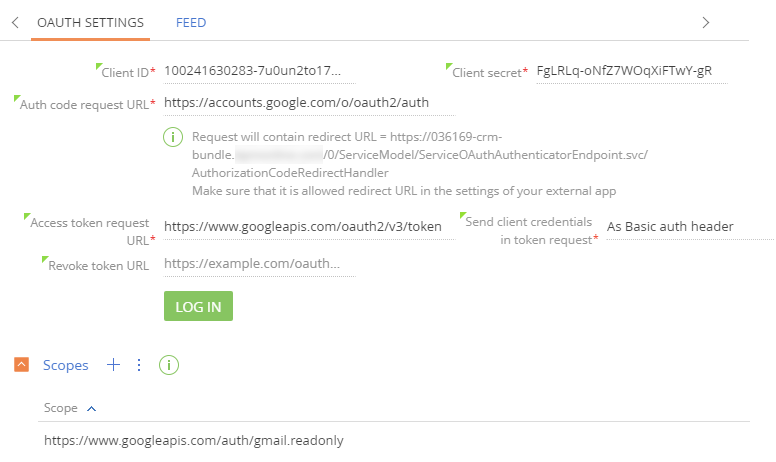
See the general recommendations on filling out the OAuth setup parameters, as well as the tips on how to retrieve the correct parameter values, below.
-
Name — specify the name of the new application. Creatio will display the name on the Authentication tab in the Application field. You can also select an image that will serve as this application's icon.
-
Client ID — specify the client identifier issued by the integrated web service's authorization server. The web service documentation and API may also refer to the identifier as:
- Application ID
- Consumer ID
- Public key
-
Client secret — specify the secret key provided by the authorization server. The web service documentation and API may also refer to the secret key as:
- Application secret
- Consumer secret
- Secret key
- Auth code request URL — specify the URL that will serve as an endpoint to request access from the user who can grant it. For example, when Google informs you that an application attempts to gain access to certain data, you act as the “user who can grant access”.
This is the auth_url parameter of the request. Read more in the IETF Tools documentation. For instance, the auth code request URL for the Google API is “https://accounts.google.com/o/oauth2/auth”. You can find this URL in Google's OAuth application integration example. The URL is also available in the JSON settings file you can download from the “Credentials” section of the Google developer console.
- Access token request URL — specify the URL that will serve as an access token request endpoint during the web service call. Read more in the IETF Tools documentation. For example, the access token request URL for the Google API is “https://www.googleapis.com/oauth2/v3/token”. You can find this URL in Google's OAuth application integration example. The URL is also available in the JSON settings file you can download from the “Credentials” section of the Google developer console.
- Redirect URL — specify the URL where the authentication server will redirect the users after successful authentication. Creatio displays this redirect URL on the OAuth authentication setup page (Fig. 5).
Fig. 5 The redirect URL on the Creatio OAuth authentication setup page
Make sure that you specify the correct redirect URL in the integrated service settings.
- Send client credentials in token requests — specify the part of the token request that will contain the access token. The authorization allows for several ways to pass the token. You can select from several options in the Send client credentials in token requests dropdown. The option you need to select depends on the third-party system specifics and is usually covered in the system documentation.
-
“In request body”. Many popular services, e. g., Google, Linkedin, JIRA, etc., process requests with the access token in the request body. For instance:
-
“As Basic auth header”. Some services, e. g,. Docusign, GoToWebinar, require the client id and the client secret key to be passed as headers and will not accept them in the request body. Read more in the IETF documentation. For instance:
-
“In query string as a GET request”. Some services handle authentication differently. For example, Facebook uses a token GET request with all parameters specified in the request URL instead of a POST request with parameters in the body and headers. For instance:
-
- Revoke token URL — specify the URL that will serve as an access token revoke endpoint if the web service denies the respective calls. The field is not required. In a regular scenario, a user with access to the integrated web service can revoke access to specific OAuth applications. For example, you can disable access to specific applications from your Google account settings. The token revoke request URL for the Google API is “https://accounts.google.com/o/oauth2/revoke”. You can retrieve this URL from the Google API documentation.
- Log in — click this button to log in to the web service with the shared user's credentials and allow Creatio to access the third-party application.
- Scopes — grant the application different data access levels on behalf of the end user. The Scope URLs are usually available in the web service documentation. Each API may declare one or more scopes. For instance, the Google API scopes, such as “https://www.googleapis.com/auth/gmail.readonly” (permission to view the email messages and settings), are available in the API documentation.
Since different services use different terminology and have different API and documentation structure, the authentication setup procedure may vary. Find the common OAuth setup issues and the ways to solve them below.
Common OAuth application setup issues
This is a list of common issues you may encounter when integrating the web services with OAuth 2.0 authentication.
The specified connection settings are invalid or out-of-date
The connection settings are different from those in the integrated application. The error may appear for the Client ID, Client secret, as well as the Auth code request URL, Access token request URL, and Access token revoke URL values.
The error may occur in the following cases:
-
Adding a user to the OAuth application page.
-
Calling the web service.
Make sure that you filled out all the fields on the OAuth application setup page and the values you specified are the same as the corresponding settings in the third-party application. After that, try adding a new user again.
There is an incorrect redirect URL in the external application
You have to set up the OAuth authentication both on Creatio's end and on the external application's end. Due to security requirements, a special URL has to redirect the user after the authentication server issues the access token. The redirect URL's domain often requires a separate verification.
The error may occur when adding a user to the OAuth application page.
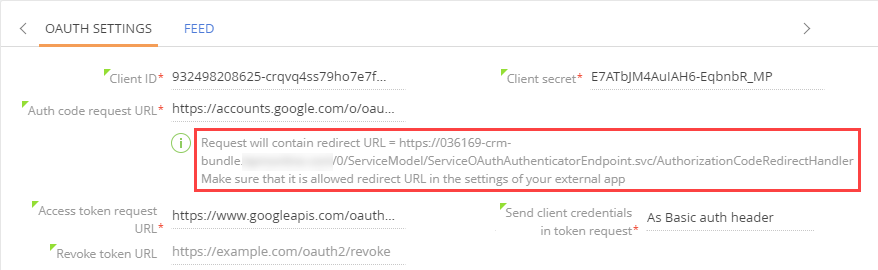
Creatio displays the correct redirect URL on the OAuth application setup page (Fig. 6).
Copy this URL to the corresponding external application settings (Fig. 7).
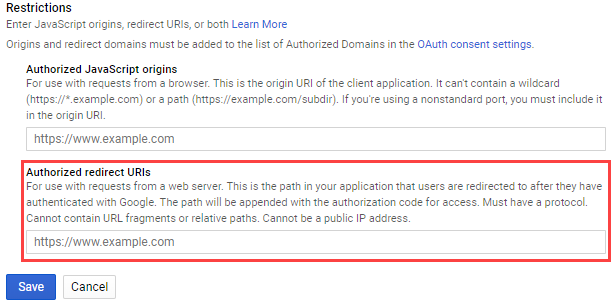
If the link in the external service does not match the link on the OAuth application setup page in Creatio, it will be impossible to receive the access token.
As such, copy the correct redirect URL from the OAuth application setup page in Creatio to the corresponding field in the external application settings to resolve this issue.
Insufficient scopes to perform an operation
In OAuth 2.0, access tokens are often issued with limited scopes to the external application's call functions. For example, an application may require separate scopes to read and modify data. In this case, you need to specify the list of the relevant scopes in Creatio, in the external application, or upon user login.
Add the scopes to the Scopes detail of the OAuth application setup page in Creatio. Creatio will request these scopes when a user authenticates with OAuth. If you do not add the relevant scope to the Scopes detail, the user will most likely be unable to log in.
The error may occur during various web service calls. For example, you need to modify the web service data yet you lack the corresponding scope. In this case, the third-party application will return a modification access error.
To resolve this issue, follow these steps:
-
Add the relevant scope to the detail.
-
Delete the web service user from Creatio to revoke the previously issued access token.
-
Revoke the access to the Creatio application in the web service settings. For instance, you can revoke access to specific applications from your Google account settings.
-
Add the user once again.
Scopes in Creatio do not correspond to the scopes in the web service settings
Sometimes you have to specify the scopes in the integrated application. For example, you can specify the extent of scopes while setting up the application in the integrated web service. In this case, the scopes in Creatio must correspond to the scopes specified in the integrated web service's application settings.
If the scopes specified in Creatio exceed the scopes in the integrated service, several errors may occur depending on the architecture of the integrated application.
-
The user may be unable to log in.
-
The external application may return an error when calling the web service to modify its data.
If a user is unable to log in, follow these steps:
-
Add the relevant scope to the external application.
-
Attempt to log in again.
If the external application returns an error when calling the web service to modify its data, follow these steps:
-
Add the relevant scope to the external application.
-
Delete the web service user from Creatio to revoke the previously issued access token.
-
Revoke the access to the Creatio application in the web service settings. For instance, you can revoke access to specific applications from your Google account settings.
-
Add the user once again.
The application denies the scopes Creatio requests upon login
The application may deny the scopes upon login even if you properly specify them in Creatio. The web service user can modify the list of issued scopes upon login in some applications, e.g., Facebook.
For example, the application is allowed to read and modify data by default. If the user unchecks the data modification permission checkbox after the login, the application will only issue a data reading token when Creatio asks for permissions to read and modify data.
The external application may return an error when calling the web service to modify its data.
To resolve this issue, follow these steps:
-
Delete the web service user from Creatio to revoke the previously issued access token.
-
Revoke the access to the Creatio application for the integrated service. For instance, you can disable access to specific applications from your Google account settings.
-
Add the user to Creatio once more and select all the needed scopes upon login.
The Use authentication box is not checked in the web service method or the authentication option is selected incorrectly
This is more of a web service integration setup process issue than something specific to OAuth authentication In this case, the web service will return the 403 Forbidden error.
The error occurs when calling the web service since Creatio attempts to connect without passing an access token.
To resolve this issue, specify the correct authentication method in the Authentication tab of the web service setup page. Alternatively, check the Use authentication box in the web service methods
There are other access restrictions in the web service settings
Some services have IP or domain-based login restrictions. For example, Facebook has domain-based restrictions.
The error occurs when adding a user to the OAuth application page.
To resolve this issue, add and set up your Creatio application IP and/or domain on the web service's end.
The application is awaiting the client ID and client secret in another part of the request
When requesting or updating tokens, Creatio includes the client id and client secret in the request body by default. For instance:
Most services, e.g., Google, Linkedin, JIRA, etc., will process such requests.
However, some services will not accept the client id and client secret in the request body. OAuth protocol allows for several other options.
For example, Docusign, GoToWebinar pass the client id and client secret using HTTP authentication.
This method is covered in the RFC (the Internet technical specifications and standards documentation) format as an alternative to the approach Creatio utilizes.
The error occurs when the user attempts to log in to the application. The login fails. Currently, there are no other ways to send the client id and client secret in Creatio.
Refresh token is missing on login
A refresh token is required to automatically update the access token. With the refresh token, the integration is going to work without the need to confirm access so long as the access token stays up-to-date. The refresh token is not always required. Depending on the architecture of the external application, this may or may not be an integration error.
There are three common cases where a refresh token is not used:
- The application token does not expire. The external application issues an access token that does not need to be updated because the token does not expire. This is a rare case. The integration may function for long periods despite the warning message.
To resolve this issue, study the web service documentation. Make sure that the application does not issue refresh tokens and the access tokens do not expire. In this case, you may disregard the access token update warning and continue working with the web service. - The application does not support access token updates. The external application issues an access token that will eventually expire. However, you cannot update this token because the security requirements limit the application settings. This is often the case with billing applications designed only for short-term user access.
Such applications will not work with shared users, as shared access is a means to avoid having to log in to the web service as each Creatio user separately.
To resolve this issue, study the web service documentation. Make sure that the application does not issue refresh tokens and the access tokens do expire. - You need to enable the access token updates in the application settings. The external application issues an access token that will eventually expire. The token cannot be updated because you have not yet set up the token updates in the application. For example, you may need to set up a separate scope to request the refresh token in the application.
To resolve this issue, follow these steps:- Study the web service documentation. Make sure that the application issues refresh tokens.
- Find out which application settings grant refresh token scopes and fill out these settings.
- Revoke the current access token.
- Add a shared user to Creatio.
- The application issues a refresh token once for each user. External applications may only issue a refresh token once. If a user receives a refresh token and logs in, they will be unable to receive it the second time.
To resolve this issue, study the web service documentation. Make sure that the application issues refresh tokens. Find out how to revoke access to the web service. The web services usually have a form or a UI element that manages third-party access. Delete the application token you need to add to Creatio. For example, remove the Creatio integration.
After this, the integrated application will issue the refresh token when you add the access token to Creatio.
-
The external application invalidated the refresh token that is still stored in Creatio. This may occur if the administrator logs in to both Creatio and the integrated application and then deletes the access token from the web service token management page. As a result, Creatio will store the outdated access and refresh tokens.
The error occurs when calling the web service from Creatio.
To resolve this issue, follow these steps:-
Delete the user from the OAuth application setup page in Creatio.
-
Add the user again.
-