Integrate custom SOAP services with low-code tools. Creatio will generate and send a request to the web service, receive the response and extract the relevant data. Use the data received from the web service to create or update Creatio records, as well as to set up custom business logic or automation.
Although the general integration setup procedure is the same for all SOAP services, the details largely depend on the web service specifics.
To set up an integration with a new web service:
- Add the web service and configure its properties and methods.
- Set up the web service authentication (optional step). The authentication setup is similar for both REST and SOAP services.
- Test the integration.
You can start using the integration in custom business processes after that. Learn more about setting up these processes in the Update currency exchange rates with web service integration article.
Creatio lets you import WSDL files or set up the integration manually.
Set up the web service properties and methods automatically
- Go to the Studio workplace and open the Web services section.
- Click New web service → SOAP service.
- Click Select WSDL file or specify the URL of the WSDL file with the web service description in the “SOAP web service quick setup” window.
- Select the SOAP service and version in the “SOAP service setup” window. Also specify the methods and method request parameters you need to call. Click Next.
- Specify the method response parameters you need to receive in the “SOAP service setup” window. Click Save. (Fig. 1).
Fig. 1 — Setting up the web service automatically
This will complete the web service setup. Creatio will populate the properties and methods on the service page automatically. Proceed to testing the SOAP service integration.
The alternative way to set up the web service properties and methods is specified below.
Set up the web service properties and methods manually
- Go to the Studio workplace and open the Web services section.
- Click New web service → SOAP service.
- Click Skip quick setup in the “SOAP web service quick setup” window.
- Study the web service documentation. The following code is used in this example.
- Fill out the fields on the web service properties page (Fig. 2).
Field Comment Example Name Enter the name that will be displayed in the Which method to call? field for the Call web service business process elements. Phone number information service Code Used to interact with this web service in Creatio source code. In this case, it consists of the method name and the “Usr” prefix. UsrPhone VerifyService Namespaces Only specify the namespaces used for methods and method parameters. Add the namespace set in the format of “Namespace prefix”:”Namespace,” separated by a semicolon “;” or a line break. If there is only a single namespace, the prefix is optional. Creatio will apply this namespace to the entire request. http://ws.cdyne.com/ PhoneVerify/ query Web service URI The complete web service call address will consist of this URI and the settings specified on the method setup page.
Use the same protocol (HTTP/HTTPS) as your Creatio application.
If the web service is located in an unmodifiable package, you can still edit its URI.http://ws.cdyne.com/ phoneverify/ phoneverify.asmx? WSDL Retries on call failure If the web service response returns an error code or times out, Creatio will repeat the request the specified number of times. Keep in mind the response timeout you are going to specify for web service methods when filling out this field. By default, “0” Package The package where Creatio will save this web service integration. The dropdown displays the packages the current user can modify. SoapWeb ServicePackage Fig. 2 Filling out the web service properties page
Set up method calling
Set up method calling for each web service integration. You can set up several methods per web service.
- Click
 to add methods to the Methods tab of the web service integration setup page.
 - Study the web service documentation. The following code is used in this example.
- Fill out the method properties (Fig. 3).
Field Comment Example Name Enter the name that will be displayed in the Which method to call? field of the Call web service business process element properties. Validate the phone number Code Used to interact with this web service in Creatio source code. In this case, it consists of the method name and the “Usr” prefix. UsrCheck PhoneNumber Message element code The name of the root XML node inside <soap:Body>. It often is the same as the operation name in WSDL. For example, the value is “MessageElementName” in this request body: CheckPhoneNumber SOAP Action Use the value specified in the web service documentation.
For instance, the “PhoneVerify” web service has a “CheckPhoneNumber” endpoint that returns the information about the phone number.http://ws.cdyne.com/ PhoneVerify/ query/ CheckPhoneNumber Response timeout, ms The time frame before Creatio considers a web service request timed out. If the service returns no response or responds with an error message, Creatio will retry the request after this time frame so long as there are retries available for this service call. By default, “5,000” Use authentication Use the authentication to access the web service. To enable the authentication, set it up on the Authentication detail of the web service integration setup page. Learn more: Web service authentication. By default, “false” Fig. 3 Web service method properties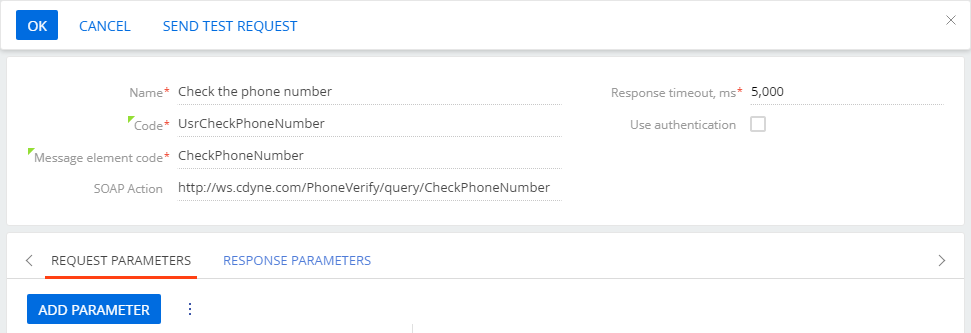
Set up the request parameters
Creatio uses the method request parameters to generate the endpoint URL for calling the web service.
The number and type of request parameters depend on the web service specifics. Add the parameters depending on the method.
The following request parameter types are available:
| Body parameter | Creatio uses this parameter type to send data of any type (including collections) in the request body. Learn more about the POST request method in Wikipedia. |
|---|---|
| Header parameter | Creatio uses this parameter type to generate request headers. Learn more about HTTP headers in Wikipedia. |
| Cookies parameter | Creatio uses this parameter type to pass cookie files in the requests. For example, you can pass a previously-received authentication cookie. Learn more about cookies in Wikipedia. |
To set up the request parameters:
- Study the web service documentation. The following code is used in this example.
- Add the request parameters:
- Click Add parameter on the Request parameters tab.
- Add the “Phone number” parameter and fill out its properties (Fig. 4).
Field Comment Example Name The service parameter name. Phone number Parameter type The service parameter type. Body parameter Path to element If the parameter uses a namespace, specify it in the format of “Namespace prefix”:”Path to the parameter.” PhoneNumber Code in Creatio Used to interact with this web service in Creatio source code. In this case, it consists of the method name and the “Usr” prefix. Usr PhoneNumber Data type The service parameter data type A parameter with nested elements must have an “Object” data type. Text Is array An array parameter value cannot be set in the process designer’s “Call web service” element. Use the “Script task” element instead. The parameter with an “Object” data type must be an array. Cleared by default Required If selected, the parameter will be required in the Process Designer. If you specify a default parameter value, this checkbox will become unmodifiable. Checked by default Default value The default parameter value. Constant Fig. 4 Setting up the “Phone number” parameter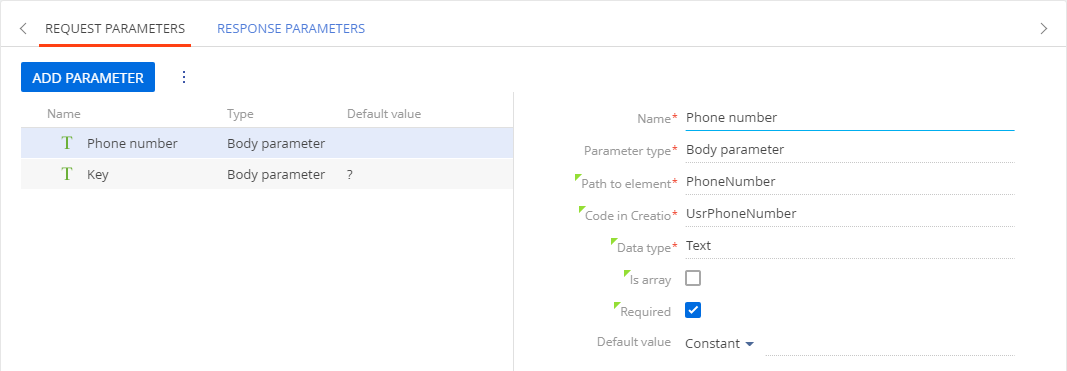
-
Add the “Key” parameter and fill out its properties (Fig. 5).
Field Comment Example Name The service parameter name. Key Parameter type The service parameter type. Body parameter Path to element If the parameter uses a namespace, specify it in the format of “Namespace prefix”:”Path to the parameter.” LicenseKey Code in Creatio Used to interact with this web service in Creatio source code. In this case, it consists of the method name and the “Usr” prefix. Usr LicenseKey Data type The service parameter data type. A parameter with nested elements must have an “Object” data type. Text Is array An array parameter value cannot be set manually in the process designer’s “Call web service” element. Use the “Script task” element instead. The parameter with an “Object” data type must be an array. Cleared by default Required If selected, the parameter will be required in the Process Designer. If you specify a default parameter value, this checkbox will become unmodifiable. Selected by default Default value The default parameter value. Constant Fig. 5 Setting up the “Key” parameter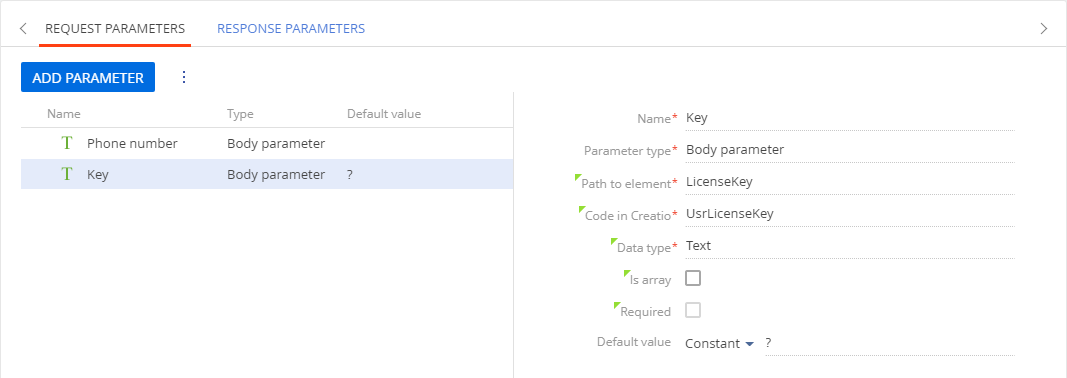
Set up the response parameters
To set up the response parameters:
- Study the web service documentation. The following code is used in this example.
- Add the response parameters:
- Go to the Response parameters tab and click Add parameter.
- Add the “Company” parameter and fill out its properties (Fig. 6).
Field Comment Example Name The service parameter name. Company Parameter type The service parameter type. Body parameter Path to element If the parameter uses a namespace, specify it in the format of “Namespace prefix”:”Path to the parameter.” CheckPhoneNumberResponse/ CheckPhoneNumberResult/ Company Code in Creatio Used to interact with this web service in Creatio source code. In this case, it consists of the method name and the “Usr” prefix. Usr Company Data type The service parameter data type. A parameter with nested elements must have an “Object” data type. Text Is array An array parameter value cannot be set in the process designer’s “Call web service” element. Use the “Script task” element instead. The parameter with an “Object” data type must be an array. Cleared by default Default value The default parameter value. Constant Fig. 6 Setting up the “Company” parameter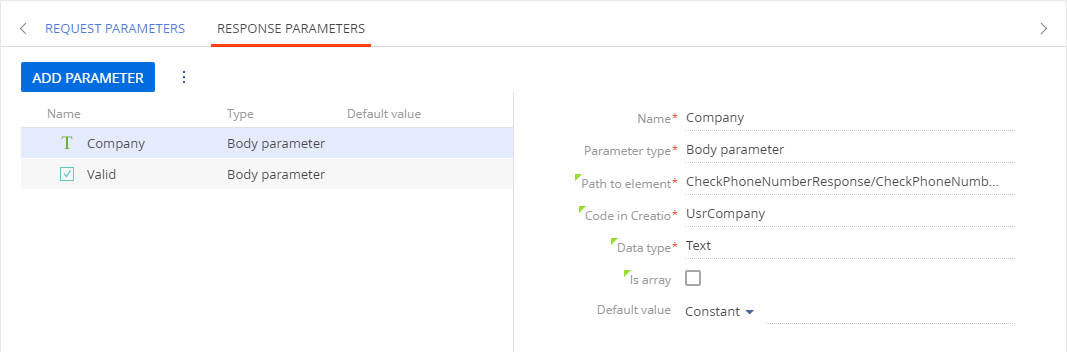
- Add the “Valid” parameter and fill out its properties (Fig. 7).
Field Comment Example Name The service parameter name. Valid Parameter type The service parameter type. Body parameter Path to element If the parameter uses a namespace, specify it in the format of “Namespace prefix”:”Path to the parameter.” CheckPhoneNumberResponse/ CheckPhoneNumberResult/ Valid Code in Creatio Used to interact with this web service in Creatio source code. In this case, it consists of the method name and the “Usr” prefix. Usr Valid Data type The service parameter data type. A parameter with nested elements must have an “Object” data type. Boolean Is array An array parameter value cannot be set in the process designer’s “Call web service” element. Use the “Script task” element instead. The parameter with an “Object” data type must be an array. Cleared by default Default value The default parameter value. Constant Fig. 7 Setting up the “Valid” parameter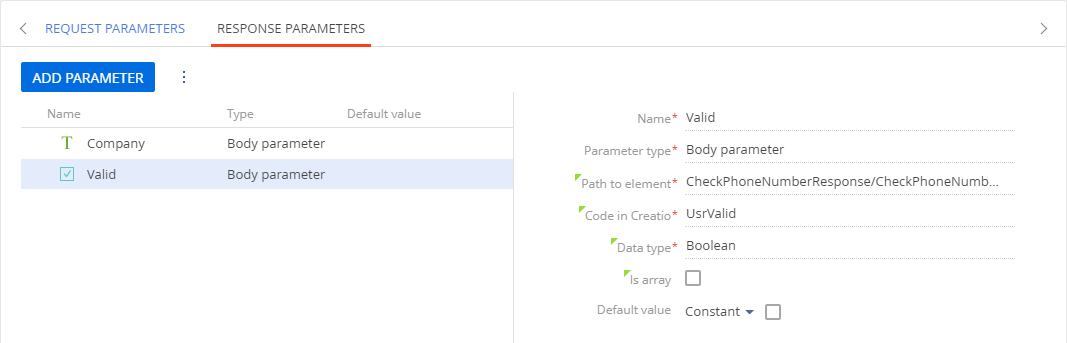
Click OK to save the settings.
Set up the “collection” type response and request parameters
A collection (or an array) is a set of elements. Creatio can pass collections to the web service and parse the service responses that contain collections. You can set up both request and response “collection” parameters, provided the web service can receive and/or send arrays.
Collection parameter types:
- Simple collection. You can make any parameter a collection by selecting the “Is array” checkbox in the parameter properties. Simple collections are arrays with data of a single type. Each value is a separate collection element. For example, “1, 2, 3” is a simple array of integer values, “Boston, New York, Chicago” is a simple array of string values, etc.
- Object collection. A root parameter (or an object) that contains nested parameters.
To set up a collection:
- Study the web service documentation. The following code is used in this example.
- Add the “CheckPhoneNumbers” method. Read more about the method fields in the Set up method calling step.
-
Set up the request parameters. Read more about the parameter fields in the Set up request parameters step.
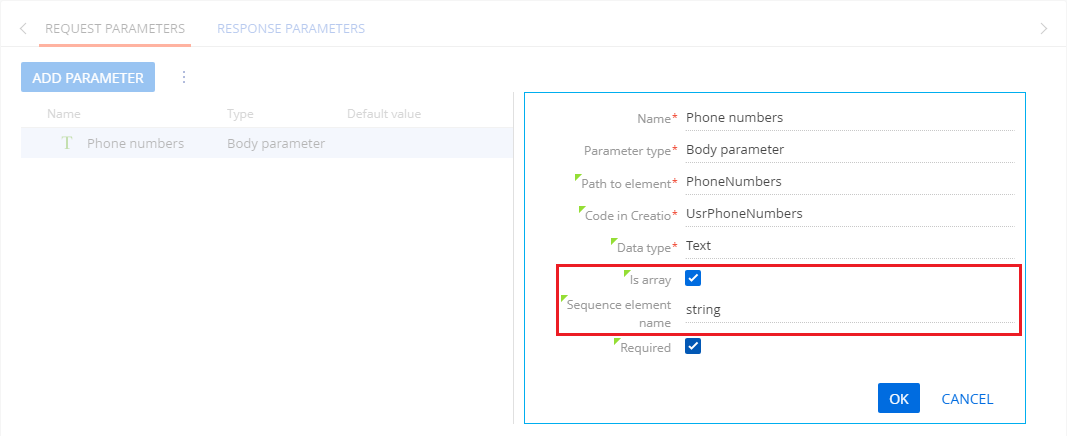
Keep in mind that, according to the web service documentation, the “ArrayOfString” request parameter has a complex type that comprises an array of “string” elements. To set up collection request parameters:
- Select “Body parameter” in the Parameter type field.
- Select the Is array checkbox.
- Specify “string” in the Sequence element name field (Fig. 8). By default, “item” (for simple arrays).
Fig. 8 Setting up the request parameters
- Study the web service documentation. The following code is used in this example.
-
Set up the response parameters. Read more about the method fields in the Set up the response parameters step.
Select “Object” in the Data type field. This will make the nested parameters available (Fig. 9).
Fig. 9 Setting up the data type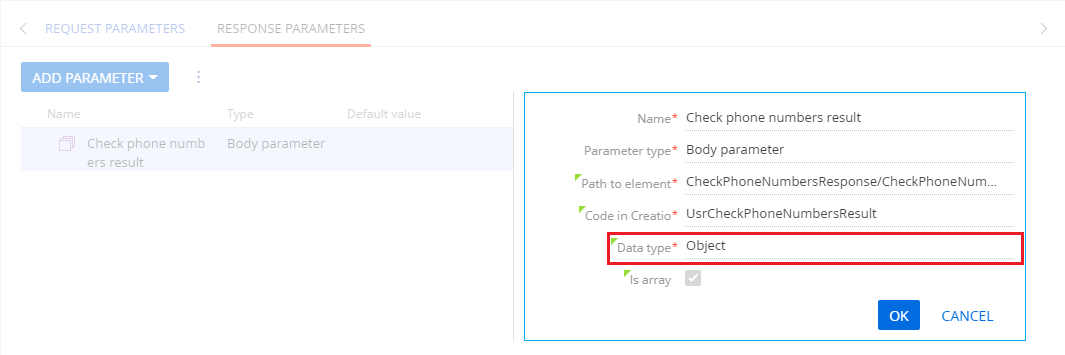
Web service response parameters of the collection type can be used as incoming parameters in the “Call web service” business process element. Learn more: Call web service process element.
Test the SOAP service integration
Test the integration setup before using the data received from the web service with custom business logic.
Since Creatio version 7.18.0, you can test a SOAP integration in the UI without creating a test business process.
To test the SOAP web service integration setup:
- Go to the Studio workplace and open the Web services section.
- Open the page of the web service whose integration you want to test. For example, “Phone number information service.”
- Open the “Check the phone number” method on the Methods detail of the web service integration setup page.
- Click Send a test request on the method setup page.
- Specify the values for the method call parameters.
Parameter Value Phone number +1 617 765 7997 - Click Send request (Fig. 10).
As a result of the test request, the web service will send a response. The values of the response parameters are displayed on the Response parameters tab in the corresponding fields (Fig. 10). View the request and response formatted as XML or raw HTTP on other tabs.
If the web service integration is configured with an error, the test request will result in a response with empty parameter values. In this case, check all of the web service’s settings and try again.
Once you test the web service integration, you can start using the service in custom business processes. Read more about this example in the Update currency exchange rates with web service integration article.
Depending on the web service specifics, you may need to authenticate the service before it becomes available. Read more: Set up the web service authentication.